10 Simple Grinch Craft Ideas for Kids


Despite all his evil schemes, everybody has come to love the Grinch over the years. There is no holiday celebration and fun without celebrating the failures of our most beloved villain. You’ll often find that people come up with all kinds of arts, crafts, ornaments, and games themed around the Grinch. If you are looking for some Grinch arts and crafts ideas, then this article has some great ideas for you to try out.
Creative Grinch Christmas Craft Ideas for Kids
Check out these Christmas Grinch crafts that your kids can make:
1. Paper Plate Grinch
This Grinch craft is one of the easiest to learn and make. They are perfect for decorating the walls or the Christmas tree.
Materials Needed
- Paper plates
- Green paint
- Marker pens (black)
- Green, red, and white card stock
- Scissors
- Craft glue
- Grinch template from the internet
Instructions
- Using a paintbrush, paint the whole paper plate green and allow it to dry.
- Use the face template to draw over the dried paper plate and cut it out.
- Cut out the eyes from the template and glue them 2 inches below the head.
- Cut the nose of the Grinch out of the green card stock and glue it below the eyes.
- Using a pencil, draw the outlines for the eyebrows and smile. Then, draw over it using the black marker pen.
- Use the template to mark and cut out the hat from the red card stock. Mark and cut out the hat puff from the white card stock.
- Glue the pieces together to complete the hat.
- Stick the hat over the head to finish it.
2. Grinch Hand Print Ornament
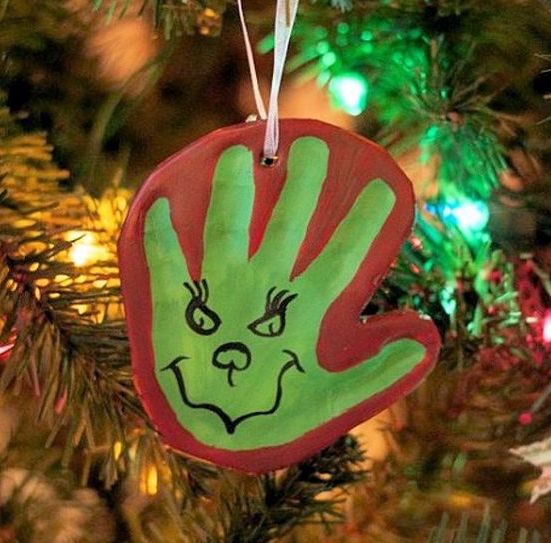
Made out of clay, this ornament can last for long and hold wonderful memories for years. And since it can last for long, it is one of the best Grinch crafts for toddlers to make this Christmas!
Materials Needed
- Air-dry clay
- Green and Red paint
- Black marker pen
- Ribbons
Instructions
- Knead your clay well and roll it out into a flat slab that is about 1/4th inch thick.
- Press your child’s hand into the clay to form a nice imprint.
- Using a pairing knife and leaving behind a 1/4th inch margin around the print, cut out the excess clay to leave behind just the impression and some extra margin.
- Put a small hole between the fingers at the top using a skewer. This is to let it hang from the tree.
- Allow it to dry for three days.
- Once it dries up, use some paint to colour it green.
- Once the paint is dry, colour the border of the ornament with red paint.
- Using the black marker, draw the Grinch’s face and an expression.
3. Grinch Handprint Craft
The Grinch in this handprint craft is based on the new movie released in 2018.
Materials Needed
- Card stocks – light green, red, white, and dark green
- Large googly eyes
- Green pom pom
- Scissors
- Glue Sticks
- Black Marker
- Grinch template from the internet
Instructions
- Download and print the template pieces.
- Ask your child to place her hand on the green card stock and trace it out using the marker.
- Cut the handprint out and start assembling the Grinch by glueing the handprint to the body cut out using a template.
- Glue the arms and feet cut out of the green cardstock and allow them to dry as they are the most delicate parts.
- Cut the scarf out of the red card stock and glue it to the neck just below the handprint.
- Cut the eyebrows using the dark green card stock and glue it to the palm at the fingers’ base.
- Glue the googly eyes below the eyebrows.
- Make a nose out of the green card stock or a pom-pom and stick it below the eyes.
- Use the black marker to draw the Grinch’s smile.
4. Grinch Slime
Who wouldn’t enjoy playing with slime?! This Christmas is the best time to make your own Grinch-themed slime that is non-toxic and doesn’t stick to the hand. It comes off clean, and you can have plenty of fun with it.
Materials Needed
- Chia seeds
- Corn flour
- Green food colouring
- Water
- Mixing container
Instructions
- Pick a handful of chia seeds and pour them into a container. Fill it with a little water, just enough to cover it, and let it sit for about an hour.
- When you come back, the mixture will be thick and gloopy.
- Add a few tablespoons of cornflour and start mixing it well.
- Keep mixing it until you reach a consistency that you like.
- Add a few drops of green food colouring and continue mixing it until it is uniformly green.
- Your Grinch slime is ready!
5. Grinch Playdough
What’s more fun than Grinch slime? It’s Grinch Playdough! Your kids will love making this and playing with it.
Materials Needed
- 1 cup flour
- ½ cup of salt
- 1 tablespoon cream of tartar
- 1 cup of warm water
- 1 tablespoon vegetable oil
- Red and green food colouring
- Mixing bowl and whisker
- Ziplock bags
Instructions
- Add the salt, flour, and cream of tartar into the mixing bowl and whisk to blend them.
- Add warm water and oil into a saucepan and stir well.
- Add the mixture to the saucepan slowly and whisk to combine them uniformly. Break up the lumps and continue whisking until it is uniform.
- Place the saucepan over a stove on medium heat and stir well until the mixture becomes a large lump of dough.
- Remove it from the stove and set it aside to cool for a while.
- Divide the dough into two equal parts and put them into separate ziplock bags.
- Add a few drops of green food colouring into one and red food colouring into the other.
- Seal the bag and knead the playdough until the colour has mixed uniformly.
- Take out the play dough from the bags and let your kids play with it.
6. Grinch Toilet Paper Core Craft

This little project is a great way to use all those TP roll cores you’ve been collecting!
Materials Needed
- Toilet paper roll cores
- Small white pom-poms
- Glue sticks
- White paper
- Scissors
- Grinch template from the internet
Instructions
- Download the Grinch paper template and print it small enough to be glued to the side of the toilet paper core.
- Cut out the template and apply some glue using the glue sticks to the back of the paper.
- Glue the template to the outside of the core.
- Apply a tack of glue along the centre’s circumference where the Grinch’s head and the scarf meet.
- Stick the white pom poms along the applied glue.
- Make the Grinch’s hat by glueing the pom-poms to the hat’s base that is cut out of the printed template. Allow it to dry for a while.
- Apply some glue to the back of the hat and stick it above the face of the Grinch, and you’re done!
7. Paper Plate Grinch Heart
The Grinch’s heart grows bigger towards the end of the story, and there’s no better way to depict that than with this craft.
Materials Needed
- Paper plates
- Green paint
- Red yarn
- Tape
- Paintbrush
- Yarn needle
- Hole punch
- Scissors
- Pencil
Instructions
- Start by painting the paper plates green using the paintbrush. Allow it to dry for a few hours.
- Once the paint is dry, draw a big heart in the middle of the paper plate. Cut the heart out with scissors.
- Using the hole punch, make a series of holes around the circumference of the hollow heart in the plate. The holes will have to be of equal distance from each other.
- Take a big strand of yarn and thread it through the yarn needle.
- Tie one end to the needle and stick the other end to the back of the plate using tape.
- Thread the red yarn through the holes running them across the heart space in the plate.
- Thread through all the holes and cover up as much of the heart space as possible to make it look realistic.
8. Grinch Mask
This one is an easy Grinch craft that all kids can make and wear!
Materials Needed
- Posterboard
- Crayons
- Large popsicle stick
- Glue scissors
- Black sharpie
- Tissue paper
- Pom-poms or craft fluffs
- Grinch template from the internet
Instructions
- You can either draw the Grinch face by yourself or use a template downloaded from the internet for this project.
- Once you have your template, trace it out on the poster board.
- Let the kids colour the Grinch’s face in any way they like or keep it to the classic green.
- Apply some glue to the tip of the hat and the edge above the forehead to stick the pom-poms.
- Using a black marker, trace out the features on the face.
- Cut out slots at the eye using a hobby knife.
- Glue the popsicle stick to the back of the mask and allow it to dry.
- If they don’t like holding the mask to their face, you can punch two holes at the sides of the mask and tie a rubber band to keep it in place.
9. Grinch Popsicle Stick Craft
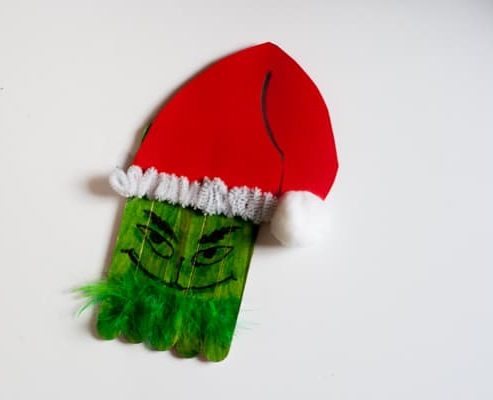
For this craft, your child will need your assistance in cutting and pasting things. It can be done by kids of every age group with some help.
Materials Needed
- Large Popsicle sticks
- Green paint
- Scissors
- Glue
- Red construction paper
- Large white pom pom
- Pencil
- Black market pen
- Green feathers
- White pipe cleaners
Instructions
- Pick 5 of the Popsicle sticks and paint one side of the sticks green.
- Use another Popsicle stick and cut it in half.
- Place the 5 sticks next to each other and glue the two halves of the other Popsicle stick to the backside to hold them all together.
- Once it is dry, flip the coloured side back and apply some glue to the bottom of the sticks.
- Take some of the green feathers and glue them at the bottom and allow them to dry.
- Once the glue has dried, place the glued sticks over the red construction paper and draw the outline of a Santa’s hat.
- Cut the hat out and glue it to the top of the sticks.
- Glue a pom-pom to the end of the hat.
- Fold the white pipe cleaners into a zig-zag to make the base of the Santa hat.
- Glue the pipe cleaner to the hat.
- Using the black marker draw the Grinch’s face, and you’re done!
10. Grinch Card
This is an excellent Grinch preschool craft for your child that is really easy to make.
Materials Needed
- White cardstock
- Green and red paint
- Transparent plastic sheets
- Double-sided foam tape
- Small silver sequins
- Small red ribbon
- Grinch card template
Instructions
- Start by printing the template on a sheet of paper and sticking it to one side of the cardstock. Fold the cardstock in half to form the Grinch card. With scissors, cut the bulb area.
- Paint the Grinch’s hands green and paint his arms red.
- Using the double-sided tape, glue the transparent sheet to the inside of the cardstock.
- Cut the foam tape into little squares about a quarter of an inch wide.
- Arrange the foam bits uniformly around the bulb area on the inside of the card.
- Drop in the silver sequins inside the bulb area and cover it up with the picture of the person you are sending it to.
- Write a special note to the person on the inside, and the card is ready!
Grinch craft ideas are a wonderful way to teach your children how to be artistic and use a range of craft materials in different ways. Try these craft ideas this Christmas, and have fun distributing all your DIY Grinch crafts to family and friends.
Also Read:
Caterpillar Craft Ideas for Children
Egg Carton Craft Ideas for Children
Birthday Party Craft Ideas for Children
Was This Article Helpful?
Parenting is a huge responsibility, for you as a caregiver, but also for us as a parenting content platform. We understand that and take our responsibility of creating credible content seriously. FirstCry Parenting articles are written and published only after extensive research using factually sound references to deliver quality content that is accurate, validated by experts, and completely reliable. To understand how we go about creating content that is credible, read our editorial policy here.
- Author
Related Articles
-

15+ Amazing Classroom Valentine Ideas for Kids
-
Best Camp Songs for Kids
-
Disney Halloween Coloring Pages - Free Printable Pages For Kids
-
20 Fun Word Games for Kids to Boost Vocabulary & Spelling Skills
-
15+ Easy Origami Crafts for Kids: Fun Paper Folding Ideas
-
Children's Day Coloring Pages - Free Printable Pages For Kids


.svg)


")


