6 Fun Letter ‘A’ Crafts & Activities for Kids


In this Article
View More
Teaching the alphabet to little ones is not easy. They get bored and distracted easily, and as parents to a toddler, you will have to come up with new tricks to ensure that your little one pays attention and learns what you’re teaching him. Now if you’re planning to teach your child how to write the letter ‘A’, then you will have to get creative with the process and make it interactive. Want to know how you can make it fun for your child? Easy! Try some letter ‘A’ craft ideas and activities. We’ve covered some simple craft ideas and activities that you could use to teach your child how to write the letter ‘A’.
Crafts and Activities for Preschoolers and Young Kids That Begin With the Letter ‘A’
Letter ‘A’ activities and crafts are a fun way to introduce preschoolers to the first alphabet. These simple letter A preschool crafts make learning enjoyable for your child before he starts school.
1. Angel Craft
Your child will have a lot of fun trying this angel craft idea. It will also teach him how to write the letter ‘A’.
Materials You Will Need
- 1 coloured construction paper
- 1 pipe cleaner
- 2 feathers
- 2 googly eyes
- 1 marker
- 1 letter ‘A’ paper cut-out (white paper)
- A pair of scissors
- Glue
Instructions
- Place the plain cut-out of the letter ‘A’ on the coloured construction paper.
- Help your child stick this cut on the coloured paper with some glue.
- Cut a part of the pipe cleaner and shape it like the halo of the angel.
- Stick it on the top of the letter ‘A’ cut-out.
- Then help your child stick the googly eyes on the top part of the letter ‘A’ to make the eyes of the angel.
- Then help him glue the feathers on the left and right side of the letter ‘A’ to make the wings of the angel.
- Using a marker, teach your child to make the lips of the angel, and it’s done!
2. A for Airplane Craft
Your child will enjoy making an aeroplane by recycling empty boxes and other things that are easily available at home.
Materials You Will Need
- Empty cardboard box (cereal or biscuit box)
- The letter ‘A’ printable (an airplane craft template)
- Scissors
- Empty paper towel cardboard tube
- Pencil
- Glue
- Ruler
- Masking tape
- Paint
- Paintbrush
Instructions
- Keep the blue construction paper on a table.
- Fold the white construction paper and draw half of the letter “a” on it. A simple way to do it is to draw a half-circle and then a rectangle below it.
- Cut the letter “a” shape and unfold the shape.
- Fold the orange sheet and draw two triangles for the wings of the aeroplane.
- Draw a flame to make the tail of the aeroplane.
- Place all the shapes on the blue sheet to mark their places.
- Now paste the wings and tail of the aeroplane on the blue sheet.
- Then stick the white aeroplane shape on top of them.
- Cut the kid’s picture in a circle and stick the picture in the middle of the aeroplane shape.
- Now draw a few clouds on the remaining white sheet.
- On the yellow sheet draw a half circle to make the sun.
- Stick the sun behind one cloud.
- Stick all the clouds on the blue sheet above the aeroplane.
3. A for Apple Craft
This simple letter A craft doesn’t have the Letter A but is of fruit starting with letter A- Apple. Making it will help the kids to remember the things starting with A.
Materials You Will Need
- Tissue paper- red and green
- Paper plate– large size
- Glue
- Marker – brown
- Scissors
- Tape
Instructions
- Take the paper plate and draw the shape of an apple on it.
- Cut out the apple shape.
- Make the shape of the leaf and stem from the waste cut off pieces of the paper plate.
- Colour the stem brown with the brown marker.
- Stick the stem and leaf together with tape and then glue or tape them to the top of the paper plate apple.
- Tear the green tissue paper into small pieces and glue them on the leaf shape.
- Tear the red tissue paper into small pieces and glue it to the apple shape. Make sure no white spaces are visible.
- The A apple craft is ready.
4. A for Astronaut
This engaging letter A craft will teach the kid letter A shape along with the association of letter A with astronauts. The kid will have the curiosity to learn about astronauts and space.
Materials You Will Need
- Construction papers- white (2 qty), blue, pink/skin-colored, black
- Scissors
- Scale
- Pencil
- Glue
- Marker-black
Instructions
- Draw a large letter A shape with a pencil and scale on the white construction paper. Make sure the thickness of the letter is at least 1-2 inches broad.
- Cut the letter A. (The parent or teacher can help the kid in this).
- Draw the helmet (circle) and arms of the astronaut on the second white sheet.
- Take the black construction sheet and draw the boots of the astronaut. Draw two half circles as hands of the astronaut.
- Take the pink or skin-colored sheet and draw a half circle as the face of the astronaut.
- Cut out these shapes.
- Paste the letter A on the blue construction sheet.
- Stick the round white paper cut-out as the astronaut’s helmet on top of the letter A.
- Stick the face shape on the lower half of the helmet circle.
- Stick the black half circles on the white sheet arms as hands.
- Stick the arms on the letter A to make the arms of the astronaut.
- Stick the black boot shape on the bottom of the letter A to make the boots of the astronaut.
- Draw the eyes and mouth of the astronaut on the face to complete the face of the astronaut.
- The letter A Astronaut is ready.
5. Letter A Apple Sorting Activity
This letter A sorting activity is perfect to teach the kids the difference between capital and small A. As they play this sorting activity, they will learn to differentiate the two.
Materials You Will Need
- Brown basket printout- 2
- Apple shape printouts in red, green and yellow colors
- Tape
- Scissors
- Black marker
- Sticky tack
- Brown paper lunch sacks
- Green construction sheet
Instructions
- Take the brown paper lunch sacks and crumple them. Stick them with tape on the wall to make the trunk of the apple tree.
- Draw the shape of the upper portion of the tree on the green construction sheet. Cut the shape and stick it on the wall above the trunk of the apple tree.
- Cut out the apple shapes from the printout and write capital or uppercase A with a marker on half of them. Make sure the apples are in mixed color.
- Write small or lowercase A on the remaining half.
- Paste sticky tack behind the apple shapes.
- Now the apple shapes can be attached to the tree without spoiling the ripping the construction paper.
- Cut out the basket shapes and stick them on the wall with tape. Write uppercase A on one basket and lowercase A on the other.
How to Play
- The kid now needs to sort the uppercase and lowercase A apple shapes and put them in the respective basket.
- He/she can take one apple shape at a time and remove it from the tree and stick it near the correct basket.
- Repeat till all the apple shapes are in the correct basket.
6. Paper Plate Acorn Craft
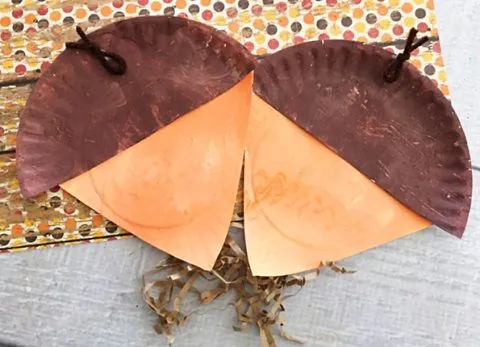
Source: Pinterest
Another letter A craft is simple and will help the kids learn things starting with the letter A-Acorn.
Materials You Will Need
- Paper plate
- Paint-brown and orange
- Paintbrush
- Glue
- Scissors
- Pencil
- Black wool
Instructions
- Take the paper plate and draw a line in the center. Cut the paper plate into two parts.
- Paint one part brown and the other part orange. Let them dry.
- Cut out a triangle from the orange half.
- Glue the brown half over the orange triangle to make the acorn.
- Stick a small piece of black wool to the top to complete the acorn.
Kids will have an enjoyable time doing the letter A crafts and activities. They are a fun way to teach alphabets and making phonetic connections. These crafts are easy and engaging and will help the kids to develop their motor skills as well. Displaying these crafts in the classroom or at home will encourage and reinforce them to learn the letters.
Also Read:
Paper Crafts for Children
Newspaper Craft for Children
Plastic Bottle Crafts for Children
Was This Article Helpful?
Parenting is a huge responsibility, for you as a caregiver, but also for us as a parenting content platform. We understand that and take our responsibility of creating credible content seriously. FirstCry Parenting articles are written and published only after extensive research using factually sound references to deliver quality content that is accurate, validated by experts, and completely reliable. To understand how we go about creating content that is credible, read our editorial policy here.
- Author


.svg)


")


