20 Easy and Fun Christmas Crafts for Kids
Enjoy creative and easy christmas craft ideas for kids that spark holiday joy and hands-on fun for all ages. Perfect projects to make festive memories.


Christmas crafts for kids are a wonderful way to ignite creativity and celebrate the festive season together. With a variety of easy Christmas crafts for kids available, little ones can enjoy hands-on activities that are both fun and developmentally enriching. From simple cut-and-paste projects to unique ornament-making, these Christmas art and crafts for kids spark imagination and provide memorable holiday experiences. Whether it’s decorating the Christmas tree, creating personalized gifts, or making festive decorations, these Christmas craft ideas for kids offer endless opportunities for joy and creative expression indoors during the holiday season. Perfect for all ages and skill levels, these crafts blend holiday cheer with educational play
Creative Christmas Crafts for Kids
Christmas ornament crafts for kids are simple and fun projects that help children create beautiful decorations.These easy crafts turn everyday materials into festive treasures perfect for decorating Christmas trees or gifting to loved ones.
1. Spoon Angel Ornament
This ornament craft is one of the popular choices among kids for Christmas crafts.
What You Will Need
- Wooden craft spoons
- 5-inch lace paper or doily
- Craft foam sheet – white
- Yarn – any colour
- Pointed black marker
- Glitter stick – gold
- Scissor
- Glue
- Ribbon
How to Make
- Cut out a gown from the white foam sheet taking an approximate length according to the wooden spoon.
- Take a few strands of yarn to make angel’s hair.
- Fold the round lace paper or doily into half and glue it. Now cut it into two halves to make the angel’s wings.
- Take two gold glitter sticks and bend them around in a circular shape, so that it looks similar to angel rings.
- Using a fine point black marker, draw the eyes, mouth, and nose of the angel onto the backside of a wooden spoon.
- Paste the yarn on the top of the spoon to give it a look of hair. Then, paste the angel wings and the white gown onto the spoon.
- Using the hot glue gun, paste the angel’s halo over the top of the spoon.
- Glue a short ribbon on the back of the angel ornament so hanging purposes.

Source: Pinterest

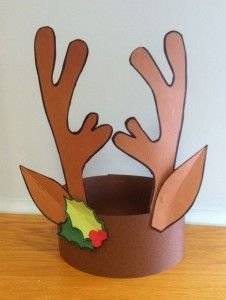
2. Reindeer Antler Headband
This reindeer antler headband is a perfect craft for your kids to create and later play with. Check out how.
What You Will Need
- Printable of reindeer antler template
- Red glitter paint
- Cardstock -brown
- sticky tape
- Scissor
- Glue
How to Make
- Cut out the shapes given in the reindeer antler template. If you do not have any template, then you can create one on the cardstock and cut the shapes out.
- Now, paste the colored templates onto brown cardstock. trim out the template shapes.
- Glue the antlers and ears of the reindeer onto the front side of the headband.
- For the red nose of the reindeer, paint the nose with red glitter paint.
- Now, staple the edges of the reindeer headband piece to give it is a wearable loop.
- Voila, the headband is ready to be worn by your kid.

Source: Pinterest
3. Paper Snowflakes
You’ve seen beautiful snowflakes and their unique patterns, right? Well. You can make some on your own at home! This may seem complex to make, but it is very simple!

What You Will Need
- Some A4 size plain sheets
- Scissors
How to Make Snowflakes
- Fold the paper 4 times to make a square.
- Cut a quarter of a circle from the square.
- Now, make random cuts into the paper. You can make squares, triangles and much more.
- Open up the folds to reveal a beautiful snowflake!
4. Orbeez Decoration
Do you want to create a beautiful Orbeez centre piece which reflects the beauty of Christmas and is fun to make? This is the perfect craft to do!

What You Will Need
- Plain white orbeez
- Christmas decorations (crystal balls and other tree hangings)
- Water
- A cylindrical glass-container
How to Make it
- Soak the plain white Orbeez overnight and allow them to soak up the water.
- Next day, take a glass cylindrical container and pour in some Orbeez balls; in intervals, add in some of the Christmas tree decorations.
- Keep adding in Orbeez till you reach the top.
- Once it is full, add in water till the top.
- It will look as though the decorations are floating in the water!
5. The Centre of Attraction
Get your child to make a centrepiece for the dining table. This will give them a sense of achievement and pride.
What You Will Need
Two pieces of green chart paper about 1.5 inches X 11 inches in size (you can also use white chart paper and then paint it a green colour)
- Small pompoms or coloured cotton balls
- Glue
- Scissors
How to Do
- Draw a tree pattern on the chart paper either freehand or with the help of a printable.
- Cut it out and make slots at the top and bottom of the tree to make it easy to slide together and hold up the tree.
- Stick on the coloured cotton balls or pom-poms to look like Christmas tree ornaments. You can also use foam if you need to make a more stable tree. Another option is to glue the tree to a flat base like thick cardboard.
6. Recycled Holiday Crayons
If you have been wondering what to do with those bits and pieces of crayons that seem to be in every nook and cranny of the house, this idea is definitely for you.
What You Will Need
- All those crayon pieces
- Silicone baking moulds in Christmas shapes
- A preheated oven around 350° Celsius
How to Do
- Peel off any paper that is on the crayon pieces and put them into the mould till each is half full.
- Then pop the moulds into the pre-heated oven and leave them there for about 6 to 8 minutes or till the crayons melt fully.
- Leave them there till the moulds fully cool down, and this can take up to an hour. If you try to take out the moulds early, they might break off. These make for great gifts too.
7. Cute Napkin Holders
Festivals are a time for family get-togethers and dinners. This holiday craft for kids will keep your kids occupied and show their artistic talent. So, let your children feel a part of the festivities by getting them to make pretty napkin holders for the Christmas dinner table.
What You Will Need
- Empty toothpaste boxes or similar
- Craft paper or chart paper
- Glue
- Glitter or sequins
- Scissors
- Paints in the colours of your choice
- Paintbrush
How to Do
- Paint the outside of the empty toothpaste box in a single colour and let it dry.
- Then cut sections of the box to about one and a half inches wide.
- Trace out a pattern of your choice like stars or a bow on the craft paper and cut it out in colours matching the box cutouts.
- Apply glitter on the pattern as well as the box cut-outs.
- Then stick the pattern on the box sections to finish off your napkin holder.

Source: Pinterest
8. Personal Snow Globe
A snow globe makes for a great showpiece or gift and definitely tops the list of interesting Christmas craft activities for children.
What You Will Need
- One glass jar (with a tight lid)
- Your child’s favourite plastic figurine or a festive one if it’s a gift for someone else (choose a size that fits in the jar easily)
- Waterproof glue
- Distilled water or boiled and cooled tap water
- Liquid glycerine
- Glitter
How to Do
- Stick the plastic figurine on the lid with waterproof glue and let it dry.
- In the meantime, fill the jar with the water. Add a few drops of glycerine and glitter to the jar and stir gently.
- Once the figurine is properly stuck to the lid, screw on the cap tightly and flip the bottle.
9. Felt Pom-Pom Ornaments
These soft and colorful felt pom-pom ornaments are easy for kids to make and decorate, offering a fun way to practice sewing or crafting skills while adding a cozy touch to the Christmas tree.
What You Will Need
- Colorful felt sheets
- Pom-poms in various sizes
- Needle and thread or glue
- Ribbon or twine for hanging
How to Do
- Cut felt shapes like stars, trees, or circles.
- Glue or sew pom-poms onto the felt shapes to decorate.
- Attach a loop of ribbon or twine for hanging on the tree.
10. Paper Snowflake Ornaments
Simple yet beautiful, paper snowflake ornaments let kids create unique and delicate winter-themed decorations through folding and cutting, perfect for decorating windows or trees during the holiday season.
What You Will Need
- White paper (copy or craft paper)
- Scissors
- Tape or stapler
How to Make it
- Fold the paper into a square and make a series of folds to create the snowflake base.
- Carefully cut shapes into the folded paper to form unique snowflake patterns.
- Unfold the paper and attach a thread or ribbon for hanging on a Christmas tree or windows
Christmas Tree Crafts for Kids
Christmas tree crafts for kids are simple, hands-on projects that transform basic materials into festive holiday decorations.
1. Holiday Paper Plate Wreath
Crafting a festive wreath using paper plates is a delightful activity that allows kids to create a decorative piece for the holiday season.
What You Will Need
- Paper plates (2-3)
- Green paint or markers
- Colored construction paper
- Scissors
- Glue or tape
- Ribbon or string for hanging
How to Make it
- Begin by painting or coloring the front of the paper plates green to resemble the base of the wreath. Let them dry completely.
- Once dry, cut out the center of each paper plate to form a ring shape.
- Cut out various shapes (such as holly leaves, berries, or other festive shapes) from the colored construction paper.
- Arrange and glue these shapes onto the paper plate rings to decorate the wreath.
- If desired, add a bow or other embellishments using extra construction paper.
- Allow the wreath to dry thoroughly.
- Attach a ribbon or string to the back of the wreath to hang it up for display.
2. Make Some Wreaths
Green and red wreaths are an integral part of Christmas decorations. An easy Christmas craft for kids, this can be done with natural greens or coloured paper.
What You Will Need
- Red and green colour chart paper
- Scissors
- Pencil
- A ruler
- Stapler
- Glue
How to Do
- Fold the green chart paper in half along the length and cut in a straight line from the folded side to about one centimetre.
- Make such slits all across the length of each sheet of chart paper. Then roll the sheet into a tunnel shape as you join one sheet of paper to the other and also staple it to keep it in place.
- Then twist it into a wreath and decorate with bows and berry shapes made from the red chart paper.
3. Customised Christmas Stocking
One of the most popular Christmas themed activities for kids is to create a personalised stocking for Santa Claus to leave all the goodies in. Your kids can choose the colour as well as the embellishments they would like to put on it.
What You Will Need
- Two equal pieces of felt
- Stapler or craft glue
- Colourful string or paper
- Buttons, glitter, or stickers
- Scissors
- Pen
How to Do
- Keep the two pieces of felt one over the other and draw a stocking shape with a pen.
- Cut out the sock, and staple or glue the sides together, leaving the top open.
- You can then glue on the colourful string or paper along the sides.
- Make a small loop out of the leftover felt and fix it to the top corner so you can hang it up when done.
- Finish up by embellishing with buttons, glitter, or stickers. You can also get your child to draw their initials on the stocking for a customised touch.
4. Recycled Gift Bags
There is no season better than Christmas to give gifts to all your loved ones and you can add to your list of good deeds by recycling old paper bags. Put those shopping bags from the mall to some good use.
What You Will Need
- Paper shopping bags
- Cellophane
- Tissue paper
- Colourful ribbons
How to Do
- Neatly cut out the store name or logo on the shopping bags.
- From the inside, tape cellophane over this hole that you’ve cut out.
- Then line the bag with tissue paper and finish off with colourful ribbon bows. You can use it as a goodies bag or gift bag.
5. Bowled Over by the Tissue Box Snowman
Indoor bowling can be a fun activity to keep the kids entertained during the Christmas holidays when it’s cold and dark outside.
What You Will Need
- 4 empty tissue box containers
- Some white paper or white paint
- Pieces of black felt or chart paper
- A piece of orange card paper
- Glue
- Some twigs
How to Do
- Paint the tissue boxes white all over or cover them entirely with sheets of white paper.
- Stack them and then make a triangular nose from the orange card paper. Stick this on the first tissue box to make it appear like a nose.
- Then use the black felt or chart paper on the first box to make a hat and eyes for your snowman.
- Use a ball to topple over the snowman and stack the boxes back again for endless play!
6. Snowman Buntings
It doesn’t matter if you don’t get a snowy Christmas. You can always put up some snowman buntings.
What You Will Need
- White felt
- Pieces of coloured felt
- String
- Hole puncher
- Glue
- Scissors
How to Do
- Cut the white felt into squares of your preferred size.
- Then stack them one over the other and draw the shape of a snowman before cutting out the outline.
- Make felt hats for each snowman from the coloured felt and stick it on. Then punch a hole on the side of each and pass the string through

7. Popsicle Stick Christmas Tree
A simple and creative craft that lets kids build a miniature Christmas tree using common popsicle sticks, perfect for decorating their study desk or holiday shelf.
What You Will Need
- Popsicle sticks
- Green paint
- Glue
- Small colorful buttons or paper circles
- Paper star for the top
How to Do
- Glue three popsicle sticks in a triangle shape and let it dry.
- Paint the triangle green and allow it to dry completely.
- Decorate by gluing colorful buttons or paper circles on the tree.
- Attach a paper star on top to complete the look.
8. Yarn-Wrapped Christmas Tree
This craft helps kids practice fine motor skills as they wrap colorful yarn around a tree shape to create a cozy and decorative Christmas ornament.
What You Will Need
- Cardboard or sturdy paper cut into a Christmas tree shape
- Green yarn
- Pom-poms or small decorations
- Glue
How to Do
- Cut out a Christmas tree shape from cardboard.
- Wrap green yarn around the tree shape, securing ends with glue.
- Decorate by gluing pom-poms or other festive decorations on the tree.
9. Recycled Gift Box Christmas Tree
A creative way to repurpose small gift boxes into a miniature stacked Christmas tree, perfect for eco-friendly holiday decor.
What You Will Need
- Small recycled gift boxes or cardboard boxes
- Green wrapping paper or paint
- Glue or double-sided tape
- Small decorative items like beads, ribbons, or stickers
How to Do
- Wrap the boxes with green wrapping paper or paint them green.
- Stack the boxes from largest to smallest, securing with glue or tape.
- Decorate the tree with beads, ribbons, or stickers to add festive charm
10. Candy Cane Paper Chain Tree
A festive and interactive craft where kids make a tree shape using paper chains that resemble candy canes, great for practicing fine motor skills.
What You Will Need
- Red and white strips of paper
- Glue or tape
- Scissors
How to Do
- Form loops with red and white paper strips and interlock them to create chains.
- Assemble the chains into a triangular tree shape by tapering the length from bottom to top.
- Optional: Add a paper star on top for finishing touch.
Craft projects completed during the Christmas holidays can be displayed in a prominent spot inside your home. This will show your child that his efforts are appreciated and make you proud of him. Thus, you would have not only made effective use of your child’s holidays but also cemented your relationship with him in a productive manner. These ideas will help you ensure that your child cherishes this festive season forever and that diy Christmas crafts for kids become more memorable.
Also Read:
Christmas Facts for Children
Christmas Stories for Children
Christmas Party Games Ideas for Kids
Steps to Draw Christmas Tree for Kids
Christmas Celebration Ideas with Kids
Was This Article Helpful?
Parenting is a huge responsibility, for you as a caregiver, but also for us as a parenting content platform. We understand that and take our responsibility of creating credible content seriously. FirstCry Parenting articles are written and published only after extensive research using factually sound references to deliver quality content that is accurate, validated by experts, and completely reliable. To understand how we go about creating content that is credible, read our editorial policy here.
- Author
Mrunal
Related Articles
-

10 Ideas to Keep Kids Occupied While Camping
-
Solitary (Independent) Play - Benefits and Why It Is Good for Kids
-
30 Indoor and Outdoor Physical Activities for Kids
-
10 Easy Santa Craft Ideas for Kids
-
10 Amazing Pumpkin Crafts And Activities For Toddlers, Preschoolers And Kids
-
120+ Merry Christmas Wishes, Messages, Quotes and Greetings

 Play - Benefits and Why It Is Good for Kids")


.svg)


