10 Easy-to-Make Lion Crafts for Kids


Keeping kids busy and away from screens is something every parent struggles with. There are different ways to keep your kids entertained, and one of the best activities to do with your little one is making crafts. Introduce your kids to some super-fun and easy lion crafts to engage them in a fun and creative activity. The lion crafts will surely inspire the child’s creative side and inspire them to create!
10 Simple Lion Crafts for Children
If you are looking for easy animal crafts to help your kids get crafty, take a look at these 10 simple lion crafts. With easily available materials and step-by-step directions, kids will find the craft easy to follow and create great artwork.
1. Lion Footprint Craft
Handprint and footprint crafts have always been a favourite. The footprint crafts are a lovely reminder of how young the children are and a great way to preserve these memories. The kids would love to make the lion craft with their footprint, and these cute lion crafts will make a lovely gift. Paint the creative lion footprint craft on a canvas to create special wall art.
What You Need
- Paper/Canvas
- Bright yellow or orange paint
- Black sharpie
Directions
- Start by dipping your kids’ feet with yellow paint.
- Make a footprint on the paper or canvas.
- Using the yellow paint, add a tail.
- Dip the child’s fingers in orange paint and create a mane around the heel of the footprint.
- Let the prints dry out, and then draw a face using the black sharpie.
2. Lion Corner Bookmark
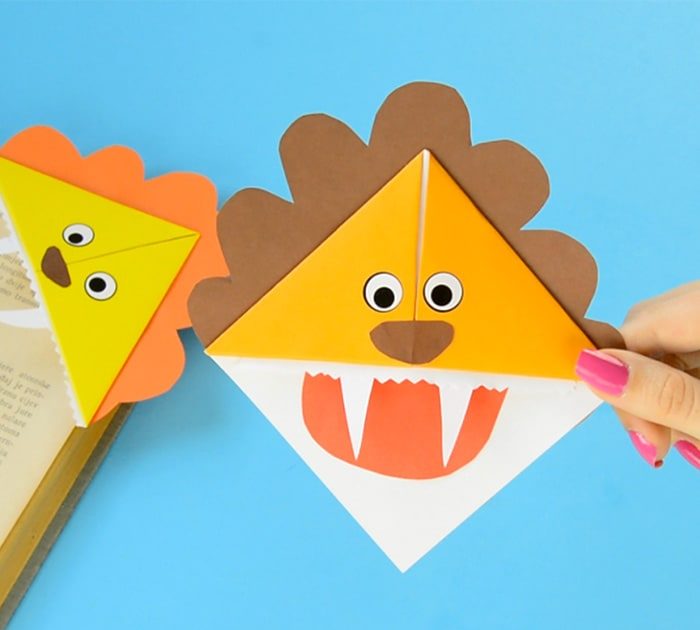
Reading books is a great habit! If your kids love reading books, or you love reading them to your kids, the lion corner bookmark is the perfect craft to try with your child. The bookmark will be a lovely addition to the book.
The DIY lion corner bookmarks are super easy and fun to make. With some basic supplies, the bookmarks are the perfect origami for kids. You can also decorate them in your own way and enjoy reading!
What You Need
- Orange origami paper/ square printed paper
- Brown paper
- White paper
- Red paper
- Eye sticker/Black marker
- Glue
- Scissors
Directions
- Fold the orange paper in half to create a triangle with the coloured side of the paper on the outside.
- Again, fold the triangle in half and press at the bottom to mark the middle.
- Unfold the paper to go back to the first triangle.
- Next, take a layer of the triangle, grab the top corner, and fold it to the bottom of the triangle.
- Now, fold the right corner of the triangle towards the middle of the triangle.
- Repeat the same to the other side.
- Unfold the paper.
- Retake the right corner, and fold it towards the top of the triangle.
- Repeat the same on the other side.
- Tuck the flaps in the pocket.
- You now have your basic corner bookmark design ready!
- To decorate it further, draw a mane around the bookmark.
- Cut the mane and glue it to the back of the bookmark.
- Using the brown paper, cut the snout and glue it onto the bookmark.
- Now, glue the eyes or draw them using a black marker.
- Your cute, bright-coloured lion bookmark is ready!
3. Lion Paper Plate Craft
Next on the lion craft list is a lion paper plate craft. The craft is super cute and easy, and kids of any age can try it.
What You Need
- White paper plates
- Yellow and brown paint
- Brown construction paper
- Googly eyes
- Paintbrushes
- Scissors
Directions
- Start by painting the outer part of the paper plate brown.
- Paint the inner part of the paper plate using the yellow paint. Draw yellow streaks on top of the brown paint with a paintbrush.
- Cut a rounded nose from the construction paper. Stick the nose and the eye on the freshly wet yellow paint. You can use glue if the paint has dried.
- Using a brush, paint a mouth and whiskers on the lion’s face.
- After the paint dries, snip the brown ring with scissors. Bend the ruffled edges to create the mane.
4. Wooden Spoon Lion Craft
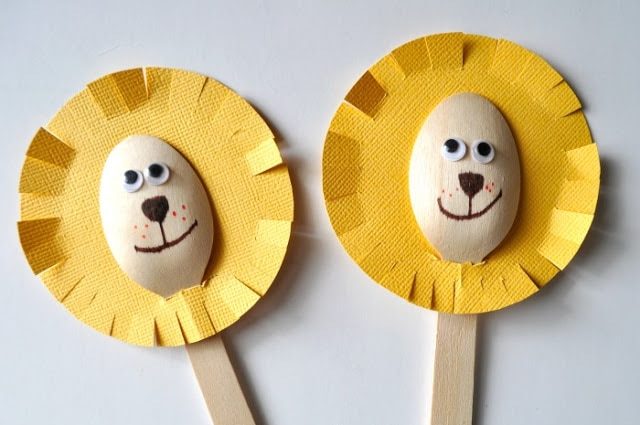
This simple wooden spoon lion craft for toddlers is adorable and easy to make. This one is perfect if you are looking to engage your kids in crafting without making things messy. The craft doesn’t require any painting and makes a great toy too.
What You Need
- Yellow cardstock papers (Yellow)
- Wooden spoons
- Googly eyes
- Orange and brown markers
- Pencil
- Scissors
- Glue
Directions
- Cut a 3 ¼ inch circle out of the yellow cardstock paper. You can use a cup to trace the circle.
- Put the spoon facing down on the centre of the yellow circle. Mark on the sides of the spoon to remember where to place the cut to pull the spoon through.
- Bend the circle in half and cut between the marks.
- Create small slits along the outside of the wooden spoon and bend the slits up to make them look like lion hair.
- Attach the googly eyes on the back of the wooden spoon. Using the brown and orange marker draw a mouth, a nose, and whiskers.
- Pull the spoon down into the slit in the yellow circle. Put some glue at the top of the spoon to attach it to the yellow circle. Let the glue dry.
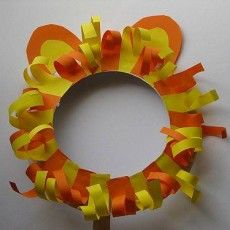
5. Curly Paper Plate Lion Craft
The craft will fill kids with joy, and they’ll enjoy the process of cutting, curling, and glueing to create a ruffled mane paper plate lion. The craft is a creative twist to the simple paper plate lion craft with a ruffled curly mane.
What You Need
- White paper plate
- Orange, yellow, brown or beige construction paper
- Sponge
- PVA glue
- String
- Googly eyes
- Orange, yellow, and black paint
- Scissors
Directions
- Use a sponge to paint the paper plate by dabbing its surface with the paints and blending the colours.
- Now, cut the construction paper into strips with varying width. You can use the end of a paintbrush to wrap each strand of paper to create coils.
- Follow the paper plate’s circumference and glue each paper strand onto the paper plate, leaving a gap between each strip.
- Repeat the process, filling the gaps of the outer layer and then add another layer to give the lion’s mane some extra bounce and body.
- Add a black nose, a pair of googly eyes, and string for whiskers to complete the lion. Lastly, add a little smile using a black sharpie.
6. Lion Party Favour
The lion party favour is a great choice of craft when you are throwing an animal-themed party. With so many possibilities for animal crafts, the lion party favour is an adorable and cute one!
What You Need
- Empty cereal carton
- Brown, yellow and green cardstock
- Yellow and white paint
- Ribbon
- Googly eyes
- Hot glue and regular glue
- Scissors
- Black marker
- Paintbrush
- Hole punch
Directions
- To create the lion’s body and grass, cut it out from the empty carton, fold it over in a cylinder, and stick it with hot glue. Add a coat of white paint and let it dry for a while.
- You can create some green grass by using the other side of the cereal cartoon. Cut a small square and cover it with green cardstock.
- Now, create the lion’s face and mane by cutting out two circles, a large and a small one. Using scissors, fringe the ends of the bigger circle for the lion’s mane. Use a black marker to draw a nose and a mouth, and lastly, add googly eyes.
- Next, cut out the ears and glue the face together.
- Finally, use the yellow cardstock to cut out a thick strip for the lion’s tail and a small brown slanted square for the end. Fringe the tail and glue it together.
- To assemble the craft, add some glue behind the lion’s head and tail. Wrap the grass around the feet of the lion’s body and glue it to the place. Add some glue to the lion’s bottom and place it on the grass square.
- Leave the craft to dry for 30 mins.
- Now, it is time to add the lion’s handle. Carve some holes to the top of the lion and tie a decorative ribbon for the handle.
- Finally, fill the body with colourful paper shreds and goodies to complete the lion party favour.
7. Easy Lion Mask Craft
Try your hands at this easy paper plate lion craft for preschool kids, and your kids will enjoy making and playing with it! Roarrr!
What You Need
- Round paper plate
- Scissors
- Double-sided tape
- Yellow and orange paper
Directions
- Cut out the centre of the paper plate.
- Put the double-sided sticky tape around the paper plate rim.
- Cut out strips from the yellow and orange paper.
- Stick the strips around the edge of the paper plate.
- Keep sticking the strips until the double-sided tape is completely covered.
- The lion paper plate mask is ready!
8. Pine Cone Lion Craft
Let’s use pine cones for a different craft from the usual ones like reindeer, snowman, owl ornaments, or such. To try something new, try the pinecone lion ornament craft.
What You Need
- Pinecone
- Yellow paint
- Orange pom-poms
- Googly eyes
- Black and orange cardstock
- Yellow felt
- Twine
- Glue
Directions
- Using the yellow paint, paint the bottom part of the pinecone. Let it dry, and then apply the second layer.
- Stick the pom poms along the edge using glue.
- Cut out the ears from the yellow felt and glue them on the side. Stick the googly eyes.
- Cut a nose and mouth from the black cardstock and glue it on the cone.
- From the orange cardstock, cut a few tiny strips for the whiskers.
- Wrap the twine around the pine cone for hanging.
9. Paper Plate Yarn Lion
A super creative and easy craft that kids will enjoy making. Get going with the lion yarn craft and get ready to ‘roar’.
What You Need
- Paper plate
- Hole punch
- Orange craft yarn
- Craft scissors
- Black sharpie
- Large googly eyes
- Glue
Directions
- Start by painting the entire paper plate yellow.
- Let it dry completely.
- Next, punch small holes around the paper plate’s rim, leaving space between each hole. Place aside.
- Grab the orange yarn and cut 3 five-inch strands of yarn per hole on the plate.
- Next, thread three strands together in each hole to complete the lion’s mane. Trim the hair as you like.
- To complete the lion, glue the eyes and draw a nose and a mouth.
10. Paper Roll Lion Craft
Get your stash of paper rolls ready and get ready to roar with your own paper roll lion craft.
What You Need
- Paper roll
- Yellow paper or yellow paint
- Eye stickers
- Brown papers
- Scissors
- Glue
- Marker
Directions
- Glue the yellow paper around the toilet paper roll or paint the roll with yellow paint. Cut out two strips of paper for the legs and a long strip for the tail. Draw the claws.
- Cut a circle out of the yellow paper for the head, put the circle on the brown paper, and draw an outline for the mane. Cut out the mane. Glue the eyes and draw a mouth on the face.
- Place the head on the mane and stick it with the glue.
- Stick the legs on the head and glue the head on the paper roll. Lastly, add the tail, and your paper roll lion craft is complete.
These lion crafts are an amazing way to encourage children to spend their creative energy and build their imagination. The kids will discover and create fun crafts while enjoying the whole process. The lion crafts made by the kids can make a great display or artwork. These crafts will also make a great gift or toys that they can play with. Choose a craft from the list and get roaring!
Also Read:
Super Fun and Easy Turtle Crafts for Children
Unique Bird Crafts for Children
Easy Penguin Crafts for Children
Was This Article Helpful?
Parenting is a huge responsibility, for you as a caregiver, but also for us as a parenting content platform. We understand that and take our responsibility of creating credible content seriously. FirstCry Parenting articles are written and published only after extensive research using factually sound references to deliver quality content that is accurate, validated by experts, and completely reliable. To understand how we go about creating content that is credible, read our editorial policy here.
- Author


.svg)


")


