15 Simple Pumpkin Carving Ideas for Kids with DIY Designs
Nothing screams Halloween like scary and fun pumpkin carvings! Carving pumpkins is one of the best activities of the season, not only because it allows your children to show off their creative skills but also because it can be your inexpensive Halloween décor option! Whether you are looking for something super scary or simply a fun little pumpkin face to lift your Halloween spirits, there is something for everyone! If you need inspiration, check out these kids pumpkin carving ideas—they’re perfect for little hands and big imaginations. From silly grins to spooky ghosts, the possibilities are endless with these cute ideas. Plus, it’s a great way to bond as a family while creating festive memories.
15 Easy Pumpkin Carving Ideas for Children
Check out the following simple ideas and find out your favorite one from this wonderful collection!
1. Pumpkin House Number
Let your mailman’s job become a bit more fun and easy with this cute pumpkin carving idea!
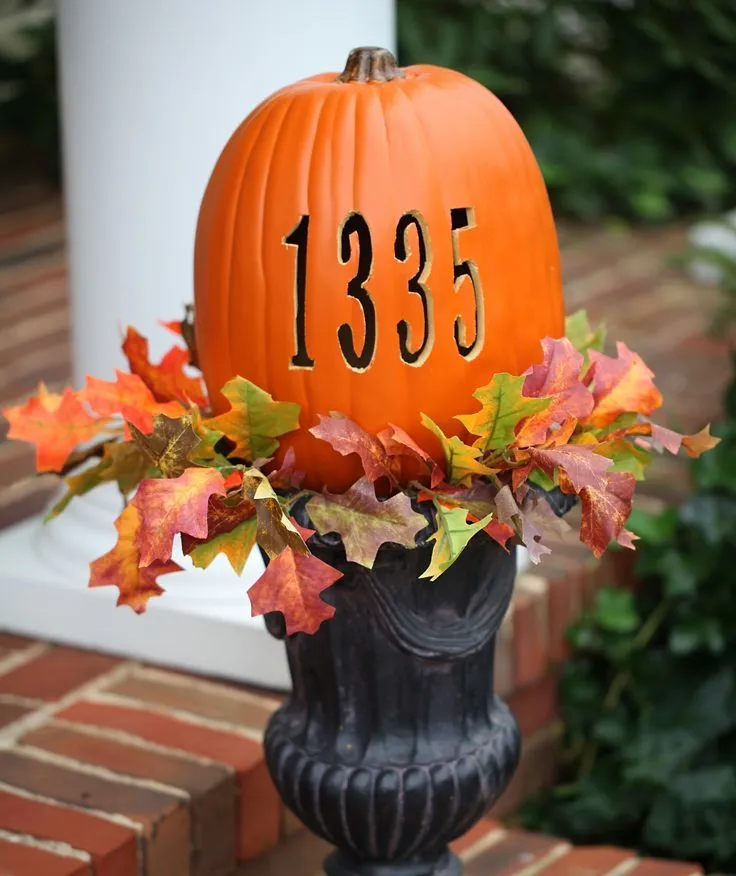
Image Credit: Pinterest
Materials Needed
- Hot knife
- Foam pumpkin
- Printout of the house number in a preferred font
- Tape
- Needle
How to Make
- Take a printout of the house number in any font you prefer, with the size of the number being large enough for the pumpkin.
- Center this printout on the front of the pumpkin and secure this using tape.
- Punch holes in the pumpkin over the printout along the outer edges of the number. Remove the paper, and you will be able to see the outline of the number.
- Using the hot knife, carve each number through the dots to remove the inner parts of the number. Once done, smooth the edges using sandpaper or a nail file.
- For a really spooky effect, clean the insides of the pumpkin by taking out the pulp and seeds and place a candle inside. This way, your house number would light up in the dark.
2. Etched Pumpkin
Using simple templates, you can make your own beautiful etched pumpkins to decorate your home.
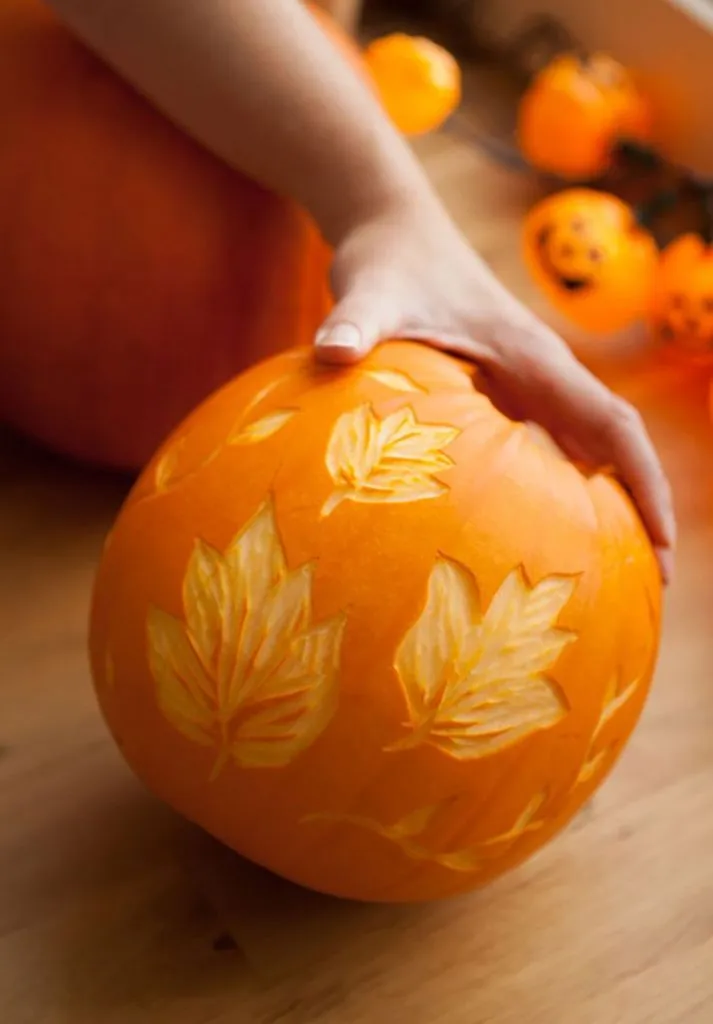
Image Credit: Pinterest
Materials Needed
- Required template
- Tape
- Scissors
- Paring knife
How to Make
- Print out the required template (for example, if you are looking for a non-scary design, then you could go for the autumn leaves template).
- Cut out the pattern from the paper after leaving a ½-inch border around the outline. Use tape to hold the pattern over the surface of the pumpkin.
- Using the paring knife, pierce over the outline of the design through the pumpkin. Remove the paper and peel the skin inside the pattern using the knife. Do not cut it out; instead, etch through the surface of the design.
3. Candy Land Pumpkin
Turn your children’s Halloween into something sweet this Candyland, a creative pumpkin carving idea.
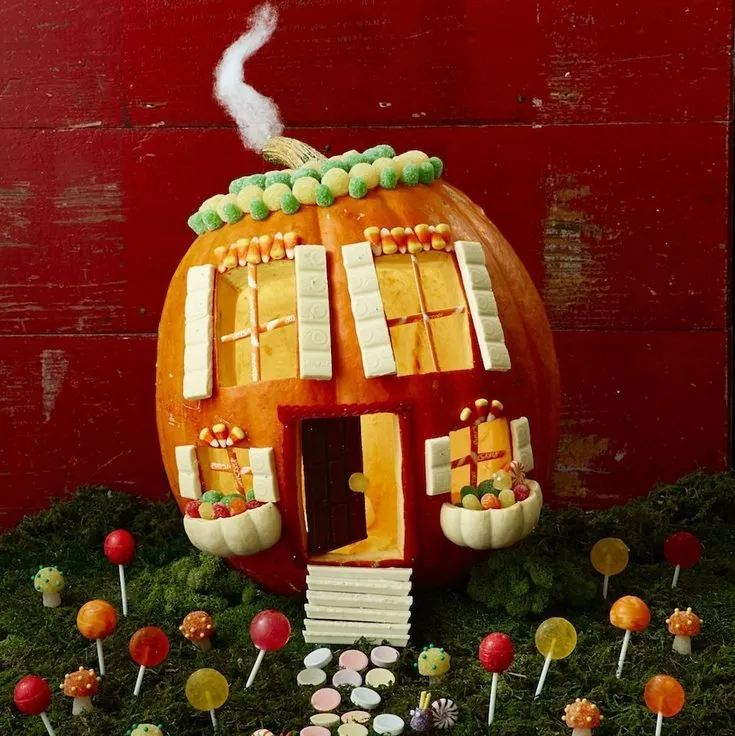
Image Credit: Pinterest
Materials Needed
- Large pumpkin
- Pumpkin carving kit
- White Jack Be Little Pumpkin
- Craft foam
- T-pins
- Artificial moss
- Candy (white chocolate, gumdrops, candy corn, sugar straws, liquorice, peppermints, and more)
- Polyester batting
How to Make
- Take the large orange pumpkin and hollow out the insides through a round opening at the top.
- Cut out 3 rectangles for the door and windows at the front.
- Make a slight hill of craft foam and cover it with artificial moss. Place the pumpkin on the hill.
- Cut the top off the little white pumpkin and then cut the rest of the pumpkin in half to create window boxes. Attach these a little below the windows using T-pins.
- Paste a few more details like gumdrops for the roof, polyester batting for smoke, shutters of white chocolate.
- Use sugar straws for window frames, and white chocolate bars with gumdrop handles as a door.
- Small pieces of white chocolate bars can also be used for the steps from the bottom of the moss hill all the way to the door.
4. Robot Pumpkins
Give your Halloween a futuristic twist with this funny pumpkin carving idea!
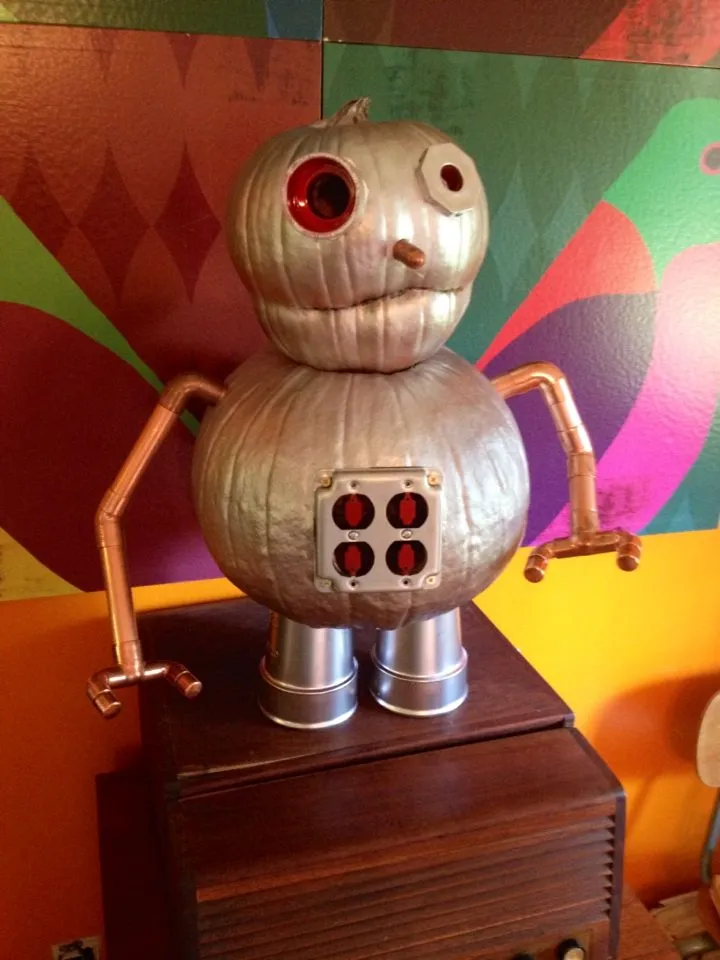
Image credit: Pinterest
Materials Needed
- Mini pumpkins
- Metallic gold and silver spray paint
- Bolts, hex nuts, felt scraps, screws
- Googly eyes
- Wire
- Hot glue gun
How to Make
- Spray paint the little pumpkins and leave them aside to dry completely.
- If you want the nuts and bolts to be colored, then spray paint these as well in any colors your kids’ love.
- You can paste the other parts to the pumpkin in any design you want using the hot glue gun.
- For arms, you could paste the bolts, and the nuts can be the eyes (paste googly eyes over the nuts for a funnier look), the washers, and the wire can be any decorations on the body of the pumpkin.
- This craft can also be done on gourds so you can make an army of futuristic robots of various shapes and sizes for Halloween.
5. Stacked Pumpkin Topiary
Looking for traditional and scary pumpkin carving ideas? Check out this stacked pumpkin topiary this Halloween!
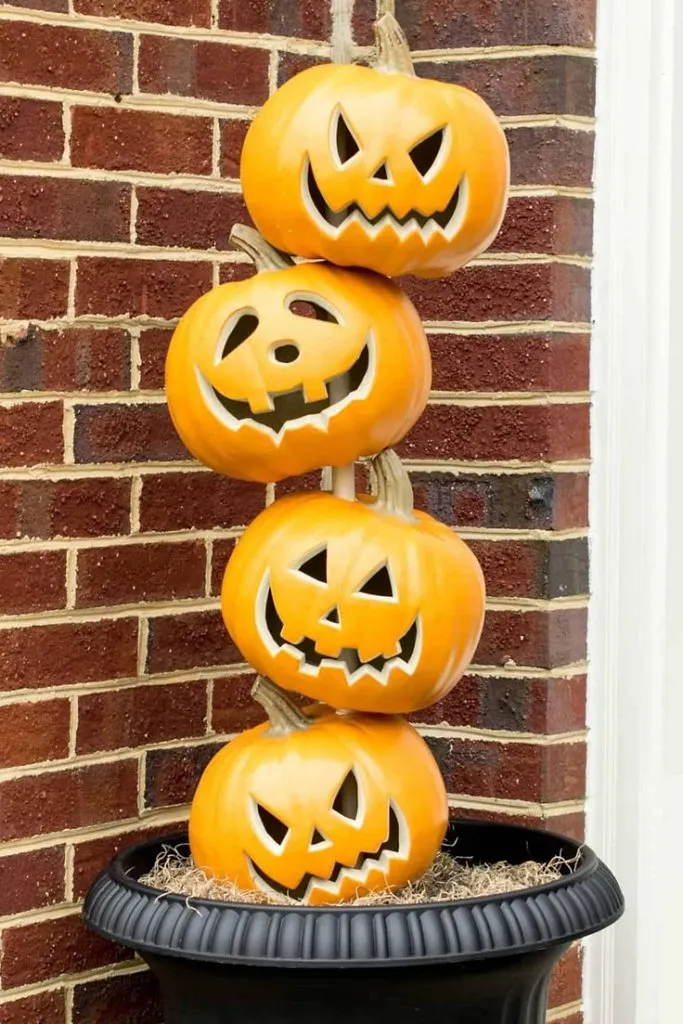
Image Credit: Pinterest
Materials Needed
- Halloween lighted pumpkins (5)
- Pot
- Wood dowel (1” circumference)
- Flower
- Primer
- Spray paint (white and black)
- Extension cord
How to Make
- Prime three pumpkins and spray paint two of the pumpkins black and the others white.
- Spray paint the wood dowel black as well.
- Once the pumpkins are dry, drill 1-inch holes into them. When drilling holes, ensure that one pumpkin that is supposed to be kept at the top of the stack is drilled only at the bottom (meaning that it would have only one hole).
- Put some soil and flowers into the pot and place the wooden dowel in the middle once the spray paint dried.
- Stack the pumpkins through the dowel in alternating colors. The final pumpkin with one hole can be placed at the top such that the dowel rests inside the pumpkin.
- Attach some lights through the back of the pumpkins, and you have your own scary Halloween stack!
6. Sick Pumpkin
The simpler the pumpkin face, the more laughs it is going to get at your Halloween party!
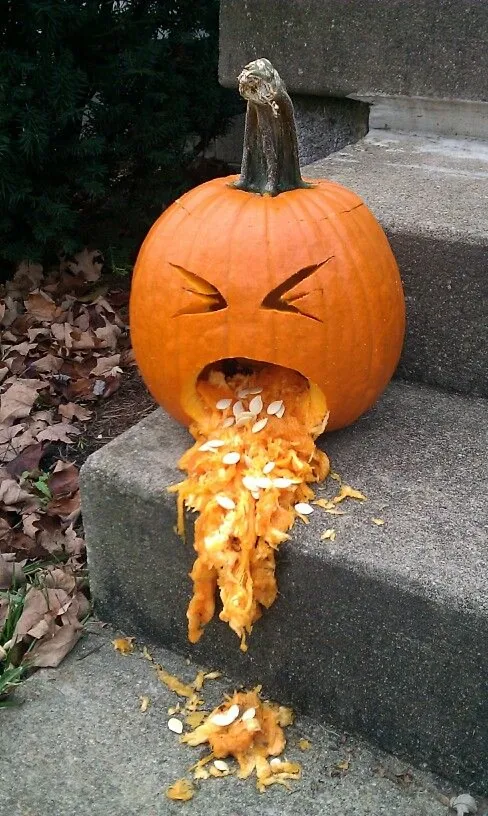
Image Credit: Pinterest
Materials Needed
- Huge pumpkin
- Knife
- Needle
- Spoon
- Bowl
How to Make
- Cut out around at the top and hollow the pumpkin using a spoon. Save the insides to be used later inside a bowl.
- Use a needle to punch holes on the outline of your pumpkin’s expression. Carve out a face of pure agony (make sure the mouth is wide-open) using a knife.
- Arrange the insides of the pumpkin from the bowl near the mouth such that it looks like the pumpkin is puking its guts out.
7. Pumpkin Candy Dispenser
A DIY pumpkin candy dispenser is a very seasonal decoration idea you should definitely try this Halloween!
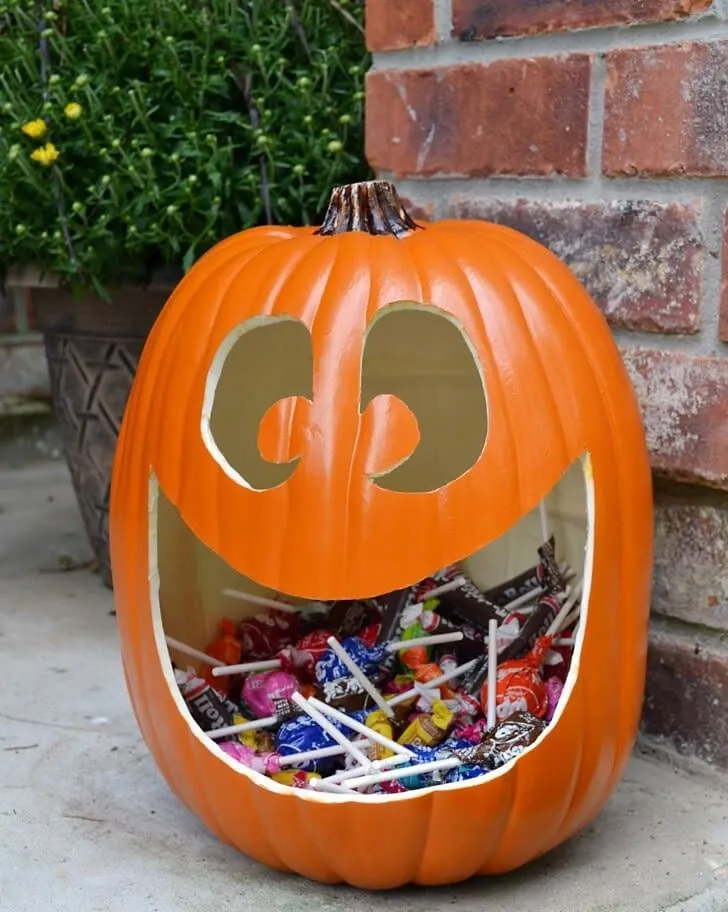
Image Credit: Pinterest
Materials Needed
- Large orange Pumpkin
- Rope
- Knife
- Hot glue
- Spoon
- Bowl
How to Make
- Trace the bottom of a storage container or a glass bowl onto the front of the large pumpkin.
- Use the knife to cut around the outline and take the area out. Use a large spoon to scoop out the seeds and the pulp of the pumpkin.
- Insert the bowl inside the cavity (you can make the hole slightly bigger, if necessary).
- Using hot glue, paste the thick rope around the edge of the opening and fill the bowl with sweet Halloween candy!
8. Honeycomb Pumpkin
A sweet beehive design that’s easy for kids to create!
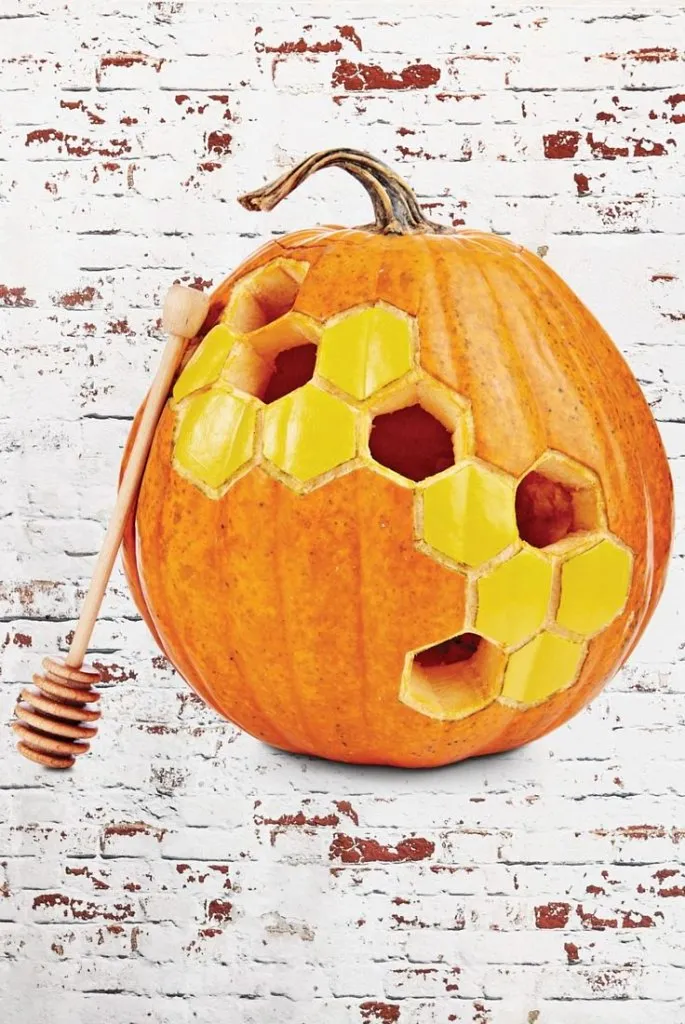
Image Credit: Pinterest
Materials Needed
- Medium orange pumpkin
- Pencil or washable marker
- Small knife or pumpkin carving tool
- Spoon
- Yellow tissue paper or cellophane (optional)
- Tea light or LED candle
How to Make
- Cut off the top of the pumpkin and scoop out the insides.
- Lightly draw hexagon shapes all over the pumpkin using a pencil or marker.
- Carefully carve out every other hexagon to create a honeycomb pattern (adults help with cutting).
- For a glowing effect, tape yellow tissue paper behind the carved holes.
- Place a candle inside—watch the “honeycomb” glow!
9. Lollipop Pumpkin
Let the children help themselves to sweets with this adorable lollipop pumpkin.
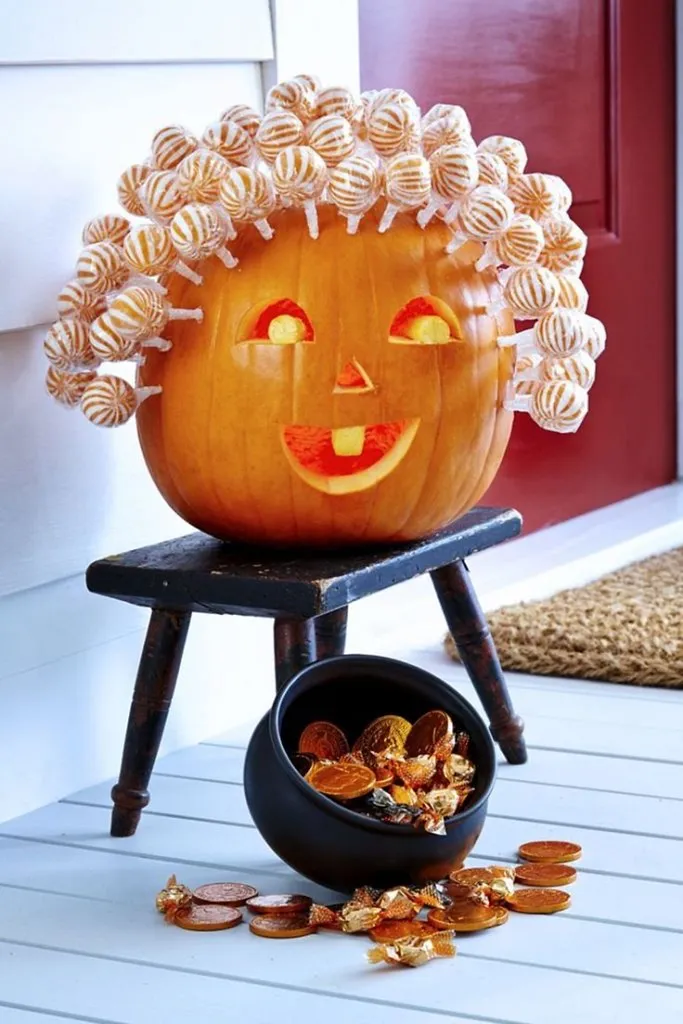
Image Credit: Pinterest
Materials Needed
- Large pumpkin
- Lollipops
- Knife
- Needle
- Linoleum cutter
How to Make
- Cut the circle at the top of the candy and hollow it out with a spoon.
- Carve a semi-circle with a single tooth for the mouth, a triangle for the nose, and two little upper semicircles with pupils for the eyes. You could etch the pupils using a linoleum cutter.
- Using a needle of a large enough diameter to hold the stick of the lollipop, poke holes about 1 ½ inch apart across the head of the pumpkin.
- Push the lollipop sticks into the holes to create the hair.
10. Mummy Pumpkin
Spook your little trick or treaters with a fun and creepy mummy pumpkin!
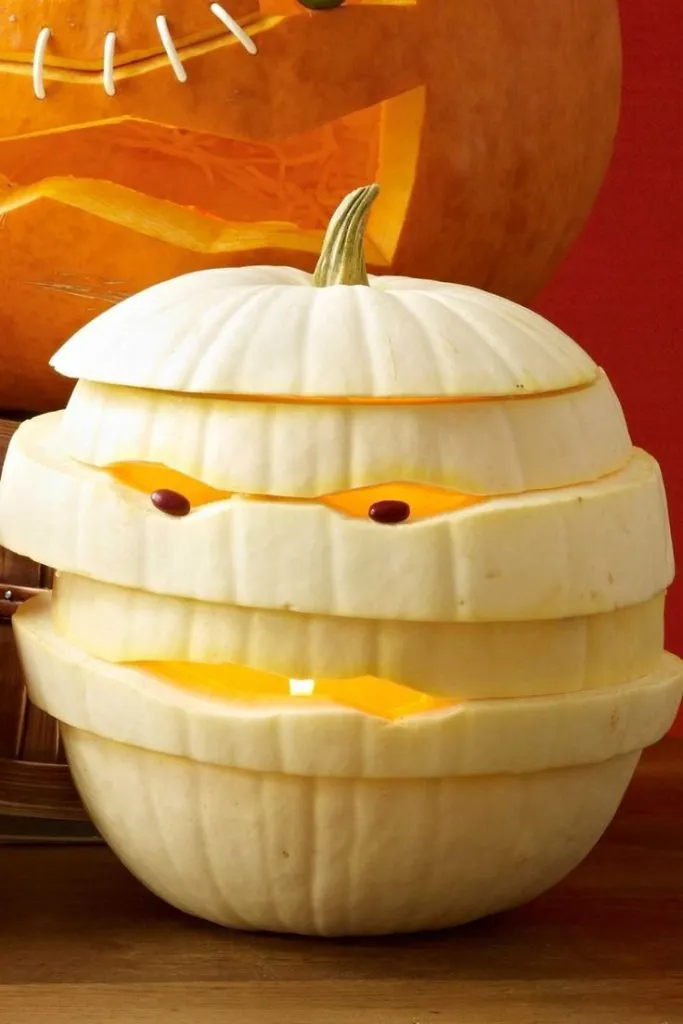
Image Credit: Pinterest
Materials Needed
- White pumpkin
- Knife
- Toothpicks
- Beans
- Spoon
How to Make
- Take out the white pumpkin, cut off the top quarter, and scoop the pulp and the seeds.
- Starting around 1” to 2” (based on the size of the pumpkin) below the opening, cut out the pumpkin all the way around horizontally.
- Repeat the above step 4-6 times until the last piece is around 3” in height and separate the pieces.
- Keep the bottom and the top pieces the same and restack the other pieces in any order.
- You can rotate the pieces to form any shapes you like, and once you have decided on the position, use toothpicks to secure it in place (you can take the pieces off carefully, press toothpicks into the top of each piece, and press the upper pieces over it, restacking it in the process).
- Once done, carve two holes for the eyes and carve out a scary mouth.
- Place beans into the eye holes either using hot glue or half toothpicks.
11. Spiderweb Pumpkin
A step-by-step web design that’s impressive but easy!
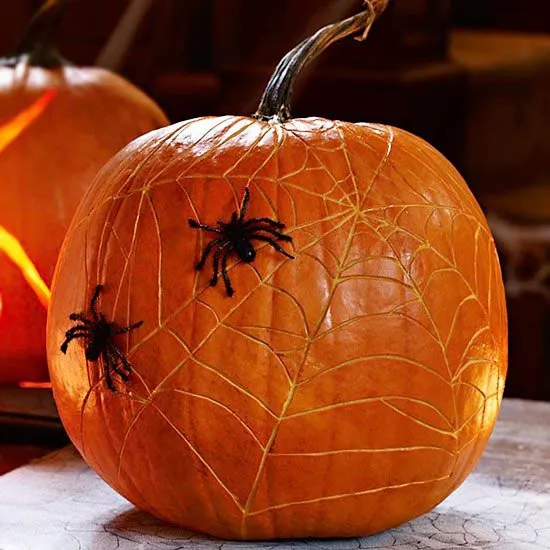
Image Credit: Pinterest
Materials Needed
- Round pumpkin
- Toothpick
- Paring knife
- String or yarn (for tracing)
How to Make
- Prep the pumpkin: Hollow it out and smooth the inner walls.
- Tie a string to a toothpick, press it into the pumpkin’s center, and pull the string taut to trace 6-8 “web lines” with a marker.
- Use a knife to etch shallow lines between the marks, connecting them with curved cuts to form a web.
- Carve a small hole near the web and insert a plastic spider for extra creepiness!
12. Pumpkin Lantern with Stars
A celestial design that’s great for practice!
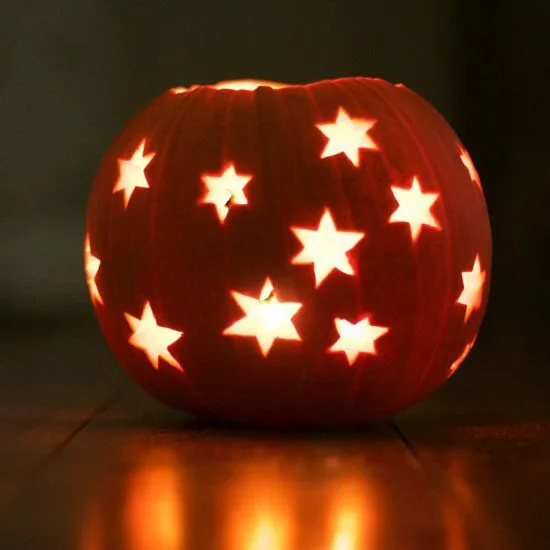
Image Credit: Pinterest
Materials Needed
- Small pumpkin
- Star-shaped cookie cutters
- Rubber mallet
- Nail file (for smoothing)
How to Make
- Hollow the pumpkin: Save the seeds for roasting!
- Press cookie cutters into the pumpkin’s sides and tap gently with a mallet. Remove the cutouts.
- Use a nail file to smooth any rough spots.
- Add a candle—the stars will twinkle when lit!
13. Owl Pumpkin
Create a wise old owl using pumpkin seeds for unique, textured eyes!
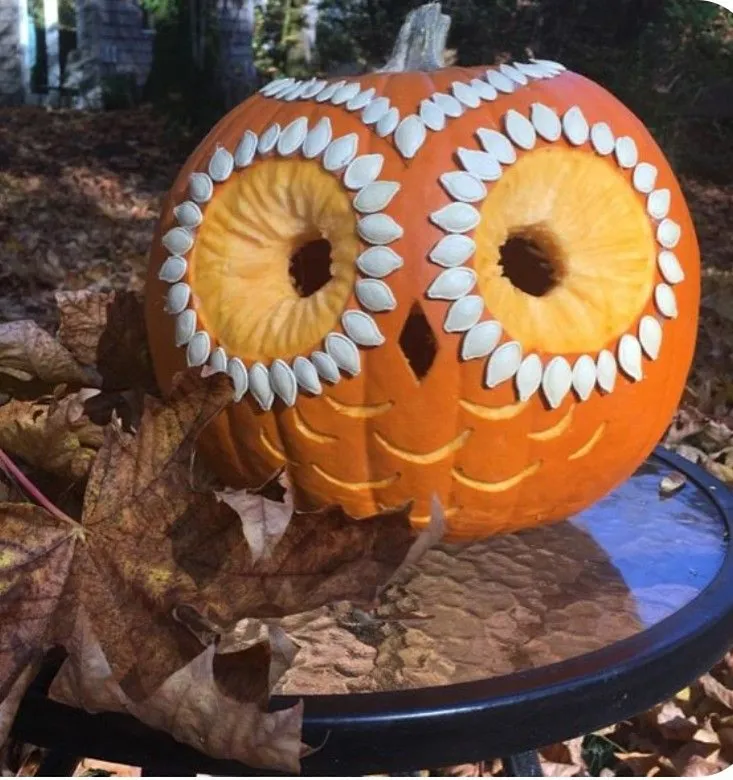
Image Credit: Pinterest
Materials Needed
- Medium pumpkin
- Pumpkin seeds (cleaned and dried)
- Black marker
- Small carving knife
- Spoon
- Glue gun or white craft glue
- Tea light or LED candle
How to Make
- Cut off the pumpkin top and scoop out the insides (save seeds)
- Draw two large circles for eyes and a diamond beak
- Carve out the diamond beak completely
- Carve shallow bowls (not holes) in the eye circles
- Glue pumpkin seeds in the eye bowls, pointing outward
- Add two vertical seeds between eyes as “nose bridge”
- Stick twigs on top for ears (optional)
- Place candle inside
14. Pumpkin Pirate
Arrr! A simple pirate face with an optional eyepatch.
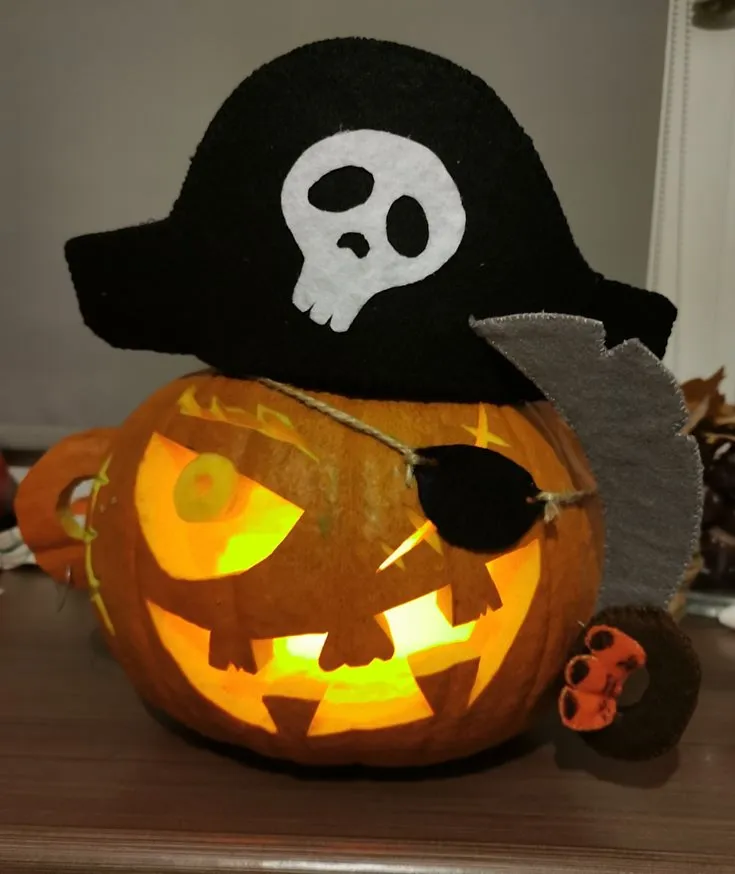
Image Credit: Pinterest
Materials Needed
- Round pumpkin
- Black felt
- Toothpick
- Knife
- Gold marker
How to Make
- Carve classic triangle eyes and a mean mouth
- Cut one eye hole larger for the eyepatch
- Make a felt eyepatch with a toothpick strap
- Draw a gold tooth with a marker
- Add cuts for scars/stubble
15. Unicorn Pumpkin
Magical design that’s mostly carving-free!
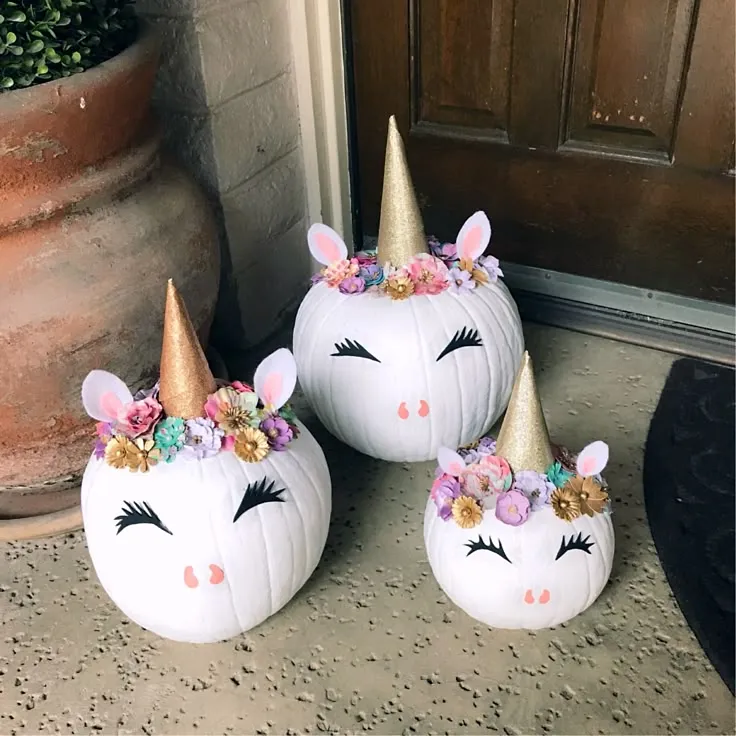
Image Credit: Pinterest
Materials Needed
- White or orange pumpkin
- Gold spray paint
- Cardboard cone
- Glitter glue
- Fake flowers
How to Make
- Spray paint cone gold for horn
- Glue horn to stem area
- Use glitter glue for eyelashes/swirls
- Attach flowers around base as mane
- Optional: Carve small star shapes
FAQs
1. What’s the safest way to let kids participate without sharp tools?
Let kids scoop seeds with hands or spoons, draw designs with markers, or use cookie cutters + rubber mallets for no-cut impressions. Supervise closely for any tool use.
2. How can I preserve a kid-carved pumpkin longer?
Rub the cut edges with petroleum jelly to lock in moisture, store it in the fridge overnight, and avoid direct sunlight to slow rot.
3. Are there allergy risks when handling pumpkins?
Rare, but pumpkin flesh/sap can cause mild skin irritation. Rinse hands after carving, and avoid touching faces (especially eyes) during the activity.
4. Why does my pumpkin shrivel after carving, and how can I prevent it?
Carved pumpkins lose moisture fast. Soak the pumpkin in cold water for 1–2 hours before carving, and spritz it daily with water to keep it plump.
These were some awesome pumpkin carving ideas. Gather a few pumpkins, take out your carving knives, and settle in for a fun-filled day with your family!
Also Read:
Jellyfish Crafts for Kids
Halloween Crafts for Children
Halloween Makeup Ideas for Children
DIY Halloween Costume Ideas for Children
Was This Article Helpful?
Parenting is a huge responsibility, for you as a caregiver, but also for us as a parenting content platform. We understand that and take our responsibility of creating credible content seriously. FirstCry Parenting articles are written and published only after extensive research using factually sound references to deliver quality content that is accurate, validated by experts, and completely reliable. To understand how we go about creating content that is credible, read our editorial policy here.







.svg)


