20 Easy DIY Bookmark Ideas for Kids
Books are an investment and fragile commodity that needs good care for them to last a lifetime. Bookmarks are a marking tool that ensures that your books remain in good or even mint condition without getting defiled by dog-ear culprits. Bookmarks help you keep track of your progress and quickly return to where the previous reading session ended. Fun bookmarks for kids encourage them to care for their books and maintain them well. There are several DIY bookmarks for kids to make that can be a stepping stone in starting a love for your child’s reading journey. In the following post, we are sharing some amazing and cutesy bookmark ideas for students who’d love to make their reading time fun and engaging. Join in if you want some, too.
Creative Bookmark Ideas for Children
Modern bookmarks are made from different materials and showcase a variety of designs and styles. Simple bookmark ideas for kids can be interesting craft projects. Designing bookmarks can improve kids’ fine motor skills and get them into the habit of reading if only to admire their creations. Handmade bookmarks for kids make lovely gift ideas for Mother’s Day, Father’s Day, Teacher’s Day, and Friendship Day.
In case you’re wondering how kids can make their bookmarks, there are endless possibilities for customizing themed bookmarks based on their adorable cartoon characters, superheroes, or protagonists of a book.
Bookmark crafts for kids help to engage them positively and inspire them to read. Here are some of the best bookmark craft ideas for preschoolers that can be used in the classroom, library, or home.
1. Seasonal Bookmark Craft

Making this bookmark can be a part of your child’s school craft activity and portray whichever season catches their fancy.
What You Will Need
- Colourful Cardstock Paper
- Markers
- Paint Sticks
- Stickers
- Paper Cutter
Instructions
- Cut card stock paper into strips of about 1.5 inches in width using a paper cutter.
- Choose any colour for the bookmarks and decorate as desired.
- Laminate them.
2. Mini Bookmark
This pretty pixilated project lets kids embrace the multi-bead sensation and become geniuses in all sorts of creations.
What You Will Need
- Boards
- Ironing Paper
- Standard Metal Paper Clips
- Iron
Instructions
- Make a design out of Perler beads on the Perler grid board.
- Melt one side of the design by placing the ironing paper on top of the design and then pressing it down with a hot iron.
- After one side is fused, turn it over and place a metal paper clip near the bottom end of the design. The opening end of the clip needs to be opposite the Perler beads so that the clip can easily open once everything is fused.
- Keep the ironing paper over the beads and paper clip. Press down with a hot iron until the clip is fused to the beads. Leave it to cool.
3. Ribbon Bookmarks
These non-slip elastic ribbon mark stretches to accommodate the book pages and ensure you never lose your page again.
What You Will Need
- Decorative Ribbon (1/2 in. wide)
- A Pair of Scissors
- Elastic Hairbands
- Needle and Thread or Sewing Machine
- Decorative Buttons
Instructions
- Cut the ribbon into 18-inch strips.
- Fold the ribbon from one end over 1/4 inch. Fold it over another 1/4 inch and stitch across with any design of your choice, using your hand or a sewing machine.
- Repeat the process by folding the other end of the ribbon and adding the elastic hairband to complete one end of the ribbon bookmarks.
- Use a needle and thread to attach a button to the other end of the ribbon.
4. Ocean Bookmark
These bright and attractive bookmarks can get kids interested in nautical themes and the underwater world.
What You Will Need
- Pencils
- Watercolors
- Black Glue
- Cartridge Paper
Instructions
- Print out your templates.
- Cut your bookmark template and trace the outline. Fill in the details by drawing additional designs.
- Make it look like a black glue-stained glass project by adding some crisscross lines.
- Use black glue to outline your design fast enough to ensure the lines appear smoother and better.
- Once it has thoroughly dried, use paint on wet paper that blends and spreads beautifully. Leave it to dry.
- Take Black Glue and watercolour bookmarks and cut out your shapes, leaving a little white rim on the edges.
5. Avengers Bookmark
Kids would surely be excited to make bookmarks based on the superheroes from The Avengers series of Marvel comics and movies.
What You Will Need
- Jumbo Craft Sticks – 3
- Clear Paintable Sealer or Mod Podge
- Black Sharpie
- Pattern
- Black Ballpoint Pen
- Paintbrushes
- Paint Colors
- White Paint Pen
Instructions
- Freehand the characters using paint of all colours to cover all areas as per the original designs.
- Once everything dries, use a white paint pen to add the physical features and accessories associated with the heroes.
- Use a ballpoint pen to outline the mouth and the teeth. Leave them to dry.
- Apply a coat of paintable sealer or Mod Podge to give everything a protective coating. Leave it to dry overnight.
6. Scribble Monster Bookmarks
This DIY bookmark craft for preschoolers lets them take pride in their artistic creation.
What You Will Need
- Blank Index Cards
- Googly Eyes
- Ribbon
- A Pair of Scissors
- Hole Puncher
- Watercolor Paints, Marker, Crayons
- Heart Stickers
- Glue
- Cardstock, Blank Cards
- Printable Labels
- Double-sided Tape or Glue Sticks
Instructions
- Draw a scribble monster on the index card in a portrait layout.
- Use watercolour topped with crayons and marker doodles.
- Add arms and legs with a black permanent marker. Scribble monster horns and smiles.
- Stick on googly eyes of different sizes and colours with glue, double-sided tape, mounting tape, or hot glue.
- Thread a 4-inch ribbon piece into a hole near the top centre of the index card.
7. Washi Tape Bookmarks
These bookmarks can be made using some basic supplies easily available at home.
What You Will Need
- Card Stock or Heavier Weight Scrapbook Paper
- A Pair of Scissors
- Alphabet Stamps and Ink
- Paper Trimmer
- Washi Tape
- Ribbon
Instructions
- Trim the paper scraps into long rectangles measuring about 2 inches wide and 6 inches tall.
- Punch a hole in the paper on the top end.
- Use washi tape of different patterns and colours to decorate the bookmark.
- Personalize it with your favourite alphabet stamps.
- Tie a 4-5 inches long ribbon onto the hole of the bookmark.
8. Postage Stamps Bookmarks
This activity can get your child interested in philately and gain information about the stamps of different countries.
What You Will Need
- Construction Paper or Card Stock of Any Color
- Glue Stick
- A Pair of Scissors
- Old Postage Stamps
Instructions
- Cut card stock to the desired size. Stick the postage stamps with glue to the card stock.
- Wait for it to dry.
9. Cat Bookmark
If a child happens to have a pet cat, this craft can surely excite and uplift their mood.
What You Will Need
- Crafting Foam or Felt
- Small Craft Pompom
- A Pair of Scissors
- Glue
Instructions
- Create the shapes needed to form the cat – Four triangles (two medium and two small), a large arch, two small arches, a candy cane shape for the tail, and a few strips for whiskers.
- Assemble your pieces, layer, and glue the two ears first. Attach to the top of the large arch.
- Stick the pompom with glue to form the nose. Add the strips to the side for the whiskers.
- Stick the small two arches to the bottom of the body to resemble the paws.
- Stick the candy cane shape to the back of the body for it to hang as low as the cat’s tail.
10. Flower Bookmark
This fun spring activity for kids can encourage reading.
What You Will Need
- White Cardstock
- Clear Contact Foil
- Cardstock (lilac, purple, dark purple, and pink)
- Jumbo Puncher With Flower
- Satin Ribbon
- Glue Stick
- Scissors and Ruler
- Hole Puncher
- Eyelet and Eyelet Tool
Instructions
- Cut a strip of white card stock into the desired size.
- Cut a second strip of lilac cardstock slightly smaller than the previous one and adhere it to the white one, leaving an even margin on all sides.
- Punch out flowers and arrange and stick them lightly to hold them in place.
- Cut a piece of contact paper and stick it to the front side of the bookmark. The paper should be bigger than the bookmark. Cut and stick another piece to the back.
- Trim excess foil away from the sides, leaving a slight border.
- Tie a ribbon through the hole made on the top of the bookmark.
11. Button Bookmark
This simple handmade bookmark can pave the way for happy reading adventures for your kid.
What You Will Need
- Scissors
- Construction Paper
- Buttons
- Hot Glue Gun and Hot Glue Sticks
Instructions
- Use construction paper or poster paper and paint to make a design.
- Once dried, cut it into strips about 2 inches wide and 5 inches long.
- Stick buttons on the top of the bookmark with a hot glue gun.
12. Thumbprint Heart Bookmark
This unique craft makes an adorable homemade gift made from a child’s loving hands.
What You Will Need
- Red and White Card Stock or Construction Paper
- Glue
- Scissors
- Hole Punch
- Length of Ribbon (red, white, pink)
- A pair of Scissors
- Designer Edge Scissors
Instructions
- Carve out two rectangles from the red and white card stock, each measuring 6 inches long and 1.5 inches wide.
- Press your thumb down into the red stamp pad and press it down on the white card stock rectangle at a slight angle to form one-half of the heart. Overlap the first print with a second thumbprint to form the other side of the heart.
- Repeat to make four hearts down the centre.
- Cut off the long edges of the white rectangle with decorator-edge scissors.
- Stick the white rectangle to the centre of the red bookmark and leave it to dry.
- Thread through a ribbon and tie it to the hole made on the bookmarker.
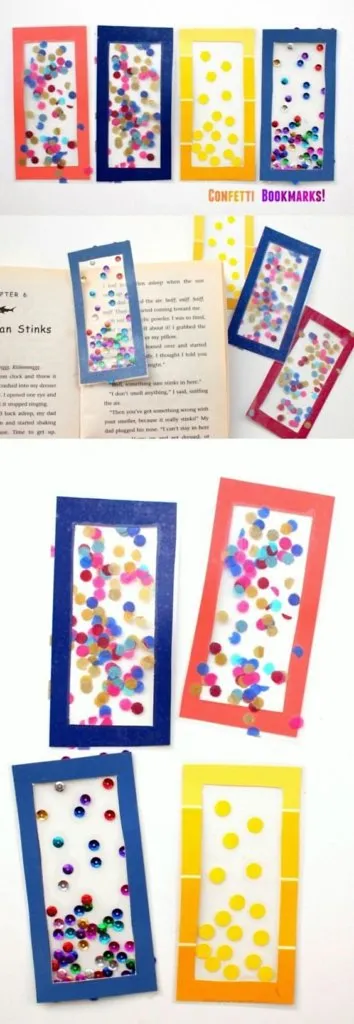
13. Confetti Bookmark
These fun and colourful bookmarks are gifts to suit any age and occasion.
What You Will Need
- Sturdy Paper – either Card stock, Paint Chips, or Scrapbook Paper
- Masking Tape
- Craft Knife and Mat
- Tissue Paper (construction paper, sequins, or circle stickers)
- Clear Contact Paper
- Hole Punch
- A Pair of Scissors
- Cutting Mat
Instructions
- Use a hole punch to create confetti out of tissue paper sheets folded together.
- Trace and cut out a bookmark template using a colourful paint chip or other sturdy sheets.
- Cut out two pieces of clear contact paper. The second sheet should be slightly larger than the first.
- Tape the smaller sheet of contact paper with the sticky side up onto the work surface.
- Stick the contact bookmark border. Sprinkle on the confetti.
- Carefully stick the second sheet of contact paper to the first.
- Cut out the bookmarks.
14. Rainbow Bookmark
The multi-coloured rainbow bookmark can help brighten up your child’s day, no matter how dull they are.
What You Will Need
- Craft Paper in rainbow colour
- White Card Stock
- Gold and Red Craft Paper
- Ruler and Pencil
- A Pair of Scissors and Glue
- Heart or Star Cutout
Instructions
- Cut an arrow shape out of white card stock paper.
- Cut out thin strips of equal width from the colored craft papers and stick them on the arrow shape, side by side.
- Trim any excess from the sides.
- Make multiple rainbows of different shapes.
- Stick a star or heart on the top end.
15. Origami Fox Bookmark
What You Will Need
- Orange Coloured Scrapbook Paper
- Scissors
- Stationery
- Sketch Pen
- Googly eyes
Instructions
- Take a square orange-coloured scrapbook paper and fold it diagonally.
- Fold it diagonally again.
- Open the second fold and fold the paper the way it is shown in Step No-5.
- Do it for both sides.
- Now, as shown in Step No-7, open the internal of the fold to make it look like the ears of an animal.
- Do it for the other side as well. Your fox ears are ready.
- Now, using a scissor, make the eyes using small white and black paper, or you can just paste googly eyes.
16. Mandala Bookmark
What You Will Need
- White Card Stock or Construction Paper
- Scissors
- Stationery
- Colour pencils
Instructions
- Carve out a rectangle from white card stock measuring 6 inches long and 1.5 inches wide.
- Carve out a mandala design on the cutout card stock with a pencil.
- Fill the design with colourful colour pencils.
- Once the colouring is done, highlight the design with a sharp-pointed black marker. Voila, your mandala bookmark is ready!
17. Cow & Bull Bookmark
What You Will Need
- Card Stock or Construction Paper – White/Brown/Orange
- Scissors
- Stationery
- Colour pencils
Instructions
- Carve out a rectangle from white card stock measuring 6 inches long and 1.5 inches wide.
- Cut that out, and on the cut-out, make a cow or bull’s face using a pencil.
- Make two hands as well.
- Now, using a scissor, fine-shape the top of the cow/bull’s head. Also, carefully cut the hands halfway so that they bend up and open. You can check the image for reference.
- Using colour pencils or any other sketch colours, you can paint the cow. You can do this with any animal.
- You can slightly fold the arms and use the space to tug at the pages.
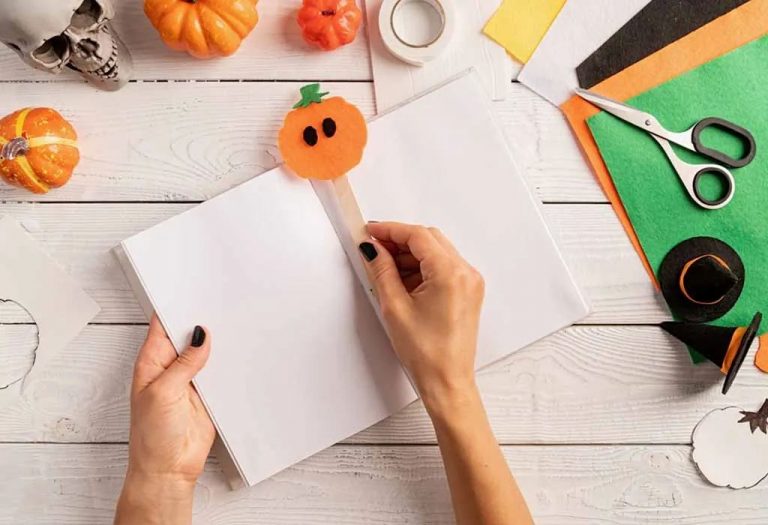
18. Halloween Pumpkin Bookmark
What You Will Need
- Card Stock or Construction Paper – Orange, Black, and Green
- Popsicle Sticks
- Scissors
- Stationery
- Glue
Instructions
- On orange cardstock paper, carve out a small pumpkin and cut it out.
- Next, make a small hat-like stem from the green cardstock or scrapbook paper.
- Cut out tiny black oval dots to make the eyes.
- Using glue, paste the eyes and stem.
- Now, take the pumpkin cut-out popsicle stick and
19. Crazy Bird Paper Clip Bookmark
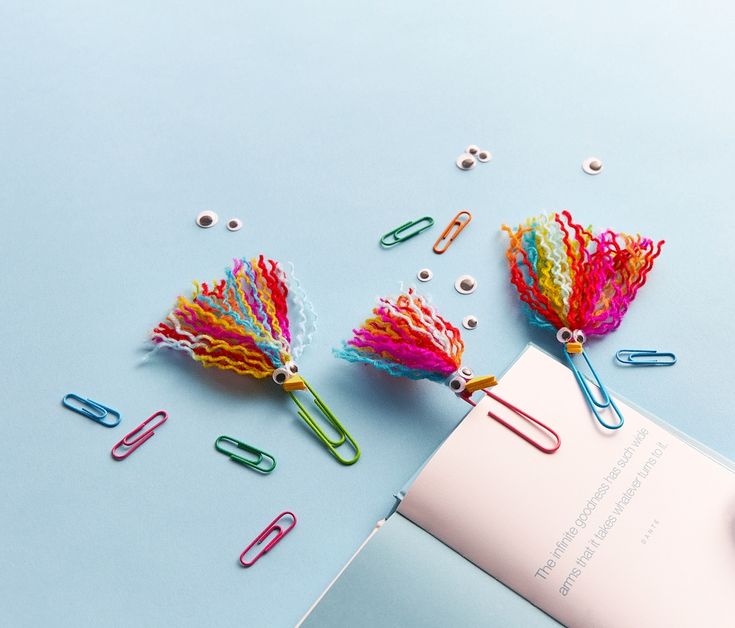
Source: Pinterest
What You Will Need
- Colour Paper Clips
- Colourful Threads
- Scissors
- Googly Eyes
- Glue
- Adhesive Foam Sheet
Instructions
- Untwist some colourful yarn to give it texture.
- Warp colourful yarns around your four fingers ten times. Cut one end of the loop.
- Now slide one end of the loop through the top of the paper clip so that it goes through the paper clip.
- Now, grasp the strands and, using another piece of yarn, tie all the strands tightly above the paper clip.
- Paste googly eyes where you tied the thread with a paper clip. This will make the eyes of the bird.
- Cut two tiny triangles from the foam and stick both together making the beak of the bird. Paste the foam beak below the googly eyes, and let it dry.
- Voila! Your crazy hair bird bookmark is ready.
20. Leaf Bookmark
What You Will Need
- Card Stock or Construction Paper – White
- Scissors
- Stationery
- Colour pencils
Instructions
- Carve out a rectangle from white card stock measuring 6 inches long and 1.5 inches wide.
- Using a pencil, draw the sketch of leaves however you like.
- Using sketch pens, embolden the edges of the sketch.
- Colour the leaves with the desired colours, and your leaf bookmark is ready!
Bookmark making for kids allows them to exercise their creativity and imagination, which has immediate and lasting cognitive benefits. Along with providing a unique bonding time with parents, which creates memories of a lifetime, you can ensure that your child develops an interest in art, can improve their fine motor skills, and can fuel their creativity through such crafts.
Also Read:
Amazing DIY Tree House Ideas for Children
Creative DIY Playhouse Ideas for Kids
Beautiful DIY Dollhouse Ideas for Children
Best Out of Waste Material Craft Ideas for Kids
Was This Article Helpful?
Parenting is a huge responsibility, for you as a caregiver, but also for us as a parenting content platform. We understand that and take our responsibility of creating credible content seriously. FirstCry Parenting articles are written and published only after extensive research using factually sound references to deliver quality content that is accurate, validated by experts, and completely reliable. To understand how we go about creating content that is credible, read our editorial policy here.









.svg)


