Making a DIY Baby Gate at Home – Step-by-Step Guide


In this Article
- Why Safety Gates Are Needed for Babies and Toddlers?
- How to Make a Basic Baby Gate
- Other Types of Homemade Baby Gates
- Things to Consider While Making Baby Gates
- FAQs
View More
As your toddler gets older, there will come a point when you can no longer just babyproof the furniture or the décor; you’ll have to restrict access to some sections of the house. Baby gates are great to keep your baby in a safe area of the house; however, they can also be expensive if you need to cover more than one area of the house. The most economical way then would be to build a baby gate on your own, and we have some great ideas in this article!
Let’s first understand a little more about DIY baby gates and why baby safety gates are needed.
Why Safety Gates Are Needed for Babies and Toddlers?
Here are the reasons why baby gates are essential for your home:
1. Children fall from stairs.
Children who are just learning to walk are super-curious about the stairs as it is often a challenging barrier. In their attempt to conquer it, they will inevitably tumble down it. As long as you are around, you can make sure they are safe. But the gates are really helpful during times when you may have to take your eyes off them.
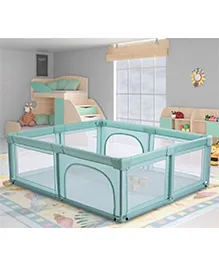
2. Children need a safe place to play.
Any open passageway is a big welcome sign for all kids to get to the other side. If your whole house is not baby-proofed, you might want to confine your kid to a safe space and a baby gate can help you do that. The gate also won’t interfere with your movement too much and you can afford to divert your attention to other activities without worrying about it.
3. Pets don’t always get along with children.
There is always a chance something might go wrong with your pet in the same room with your baby, especially if they are new or are the possessive types. Accidents often occur unintentionally so it is good to keep them separate for a while until you are confident your baby and the pet are comfortable with each other.
4. Children are curious.
Kids always want to explore what else is out there, whether it means crawling into the kitchen or to the backyard. Good baby gates in the right height are essential to keep children inside, especially if they are good climbers.
5. Children follow you everywhere.
One moment they are playing with their favourite toy and the next they are already on your trail. Baby gates will ensure you can keep your child confined to one place while you take care of other things. While many of the commercially available models can keep babies where they should be, your little one might know how to exactly beat every obstacle thrown at him. In such instances, you will have to make your own baby gate that is specifically baby-proofed for your smart one!
How to Make a Basic Baby Gate
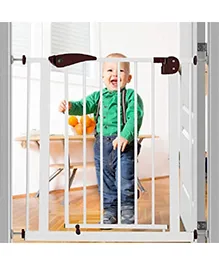
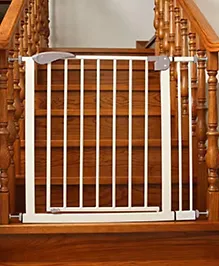
Here is a design for a basic baby gate that can be used to block off stairs and other areas in the house so your baby won’t be able to crawl or walk into the restricted space.
Supplies
- Wooden boards (3 pieces) 1”(in)x4”(in)x8’(ft)
- 1 ¼”(in) wood screws
- 2 door hinges, outdoor gate latch
- Minwax dark walnut stain
- Spray Shellac
- Circular saw
- Drill and screwdriver
- Spirit level
- Speed square
- Titebond 2 wood glue
- 220 grit sanding paper
Instructions
- The first step is to measure the area of your stairs or the entrance that needs to be covered by the gate. Look in to which way you want the gate to swing and whether the side that is screwed to the wall/frame can be drilled. If it is at the entrance to the stairs, make sure the gate only swings open away from the stairs. In this example, we show you how to build a gate that is 32” wide and 29” tall.
- Cut the boards to make the gate. You will have to cut 6 vertical planks 29” tall and two horizontal planks 32” wide to make the gate. Cut one plank using a circular saw and use it as a template to cut the rest. The width of the planks can remain the same at 4”. Lay the horizontal planks parallel to each other 29” apart from each other. Lay the vertical planks equidistantly, perpendicular to the horizontal planks. Adjust the height slightly to screw them into place.
- Use a 220 grit sanding paper to sand the surface of the wood smooth. Apply the dark walnut stain and wait for it to dry.
- Spray the shellac to give a shiny waterproof finish after the stain dries completely/
- Fix the two hinges to one of the vertical planks on one of the gate ends and screw the other side of the hinge to the wall. Do it in a way that the gate opens in your desired direction. Attach the latch to the plank on the opposite side of the hinges and the other part of the latch to the wall on the opposite side.
Other Types of Homemade Baby Gates
When it comes to baby gates, there is no one-design-fits-all. Therefore, here are some baby gates that will suit your living spaces:
1. Barn Baby Gate
Barn door baby gates are perfect for houses that have old country charm. The design is quite robust and a little bit more complicated than the rest of the door designs here. The dimensions of the door are customisable to fit your opening; the door shown here is a 35” square.

Image Credit: Pinterest
Supplies
- Wooden planks – (4 equal pieces) cut out of one 1”(in)x4”(in)x12’(ft) length plank, (14 equal pieces) cut out of three 1”(in)x3”(in)x 12’(ft) length planks
- 2 door hinges, outdoor gate latch
- Minwax dark wood stain
- Spray shellac
- Circular saw
- Drill and screwdriver
- Spirit level
- Speed square
- Whitewood glue
- 220 grit sandpaper
Instructions
- Cut the strips into different components that make up the door. Cut the 1”x4” planks 35” long each. Pick up one of the 1″x3″ planks and cut away a 4” in the middle to split the plank into two halves that will make up the half-cross brace.
- Make a square frame using the 1”x4” planks by glueing and screwing the planks at the ends. Lay down one of the 1”x3” planks across the frame to make it a full cross brace. Pick up the remaining 1”x3” planks and arrange them tightly behind the cross brace to form the back stiles. Glue and screw the half braces across diagonally, intersecting the full brace in the middle. The gate is done.
- Using a 220 grit sandpaper, finely sand the whole gate. Apply a coat of wood stain and allow it to dry before spraying a layer of shellac lacquer. Screw-in the door hinges and the gate latch on the opposite sides of the baby gate.
2. Invisible Baby Gate
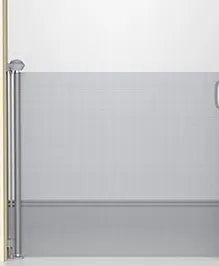
The invisible baby gate blends right into your décor! It is an ideal DIY baby gate for stairs with metal railings and the least amount of work involved to build it.

Image Credit: Pinterest
Supplies
- 1”(in)x2”(in) lumber
- Spray paint matching railing’s colour
- Mitre saw and drilling machine
- Screws
- Translucent acrylic sheet
- 2 small window hinges
- 220 grit sandpaper
Instructions
- Build the gate frame that houses the gate inside. Cut the 1”x2” lumber to fit the size of your stairs and build a rectangular attachment frame out of it. Using the same lumber make another frame that fits snugly inside the bigger one, this will become the actual gate.
- Using 220 grit sandpaper, sand the frame smooth so it can take any kind of paint or finish you might want to add to it. Spray painting with matching colour is the simplest idea and doesn’t require any extra surface preparation.
- Cut the acrylic sheet to fit exactly over the gate frame from the inner panel using screws placed at 1-inch intervals. Using the hinges, attach the frames such that one is nested inside the other and can swing open.
- Install the gate frame by either screwing the bottom into the floor or to the side of the railings. You could also use wall anchors to provide it extra strength in case your child decides to pound on it.
- Screw-in a small latch to the side of the gate that swings open. Depending on how long you would want to keep it, you could drill holes into your railings or secure it with zip ties as a temporary solution.
3. Fabric Baby Gate
A fabric gate is a simple but effective idea if you need a more retractable and quick-install solution. Some sewing skills will also go a long way in getting this right in the first attempt. This gate works for stairs that run alongside the wall with one set of the railing.

Image Credit: Pinterest
Supplies
- Home décor fabric – 2 yards
- Scissors
- Sewing machine
- Velcro strips
- Pins
- Bias tape
- Cord bundler
Instructions
- Start by measuring the width of the entrance to the stairs and cut out two square pieces of the same width (a little extra if needed) from the cloth.
- Pull out some of the bias tapes and eyeball it along the length to make a loop that will hook into the cord bundler. Make three of these to form attachment points on one side of the fabric.
- Make three longer bias tape loops for the other side of the fabric so that the loops can go around the railing post. Sew in strips of Velcro to opposite sides of the bias tape so they can quickly fasten around the post or can be removed.
- Lay the bias tape loops at the corners and one in the middle, on either side of the fabric square. Layout the second fabric cloth over it and use a zigzag stitch, sew along the corners to securely keep the loops in place. Proof test the strength of the stitches by pulling on it to ensure it won’t slip through.
- To install the fabric gate, drill three holes into the wall on one side to attach a wall anchor where the cord bundler of the gate goes. Put the gate up by hooking the cord bundlers to the wall anchors and looping the Velcro bias tapes to the railings. Test the gate buy tugging on it harder than your toddler would to be sure it doesn’t give away.
4. PVC Baby Gate
If you are looking for a baby gate that stands out as a DIY project then this PVC version is perfect for you! Although it doesn’t score very high on looks, it is a versatile design that can be expanded or customized for different places in your house.

Image Credit: Pinterest
Supplies
- 5’(ft) long pieces of SCHD 40 1-1/4”(in) PVC pipe furniture grade – 3
- 3’(ft) long plumbing grade pipe 1-1/4”(in) – 1
- 1 1/4”(in) Tees – 12
- Slip tees 1-1/4”(in) – 2
- 1 1/4”(in) 90 degrees elbows – 2
- 1 1/4”(in) end caps (internal domed) – 2
- 1 1/4”(in) table caps – 4
- 1 1/4”(in) PVC fitting caster inserts – 12
- Hitch pins ¼”(in) x 3”(in) – 2
- Pack of 3/4”(in) wood screws – 1
- PVC cement bottle – 1
- Power drill
- Hacksaw
- Miter saw
- Measuring tape
- Sandpaper
- Deburring tool
Instructions
- Start by cutting the furniture-grade PVC pipes into five 30-inch pieces, one 20-inch piece, and four 2.5 inch pieces.
- Cut the plumbing grade pipe into twelve 3-inch pieces. Use the deburring tool to smoothen rough edges.
- Two of the table caps have to be modified to form a catch mechanism. To do that use a hack saw to cut away a 1/3rd arc section in the caps. Start at the joint where the tab meets the cap and cut through the cap horizontally. At the ends of the horizontal cuts, make vertical cuts to remove the arc-segment. Before assembling the gate, layout all the PVC pieces as shown in the picture to form a template.
- Start assembly of the gate by fixing a tee on both ends of the 30” pipes to make the inside slats. Use the 3” plumbing pieces to join the tees together at the top and bottom to form the gate.
- Attach the four elbows to each corner to put into place the last slats.
- On the left end of the gate, slide two slip tees on the last 20” pipe slat. This is where the gate will hinge. The last 20” pipe slat on the right end will have two tees after the elbow, joined by the 3” plumbing pipes. Once you know that you have gotten the connections right, use PVC glue to secure all the pieces in place.
- Use the unmodified table caps and two of the plumbing pipe segments to make a wall anchor for the gate. Assemble the table caps and the pipes and trill through them to make a hole for hitch pins. This is where the gate attaches securely to the anchor and remains easily detachable. Using the with PVC cement, insert and secure the last two remaining plumbing pipe segments to the top and bottom tees of the 20” slat on the right side.
- Line up the tees of the hinge segments with the table caps and securely fit them together. Screw the table caps into the wall or the door frame to fit the gate. It should swing freely at this point. Screw the table caps with the catch mechanism cut into it to the opposite side of the wall or the door frame. When you put gentle pressure on the gate, the gate should snap right into the catch mechanism.
5. Sliding Baby Gate
A sliding baby gate is a stylish one you can have at your home if you wish to invest some extra time to build it.

Image Credit: Pinterest
Supplies
- (4 pieces) of 1”(in)x4”(in) planks at 1’(ft) 9”(in) long each
- (4 pieces) of 1”(in)x4”(in) planks at 1’(ft)11”(in) long each
- Table saw
- Drilling machine
- Whitewood glue
- 2 door hinges
Instructions
- The sliding baby gate is built as two identical sections: the fixed and the sliding sections. To build the section, use the 4” planks to construct a rectangular frame. Using a table saw, cut a ½” deep groove into the inner side of the top and bottom boards. Pick the three 1×11” wooden planks and cut them into sections of 1-1/2” wide. You will have six sections each to make the gate slats.
- Using the table saw, cut a ½” tongue that fits exactly in the top plank grove on both sides of the slats. Do this for all the slats and the two side planks of the frame as well. Put the gate section together by applying wood glue into the grooves and sliding the slats into the top and bottom section of the frame. Space them apart with equal distance. Join the side planks into the groove using glue to complete the frame.
- Use the 3 remaining slats to build the second identical gate section. Once it is dry, sand and polishes it as per your colour requirements. Attach two door hinges to the fixed section on one of the sides and install drawer slides to the top and bottom section of the gate. Attach the roller section of the drawer slide to the sliding gate using screws.
- Fasten the door hinge to the wall or the frame using screws to keep the fixed section securely in place. On the other side, attach two planks to the wall to act as a doorstop into which the gate can easily slide and stay firm.
6. Tension Rod Baby Gate
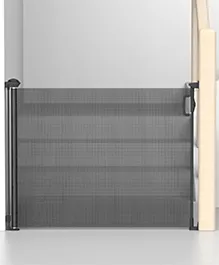
A tension rod baby gate is a quick and easy solution for doorways or narrow spaces where you need a temporary barrier. This no-drill option is perfect for renters or those who want a non-permanent solution.

Image Credit: Pinterest
Supplies
- Adjustable tension rod (choose a sturdy one that fits your doorway width)
- Dense fabric or mesh panel (width should match the doorway)
- Scissors
- Sewing machine or heavy-duty needle and thread
- Grommets and grommet tool kit (optional)
Instructions
- Measure the width of the doorway and cut the fabric or mesh panel to size, leaving a few extra inches on each side for hemming.
- Fold and sew the edges to prevent fraying. If using grommets, install them along the top and bottom edges for added durability.
- Slide the tension rod into position at the desired height, ensuring it’s tightly secured.
- Attach the fabric panel to the tension rod by either looping it over or using hooks through the grommets.
- For extra security, add a second tension rod at the bottom and attach the fabric to it as well. Test the gate by gently pushing to ensure it stays in place.
7. Pallet Wood Baby Gate
For a rustic and eco-friendly option, a pallet wood baby gate is both sturdy and customizable. This design works well for wide openings and can be stained or painted to match your home’s décor.

Image Credit: Pinterest
Supplies
- Reclaimed pallet wood (enough to cover the desired width)
- 2”x4” lumber for the frame
- Hinges and latch
- Wood screws
- Drill
- Saw
- Sandpaper
- Wood stain or paint (optional)
Instructions
- Disassemble the pallet and sand the wood to remove splinters.
- Measure the opening and cut the 2”x4” lumber to create a rectangular frame.
- Attach the pallet slats vertically or horizontally within the frame using wood screws. Leave small gaps (no more than 3 inches) to prevent little fingers from getting stuck.
- Sand the entire gate for a smooth finish, then apply stain or paint if desired.
- Install hinges on one side and a latch on the other, then mount the gate to the wall or door frame. Ensure it swings freely and locks securely.
Things to Consider While Making Baby Gates
Building a homemade baby gate can be a rewarding project, but safety and functionality should always come first. Before you start, keep these key factors in mind to ensure your DIY gate is secure and effective.
- Ensure the spacing between slats or bars is no more than 3 inches to prevent your baby from getting stuck. Avoid sharp edges or loose parts that could pose a hazard.
- The gate should withstand pushing and pulling without wobbling or collapsing. Test its strength by applying pressure before letting your child near it.
- Whether using tension rods, hinges, or wall anchors, make sure the gate is securely fastened. A poorly installed gate can tip over or become a tripping hazard.
- Consider how easily adults can open and close the gate while keeping it childproof. A latch or locking mechanism should be simple for adults but difficult for little hands.
- Use non-toxic, durable materials like solid wood, PVC, or metal. Avoid flimsy fabrics or weak plastics that could tear or break under pressure.
FAQs
1. Can a baby gate damage my walls or door frames?
Yes, depending on the installation method. Pressure-mounted gates can leave marks or dents on trim, while hardware-mounted gates may require drilling. Use protective pads for pressure gates, and opt for wall anchors in drywall to minimize damage.
2. Can I use a baby gate for a fireplace hearth?
Standard gates may not suffice—look for a hearth gate or a freestanding playpen-style barrier designed to wrap around fireplaces. These provide a wider coverage area and are often heat-resistant.
3. Do baby gates work on angled or unusual staircases?
Most gates are designed for standard straight openings. For angled, spiral, or open-rail stairs, you may need a flexible mesh gate or a custom-built solution that accommodates the unique shape without gaps.
Baby gates are essential for every home with a toddler. While there are many types of gates available in the market, they may not fit your need exactly and might need a little modification. On the other hand, DIY baby gates are much more adaptable to your home and fun to build. Read more and try these steps at home by building your own baby gates and making it safe for your loved ones!
Also Read:
Homemade Toy Ideas for Kids
Making Your Own Baby Carrier
Tips to Keep Baby Safe and Protected
Childproofing With Safety Gates and Barriers
Was This Article Helpful?
Parenting is a huge responsibility, for you as a caregiver, but also for us as a parenting content platform. We understand that and take our responsibility of creating credible content seriously. FirstCry Parenting articles are written and published only after extensive research using factually sound references to deliver quality content that is accurate, validated by experts, and completely reliable. To understand how we go about creating content that is credible, read our editorial policy here.
- Author


.svg)


")


