20 Amazing St. Patrick’s Day Crafts For Toddlers, Preschoolers & Kids


St. Patrick’s Day is observed on 17th March every year and marks the date St. Patrick, the foremost patron saint of Ireland, died. It is usually celebrated with religious services and feasts, as it also commemorates the arrival of Christianity in Ireland. Kids will, at some point, learn about the day’s history and significance. However, when they are young, they can be introduced to it through fun craft projects. Here are some amazing St. Patrick’s Day craft ideas for toddlers you can teach your little ones and pique their curiosity.
Simple St. Patrick’s Day Crafts for Toddlers
Parents often wonder how they can introduce their toddlers to different religious and cultural practices. These St. Patrick’s Day art ideas for toddlers two years old or younger are sure to come in handy!
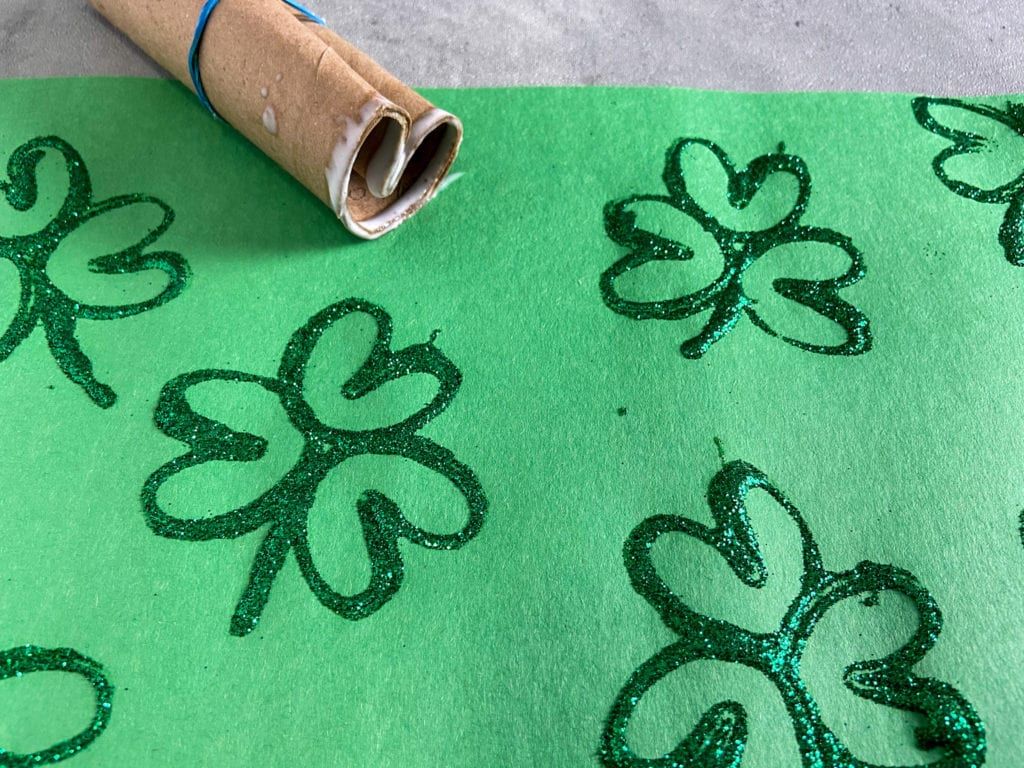
1. Toilet Paper Roll Shamrock Stamp
Source: Pinterest
Supplies
- 1 Toilet paper roll
- Green Paint
- 1 Cardstock paper
- 1 Paper dish
- Tape
- Paintbrush
Instructions
- Take the toilet paper roll and push it inwards to form the shape of a heart.
- Stick a long piece of tape on the top of the two bulges of the heart to secure its shape.
- Now, squeeze some green colour in the paper plate, and spread it evenly with a paintbrush.
- Dip one end of the heart-shaped toilet paper roll in the green colour, and press it on the cardstock paper to start making a shamrock..
- Dip the roll again in the paint, and print two more heart shapes such that their bottoms meet at the centre. The final print should resemble the shamrock.
- Use the paintbrush to fill in the outlines with green colour.
- Paint a stem running down the centre of the shamrock.
- There you have it; your easy-to-make print shamrock painting is ready!
2. Shamrock Wand
Supplies
- Cardstock paper in light and dark green colours
- A pair of scissors
- Gold or green Coloured Glitter Paint Tube
- Glue
Instructions
- Draw three heart shapes on the light green-coloured cardstock paper.
- Cut them along the outlines using scissors.
- Draw 3 to 4 stems on the dark green-coloured cardstock paper (approximately 0.5 inches thick and 6 to 8 inches tall). Cut them along the outlines, and glue them on top of each other. Set aside to dry.
- Glue the three heart shapes at their tapering end such that they resemble a shamrock.
- Glue the stem/wand behind the heart-shaped leaves in the centre.
- Use glitter paint to decorate the shamrock as you want, and set it aside to dry.
- Your vibrant, glittering shamrock wand is ready!
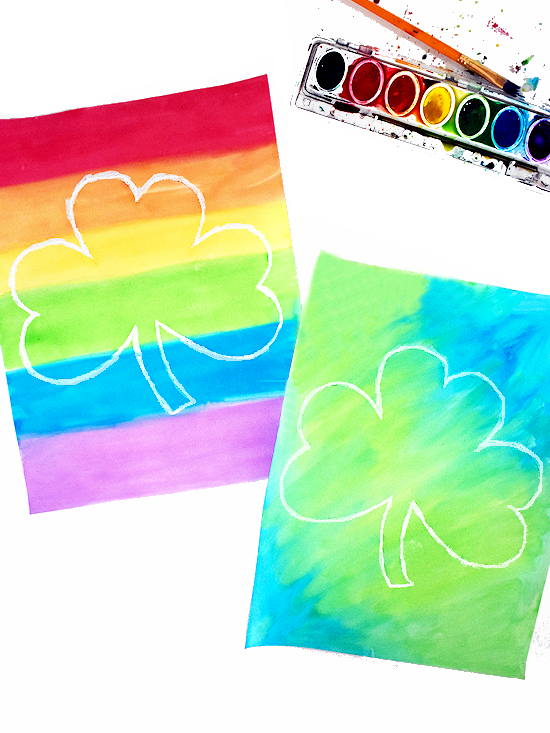
3. Rainbow Shamrock Crayon Craft
Source: Pinterest
Supplies
- White cardstock papers
- White crayon
- Watercolours
- A Paintbrush
- A pair of scissors
- A pencil
Instructions
- Draw a shamrock on the cardstock paper.
- Let your child scribble the white crayon inside the outline.
- Paint the inside of the shamrock drawing with green watercolour. Set it aside to dry.
- Then, use the same white crayon to draw vertical or curved lines outside the shamrock outline.
- Allow the child to paint the colours of the rainbow in each strip.
- Your colourful rainbow shamrock crayon craft is ready!
4. The End of the Rainbow Fingerpainting Craft
Supplies
- Cardstock paper
- Watercolours
- Pencil
- 1 Paper plate
- Paintbrush
Instructions
- Draw a pot on one side of the cardstock paper.
- Squeeze out the colours of the rainbow on the paper plate.
- Get your child to dip a finger in each colour one by one and make a rainbow coming out of the pot (or ending inside the pot).
- Once the rainbow is done, paint the pot brown in colour, and your rainbow fingerpainting craft is ready to be flaunted on the refrigerator!
5. Pom Pom Balls Rainbow Craft
Supplies
- Pom-Pom balls in the colours of the rainbow (Violet, Blue, Green, Yellow, Orange, Red, White)
- Glue
- Pencil
- Black-coloured marker or sketch-pen
- Brown sketch-pen or paint
- Paintbrush
- Cardstock paper
- Gold-coloured paper or buttons
- A pair of scissors
Instructions
- On the cardstock paper, draw a cloud on the bottom half of one end of the paper, and a pot on the bottom half of the other end.
- Draw a rainbow running from the cloud to the pot.
- Trace the outline with a black marker or a black sketch-pen.
- Colour the pot in brown colour.
- Use some glue and stick the coloured pom-poms in each strip to make the rainbow.
- Then, cut some gold circles or take the gold buttons and stick them on the brim of the pot.
These St. Patrick’s Day crafts ideas are simple and apt for kids around two years of age. Preschoolers and kids will need slightly advanced craft ideas to keep themselves engaged. Let’s look at some DIY St. Patrick’s Day crafts for preschoolers.
Fun St. Patrick’s Day Crafts for Preschoolers & Kids
With these craft ideas, you don’t have to worry about what your children can make for St. Patrick’s Day crafts for kids and keep themselves entertained!
1. Leprechaun Bookmark
Supplies
- Orange, green, black, yellow, and light pink coloured cardstock papers
- A pen
- Glue
- A pair of scissors
Instructions
- Take the green cardstock paper and cut two rectangles, one long and thin, and one wide, for the leprechaun’s hat. Glue them perpendicular to each other, such that the long, thin strip forms the brim, and the other rectangle forms the crown or top of the hat.
- Take some black paper, and make a band for the hat. Glue it across the line where the brim and the crown of the hat meet.
- Using some yellow paper, make a square for the hat’s band.
- Then, cut out one small black square to fit inside the yellow square on the band on the hat. Glue the black square on the yellow square.
- Glue the yellow square on the black band of the hat.
- Now, draw and cut out three small green hearts to make a shamrock for the hat. Glue the shamrock on one side of the crown of the hat.
- For the face, draw and cut out a circle from the light pink coloured paper.
- Cut two curved shapes from the orange paper to make the eyebrows.
- Cut two small circles from the light pink paper to make the cheeks.
- Also cut out the shape of a beard from the orange paper.
- Draw the eyes and the mouth with the pen.
- Glue the eyebrows, the pink cheeks, and the beard.
- Then, glue on the hat, and let it dry.
- Your bookmark is all ready to be used now.
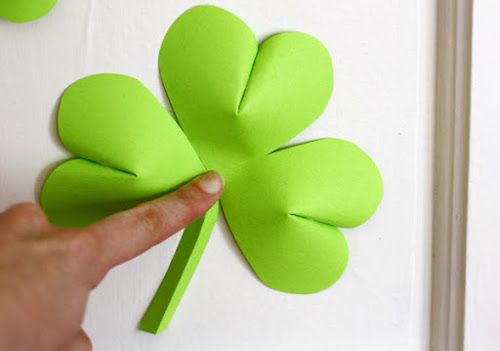
2. 3D Paper Shamrock Decoration
Source: Pinterest
Supplies
- A green cardstock
- Scissor
- Stapler
- Glue
Instructions
- Cut three paper hearts of the same size on green cardstock. Make sure the hearts are wider than usual.
- Make a slit halfway down the middle of the heart. Hold the flap of one heart, fold back, and staple in one place. Fold back the flaps and staple them in place.
- Similarly, make two more hearts.
- Cut a strip from green cardstock, about 4 inches. Apply glue to the top, and place the points of your hearts on the top. Let it dry.
- There you go! Your 3D paper Shamrock decoration is ready.
3. Rainbow Wall Hanging
Supplies
- A paper plate
- Cotton
- Glue
- Coloured paper streamers in violet, blue, green, yellow, orange, and red
- A pair of scissors
- A string
Instructions
- Take the paper plate and cut it in half.
- Take one half of the paper plate and glue cotton all over it.
- Separate streamers in the rainbow colour sequence.
- Glue the ends of each streamer behind the flat side of the paper plate with the cotton.
- Glue a string on the top of the plate to make a handle to hang it on the wall or by the ceiling.
4. St. Patrick’s Day Shamrock Charm
Supplies
- Green polymer clay
- Green acrylic paint (optional)
- A charm hook
- A toothpick or a skewer
- Polymer clay varnish
- Hot glue
Instructions
- Mould the polymer clay with your fingers to soften it.
- Make three same-sized balls, about two cms in diameter.
- Take one ball, flatten it, pinch the bottom to make a triangular/tapering end.
- Use a skewer or a toothpick to make the centre pit of the heart.
- Repeat the two steps above to make two more leaves of the shamrock charm.
- Then, gently squeeze these three leaves together to form the shamrock.
- Take some more polymer clay to make a stem for the shamrock charm. Hold it at the centre of the shamrock leaves and gently push it until it sticks.
- Using your fingers, smooth the pieces to make them look like one piece of polymer clay.
- With the toothpick, make a hole on one of the leaves. We will insert or glue the charm hook in here.
- Then, bake the charm in an oven at 225 F for 30 mins.
- When it’s cooled, use the hot glue to glue the charm hook.
- Once the glue sets and if needed, you may paint the charm with green acrylic paint.
5. Shamrock Paper Quilling Craft
Supplies
- A card in the size of your choice
- Green-coloured paper strips for quilling (1 cm thick)
- Watercolours
- A toilet paper roll
- Toothpick or skewers
- A pair of scissors
- Glue
- Pencil
Instructions
- Take the card and draw horizontal lines for the rainbow.
- Colour each strip in the colours of the rainbow, maintaining the sequence. Set it aside to dry.
- In the meantime, take the toilet paper roll and cut 0.5 inch-thick circles. Make three such circles.
- Push each circle inside to make a heart shape. Glue the heart shapes such that their tapering ends meet the centre to resemble a shamrock.
- Cut another circle from the toilet paper roll and press it slightly to form a thin, hollow rectangle. Glue this rectangle at the centre of the shamrock. Keep the shamrock aside.
- Now, take the green paper strips, and, using a skewer or toothpick, roll each strip until you have enough green paper quills for the card.
- Glue the shamrock on the rainbow card.
- Then, glue each green paper quill inside the shamrock outline.
- If the paper quills seem sunken inside the outline, you can add another layer of quills.
6. Rainbow Pop Up Card
Supplies
- A blank card
- Cardstock papers in the colours of the rainbow (square-shaped)
- A pair of scissors
- Glue stick
- A black pen
- Some colours of your choice
Instructions
- Draw a shamrock on top of the card and colour it green.
- Take the cardstock papers and make a fan by folding each side alternately.
- Lay out each fan in this sequence – violet, blue, green, yellow, orange and red.
- Then use the glue stick and stick each end of the fan to the other, forming a large rainbow-coloured fan.
- Glue the extreme ends of the fan inside the card such that the rainbow pops up when you open the card.
- Decorate the card as you wish with the rest of the colours.
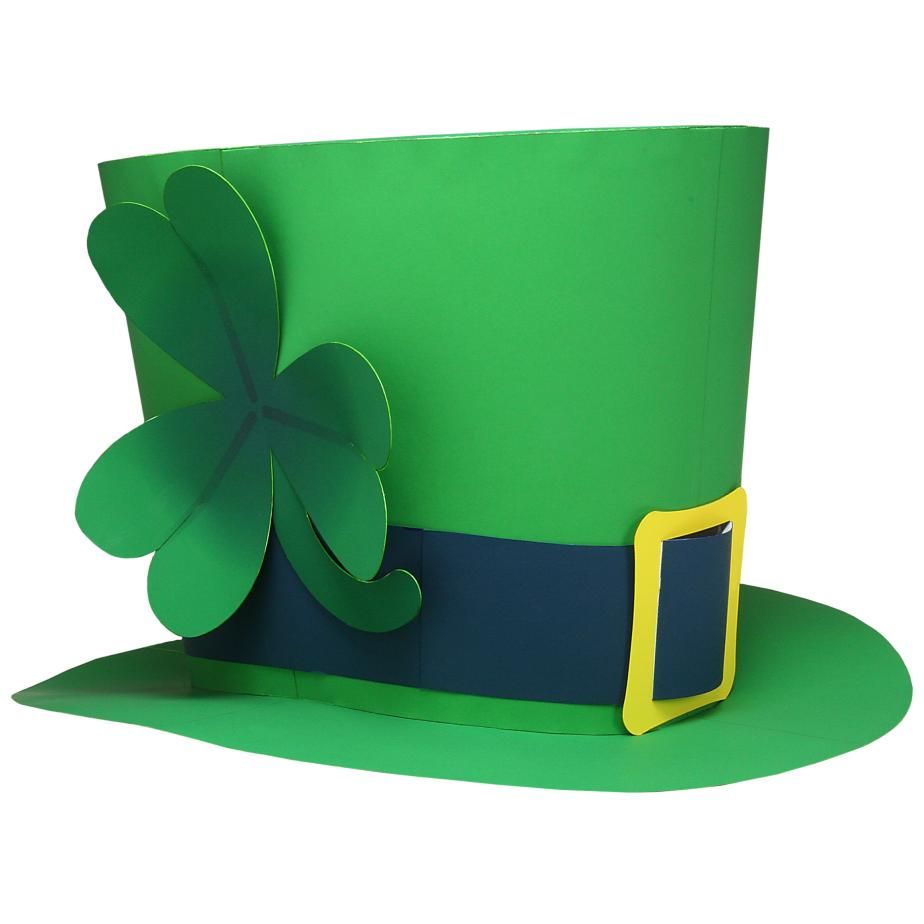
7. St. Patrick’s Day Paper Hat
Source: Pinterest
Supplies
- A paper cup
- Green cardstock paper
- A black ribbon or a long strip of black paper for the band.
- Yellow or gold-coloured paper
- Green-coloured pipe cleaner
- Glue
Instructions
- Take the green cardstock paper and cut a strip as thick as the height of the paper cup.
- Glue the cardstock paper around the paper cup and set it aside.
- Cut another, thinner green strip from the cardstock paper for the rim of the hat.
- Hold the paper cup upside down and carefully apply glue at the end of its rim to glue this green-coloured rim of the hat.
- Now, take the black ribbon and glue it over the bottom of the hat, across the line where the rim of the hat meets the crown of the hat.
- Then, use some gold or yellow-coloured paper and cut a square out of it. Glue it at the centre of the black ribbon.
- Take the pipe cleaner, and mould it to form an instant shamrock.
- Glue it at the corner of the yellow or gold square above the back ribbon.
- Your Paper Hat is now ready!
8. Shamrock T-Shirt
Supplies
- A white or Green t-shirt
- White or Green Fabric Paint (choose the green fabric paint if you have a white t-shirt, or white fabric paint if you have a green t-shirt)
- Three Heart-Shaped Cardstock Paper Cutouts
- One Thin Rectangular Cardstock Paper Cutout for the Stem
- Paintbrush or toothbrush
- A 1 square feet piece of cardboard
Instructions
- Insert the 1 square feet piece of cardboard in the shirt and place it right behind where you want to paint your shamrock.
- Lay the t-shirt on a flat surface.
- Place the heart and the stem cutouts on the t-shirt to make the shape of the shamrock. Keep some space between each leaf.
- Then, carefully choose the colour of your choice and paint or sprinkle the colour with the help of a toothbrush in between and leaves and all around the shamrock. Leave it to dry.
- Now you have a customised t-shirt ready to flaunt on St. Patrick’s Day!
9. Rainbow Mason Jar
Supplies
- A mason jar with a lid
- Strips of cardstock paper (in the colours of the rainbow)
- Glue
- Gold coins or circles cut out of gold paper
- A pair of scissors
Instructions
- Take the mason jar lid and place it on a flat surface. Ensure the inside of the lid is facing you.
- Now, measure the height of the mason jar and cut all the strips in that length.
- Take some glue and stick the rainbow-coloured paper strips inside the mason jar lid. Let is dry.
- Then, fill the jar with fake gold coins or the circles cut out of gold paper.
- Once the paper strips on the lid have dried, carefully insert the strips inside the jar and close the lid.
- You have your very own rainbow and a jar of gold to remember St. Patrick’s Day with!
10. Popsicle Stick Leprechaun
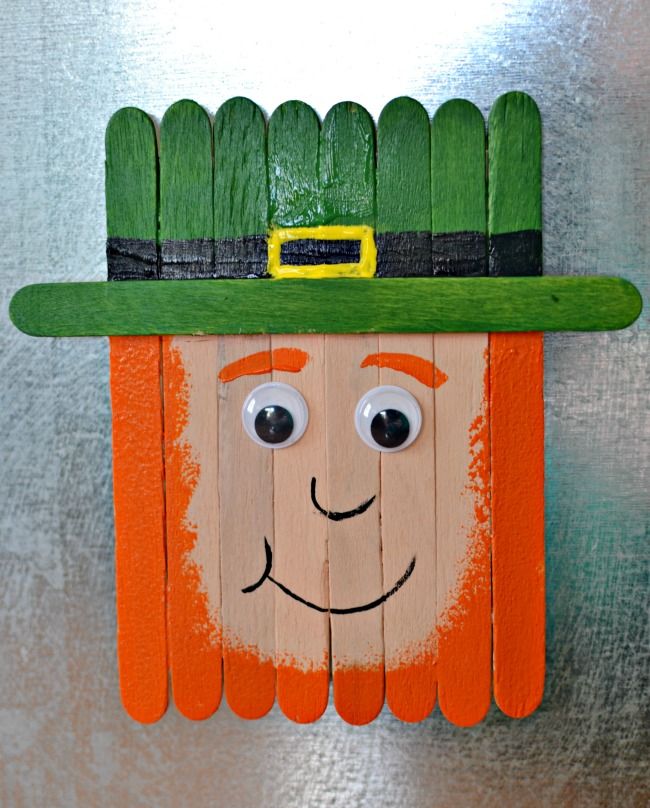
Source: Pinterest
Supplies
- 9 Popsicle sticks
- Paint
- A cardboard
- Wiggly eyes
- Glue
- Paintbrushes
Instructions
- Paste eight Popsicle sticks vertically on cardboard. Remove the excess cardboard from the ba
- Paste the last Popsicle stick to the front over the one-third portion, creating the rim of the hat.
- Paint the bottom portion with peach or skin colour to create the face.
- Paint the top part with green colour to make a leprechaun’s hat.
- Use orange colour to make the beard. Now, paint the belt and buckle of the hat.
- At last, paste the wiggly eyes and make a nose and lips using a sketch pen.
- Voila! Your Popsicle leprechaun is ready!
11. Shamrock Pins
Supplies
- Cardstock paper (dark and light green)
- Pale yellow or green ribbon
- Safety pins
- Glue stick
- Hot glue
- A pair of scissors
- Pencil
- Shamrock template
Instructions
- Trace the shape of a shamrock on the dark green coloured cardstock paper and cut it along the outline.
- Draw a smaller shamrock on the light green coloured paper and cut it out.
- Cut one long ribbon and fold it in half.
- Now, using the glue stick, glue the light green coloured cutout inside the dark green coloured cutout.
- Glue the ribbon behind the shamrock such that you get two long tails running down the shamrock.
- Once it dries, use some hot glue to stick a safety pin behind the shamrock and let it dry completely.
12. Shamrock Pot of Gold
Supplies
- A clay pot
- A shamrock stencil
- Acrylic Paint
- Paintbrush
- Tape
Instructions
- Take the shamrock stencil and carefully tape it to the pot.
- Paint the entire pot in black or brown colour. You may also decorate it as you wish. Let the paint dry.
- Then, carefully remove the stencil and paint the shamrock in a bright green colour.
- When the colour dries completely, you can fill the pot with gold coins or even candy!
13. Shamrock Handprint Art
A cute and sentimental craft where kids use their handprints to create a shamrock!
Supplies
- Green paint
- White cardstock or paper
- Paintbrush
- Marker
Instructions
- Pour green paint onto a plate.
- Have the child dip their hand in paint and press it onto the paper three times to form a shamrock shape.
- Use a paintbrush or marker to draw a stem.
- Let it dry, then write a fun St. Patrick’s Day message on it!
14. Leprechaun Paper Plate Mask
A fun mask featuring a leprechaun’s face, complete with a bright orange beard!
Supplies
- Paper plate
- Orange construction paper
- Green construction paper
- Black marker
- Scissors
- Glue
- Craft stick
Instructions
- Cut a hole in the center of the paper plate for the face.
- Cut strips of orange paper and curl them with a pencil to create the beard.
- Glue the orange strips around the plate.
- Cut out a green hat and a black band, then glue them on top.
- Attach a craft stick at the bottom to hold the mask.
15. Lucky Shamrock Wand
A magical wand kids can wave around for good luck!
Supplies
- Green construction paper
- Wooden craft stick
- Glue
- Glitter
- Scissors
- Ribbon
Instructions
- Cut out a large shamrock shape from green paper.
- Decorate it with glitter for a sparkly touch.
- Glue it to the top of a craft stick.
- Attach ribbons to the stick for extra fun!
We hope these ideas help your kids explore and engage in the fun and adventurous side of St. Patrick’s Day. May you have all the luck and happiness that life can hold, and, at the end of your rainbow, may you find a pot of gold!
Also Read:
St. Patrick’s Day Quotes, Wishes & Messages
Amazing St. Patrick’s Day Crafts For Toddlers & Kids
Saint Patrick’s Day Facts, History & Activities for Kids
Was This Article Helpful?
Parenting is a huge responsibility, for you as a caregiver, but also for us as a parenting content platform. We understand that and take our responsibility of creating credible content seriously. FirstCry Parenting articles are written and published only after extensive research using factually sound references to deliver quality content that is accurate, validated by experts, and completely reliable. To understand how we go about creating content that is credible, read our editorial policy here.
- Author


.svg)


")


