Amazing Bird Crafts for Kids


Birds are extremely popular with kids and getting them involved in bird crafts is something that will get their creative juices flowing. Craftwork is known to enhance the fine motor and gross motor skills of children. It urges them to be flexible with their fingers and improves hand-eye coordination. Preschool bird crafts are suitable for children of slightly older age too as they can make some modifications to them of their own. It is recommended to get kids to be involved in arts and crafts at a young age as it helps to build their cognitive abilities and helps them in their future.
Beautiful and Colorful Birds Crafts for Kids
Below is a collection of birds arts and crafts that you can churn with common supplies and materials that lie around your home or school. Most of these are ideal for preschoolers and toddlers. Some older kids will enjoy them too. It is easy and simple to make birds out of anything- paper, CD’s, paper plates, toilet or tissue paper rolls. You can even make bird craft suited to the weather – Easter chicks for spring, turkeys for Christmas, owls for winter, robins and ducks for summer and cardinals and blue jays for spring.
1. Bird Nest Craft
An adorable bird craft for toddlers, kids will learn a lot about birds and their homes. Use different coloured eggs for different birds- cardinals, robins, etc.
Supplies
- Paper plate
- Brown, blue and orange construction paper
- 2 plastic eggs
- Brown craft paint
- Sponge brush
- Scissors
- Glue
Instructions
- Paint the paper plate brown and set aside to dry.
- Cut the brown construction paper into thin long strips.
- Cut two small triangles out of the orange construction paper to use them as beaks.
- Cut medium-sized triangles out of the blue construction paper and use as wings.
- Use the bottom part of the plastic egg and glue the beak to the top. Glue the wings to both sides of the egg and repeat with the second egg.
- Glue the plastic egg to the middle of the brown paper plate.
- Spread out and glue the brown strips of paper around the birds to make the nest.
2. Cupcake Owl Craft
A fun craft, this involves making owls with cupcake cases. It involves a lot of sticking making it a fun, messy craft! This could also be a lovely birthday card for an owl lover.
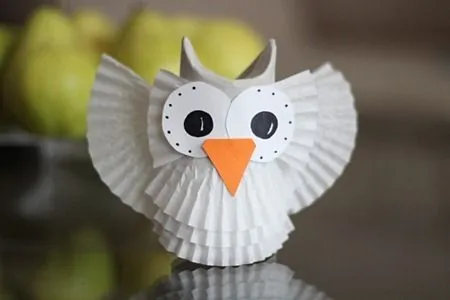
Source: Pinterest
Supplies
- Card or paper
- Cupcake cases ( preferably large ones)
- 2 mini muffin cases
- Marker
- Glue
Instructions
- Carefully cut out the centre from cupcake cases so that you have strips of the folded sides.
- From these strips cut two small pieces to make the feet. Glue it to the card paper towards the bottom.
- Cut out a strip that is longer than the two feet and stick it above the feet. It should overlap the feet or feel like an umbrella.
- Keep cutting and glueing similar strips one above the other to build the body.
- Squash a cake case flat and cut it into half. This will form wings and glue to the card.
- Squash the mini muffin cases and glue them to the owl to make the eyes.
- Stick two white paper circles, and use a black marker and draw the pupils.
- Try to use a larger piece of card to start with.
3. Handprint Chicken Craft
A lovely farm craft for preschoolers, your child will enjoy making their handprints. Capture their tiny hands and make them the wings and comb on the chicken are that you will make. With some paper plates, some paint and construction paper, there is a lot you can do with this craft to get your kid all excited.
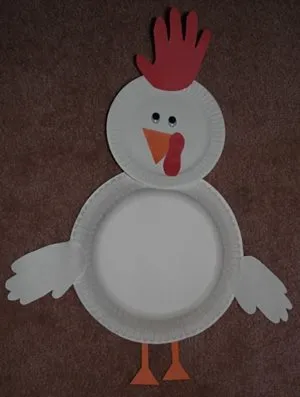
Source: Pinterest
Supplies
- One large paper plate
- One small paper plate
- Orange, red and white coloured construction paper
- A template of a chicken
- Pair of googly eyes
- A pair of scissors
- Glue
- Scotch tape
- Paint
Instructions
- Turn the big paper plate upside down. Leave the small paper plate ( the side on which you serve the food) upwards. Attach the small paper plate( the right way) over the big paper plate to make the head of the chicken. The large plate is the body of the chicken.
- Trace your child’s handprint on the red construction paper. Alternatively, you could dip their hands in paint and get them to print it on a white paper. Make sure their fingers are well spread out. Cut the handprint and glue it to the top of the small paper plate to make the feathers on the top.
- Next, trace your child’s handprint on white construction paper. This time their fingers must be close together as these handprints will form their wings. Cut them and glue them to the body (large paper plate) on either side to make wings.
- Glue the google eyes
- Cut out a small beak in the shape of a triangle on red construction paper and a tiny peanut shape on the red construction paper.
- Glue this on the small paper plate to make the beak and nose.
4. Paper Plate Peacock Craft
Vibrant, gorgeous and colourful- this one simply converts a paper plate into a burst of life. With some paint, glue and scissors, it is amazing how you can introduce your child to a whole new world!
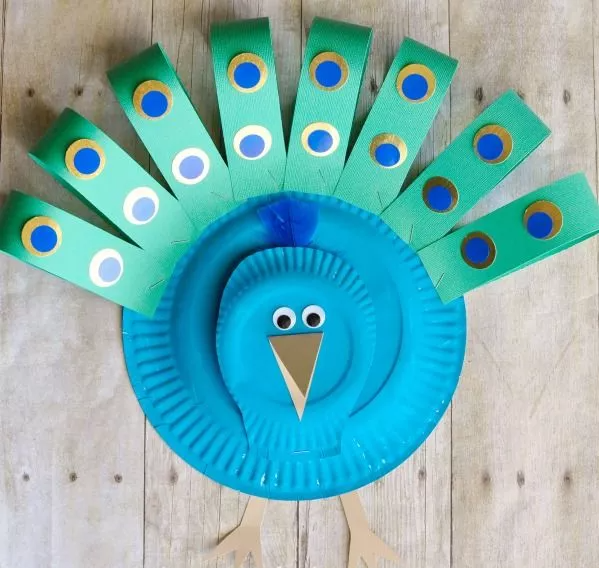
Source: Pinterest
Supplies
- 9-inch regular sized paper plate
- 6-inch small-sized paper plate
- Turquoise coloured paint
- Paintbrush
- Green card stock or construction paper
- Gold and tan cardstock paper
- Circle punch
- Blue circle stickers ( ¾ inch)
- Scissors
- Stapler
- Glue
- Blue feather
Instructions
- Trim the small paper plate around the sides to make the head of the peacock. Try to cut it in a tapering shape that tapers upwards.
- Paint the paper plates with turquoise paint and set them aside to dry.
- When they are drying, cut out long strips of the green card stock paper. Cut out 1 ½ inch long strips. Cut about 8 strips. Cut out a triangle beak and feet from the tan coloured paper. Cut out a handful of gold circles to decorate the peacock feathers. Use the hole punch to cut out perfect circles. (try to use a large hole punch).
- When the paper plates dry, staple the smaller paper plate which is the head to the large paper plate. Fold your green strips and glue or staple it to the ends of the large paper plate to make the feathers.
- Glue the beak, eyes and feet. Stick the blue feather on the top of the head.
- Lastly, stick the gold circles and blue stickers on the green feathers.
5. Wine Cork Crow Craft
Don’t throw out those wine corkscrews. They make for adorable crow bird crafts. Quirky, fun and adorable these are super easy and make for some good décor ideas.
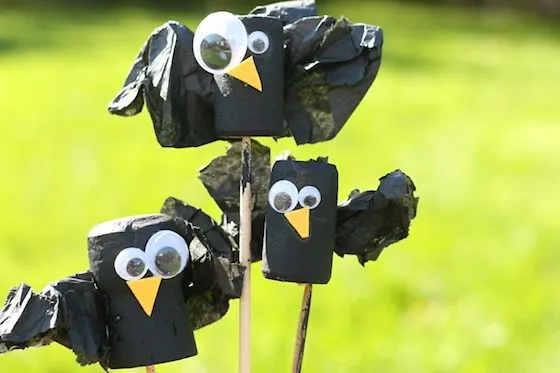
Source: Pinterest
Supplies
- Wine corks
- Black paint and paintbrush
- Googly eyes
- Yellow card stock or foam paper
- Black craft feathers
- Glue
- Skewers
Instructions
- First, push the wine corkscrews into the skewers. Hold on to the skewers as you paint the corkscrews with black paint. Leave them aside to dry.
- Once dried, glue the googly eyes and beaks made out of yellow paper or foam.
- To complete them, stick the black feather on to the sides to make wings. You could use some black tissue paper, crumple them and stick it on the sides to make wings too.
Simple, easy and fun these bird crafts can make for some great quality time with kids. Educative and exciting, your kids will enjoy making them.
Also Read:
Creative Paper Craft Ideas for Children
Ocean Crafts for Preschoolers and Children
Fun Penguin Crafts & Arts for Children
Was This Article Helpful?
Parenting is a huge responsibility, for you as a caregiver, but also for us as a parenting content platform. We understand that and take our responsibility of creating credible content seriously. FirstCry Parenting articles are written and published only after extensive research using factually sound references to deliver quality content that is accurate, validated by experts, and completely reliable. To understand how we go about creating content that is credible, read our editorial policy here.
- Author


.svg)


")


