15 Easy & Amazing Fall Craft For Toddlers, Preschoolers and Kids


“Every artist was first an amateur.” – Ralph Waldo Emerson
The Fall Season has finally arrived. It’s time for kids to learn new things, make happy memories, celebrate the season of chirping crickets and dry leaves kissing the grounds. Keep the little ones busy with art and craft projects and bring out their creative best. Here are some options for fall art for toddlers. Make a bucket list of crafts you will make with kids this fall. Let the creativity flow. The activities will foster a healthy relationship among kids when done in a group with peers and make happy memories when done with the family. The prized possessions are great to display around the home or to gift grandparents and close relatives. The kids will feel cherished when they see their art pieces displayed. Encourage them to involve in more activities rather than spending endless hours flipping channels on television or play with mobile phones and video games.
Easy Home-Made Fall Crafts For Toddlers
“Tell me and I forget, Teach me and I remember, Involve me and I learn” – Benjamin Franklin
Bring out your cardstocks and glitter, ribbons and glue, paints and brushes. Cover the art table with a protective sheet or old bedsheet and get the aprons on. It’s time to get messy and create some awesome masterpieces with your little ones. Here are some awesome autumn crafts for toddlers to try. Also included are some ideas of fall crafts for 2-year olds. Have a theme for craft projects based on various topics like nature, season, animals, food and make creative learning interesting. Most of these crafts are safe for kids to do by themselves. However, it is recommended that an adult is around for supervision to avoid accidents and spills. Reduce the screen time, television and mobile phones as they get busy with crafty times. A lot of these crafts involve things they can collect from the backyard or from the cabin trips you plan in the woods or beach. Encourage kids to pick up interesting things like pinecones, acorns, pebbles, shells, twigs, leaves, and other pretty things found in nature. These can be used for crafts and home décor. Inculcate hobbies that they will enjoy and bring them close to nature.
1. Colourful Pine Cones
Pinecones are fascinating. Everyone loves to collect them and store them in a jar. The wonderful creation of nature is perfect for arts and crafts. Use them as baubles on the Christmas tree or display them across the home. Pinecones will add beauty to your art and craft projects.
You Will Need
- A shoe-box to keep the mess contained
- Pinecones picked up from your backyard or collected on your last treasure hunt trip to the woods
- Kids friendly paints
- White paper to line the shoe box
Let’s Create
- Dab some paint on the paper in the shoe box.
- Add 2-3 pine cones at a time.
- Roll the pine cones in the shoebox to catch the paint.
- Leave them to dry for a few hours or overnight.
- Add some glitter for the extra sparkle.
- Your colorful and shiny pinecones are ready.
2. Paper Bag Puppet
Puppets never cease to fascinate. They are loved by kids of all ages. Create a special character and give them a voice. The two can talk for hours together. Get ready to record the conversations.
You Will Need
- Paper lunch bag
- Yellow paper cut into noodles type strips or yarn
- Googly eyes
- Glue
- Marker pens
- Paper cutouts for nose
Let’s Create
- Take the paper lunch bag.
- Stick the yellow paper noodles or yarn to make hair for your puppet.
- Stick the googly eyes.
- Stick the nose.
- Draw a big smile with a marker.
- Make two large dots for the cheeks.
- Tadaa .. your puppet is ready for the show.

3. Yarn Fruits
Fruits are healthy, crafting is fun. Combine the two for some awesome time under the sun. Let there be a purple apple and a pink banana, no end to the imagination.
You Will Need
- Paper plates or cardstock
- Safety scissors
- Colorful yarn or tissue paper balls
- Glue
Let’s Create
- Cut paper plates or cardstock in the shape of fruits.
- Stick the yarn in the freehand pattern.
- If the yarn is difficult to handle, replace it with tissue paper rolled in small balls.
- Your colorful fruits are ready.
- String them in a thread to make a beautiful fruit banner for your room.
4. Birdfeeder
Invite the little birdies to your balcony. Feed them, make them your buddies. Click lovely pictures of your feathered friends for the picture book.
You Will Need
- Pinecones
- Peanut butter
- String
- Bird seeds
Let’s Create
- Let your little one cover the pinecone with peanut butter.
- Help them roll it in the bird seeds.
- Attach a string and hang it in the balcony.
- You have a visitor for lunch.
5. Froot Loops Trees
Feel close to nature with beautiful and colorful trees made from cereals.
You Will Need
- Froot Loops or any colorful cereals
- Or you can color some pasta
- Empty toilet paper rolls
- Glue
- Cardstock paper
Let’s Create
- Let’s start with colouring the froot loops or pasta in vibrant shades.
- Cut out the cardstocks in the shape of trees.
- Glue them into the trees.
- Make your colorful fruit loops forest.
DIY Fall Crafts for Pre-Schoolers and Kids
It is important to keep kids busy. Create fall art for pre-schoolers by using leaves, dried flowers, twigs, pinecones and other treasures found in nature. Try these amazing ideas of fall art for kids.
1. Leaf Clay Tray
There are a lot of leaf crafts for slightly grown-up kids to try. Let them take help from elder siblings or grown-ups. These will make for a wonderful gift to give on Christmas, birthdays and other occasions. Keep tiny trinkets or jewelry on it or simply display the leafy trays on the center table.
You Will Need
- Air-dry clay
- Large-sized leaves that would look good as a tray
- Acrylic paints
- Brushes
- Mod podge or some kind of sealer
- Knife – to be used under adult supervision
Let’s Create
- Select the leaf you want to use as a stencil for your tray.
- Roll out the air-dry clay on a flat surface with a rolling pin.
- Stamp your leaf by pressing it firmly on the clay.
- Remove the leaf and cut along the edges carefully. Let an adult help with this part.
- Trim out the excess clay to get perfect leaf cut out.
- Raise some sections of the tray to form curvature with space in between.
- Use water if needed to wet the clay a little while molding.
- If you want to make your project resemble a bowl, place the clay leaf in a bowl.
- Allow the project to dry on a cookie rack for a day or till it feels hard.
- Flip it and dry the other side for a day.
- It’s time to bring out the acrylic paints. Darker shades would require 2 coats while a lighter color will need 3 coats of paint.
- Gold edges will add the sparkle to the project. A fully gold tray will be a pretty option.
- Seal the project with mod podge or a sealer.
- If you would like to use the tray as a soap dish, a coat of waterproof sealer will be required.
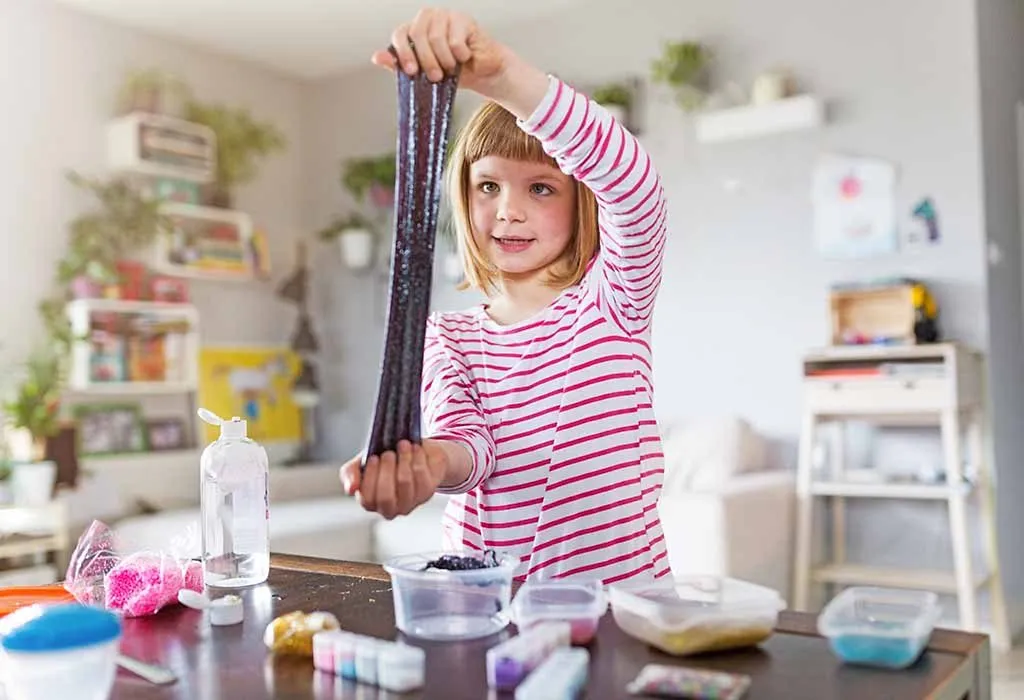
2. Home-made Slime
Playing with slime is therapeutic. All the stretching and squishing and kneading can be fun. There are chances of epic fails initially, but you will have a great time trying. This 3-ingredient slime recipe is a foolproof, fail-safe, tried and tested version. Stick to the measurements and voila, you have your secret slime monster in making. Gather kids from the neighborhood and have a great time together.
You Will Need
- 6 oz Elmer glue
- ½ teaspoon baking soda
- ½ tablespoon contact lens solution. This should have boric acid and sodium borate. Ask mommy to check the list of ingredients on the bottle.
- Water if you want stretchy slime. 2 tablespoons to a quarter cup
- Glitter to add the magical sparkle to the slime
Let’s Create
- Let’s start by putting on gloves for safety as we are handling chemicals. Put on the safety goggles as an extra precaution for eyes.
- Take a bowl and pour Elmer’s glue in it.
- Add baking soda and mix it well.
- If you want stretchy slime, add water at this stage.
- Now its time to call an adult to help you with the next step.
- Slowly add the contact lens solution while the mixing continues. Add a few teaspoons at a time to avoid epic fails.
- Keep mixing till the mixture starts hardening and slime begins to form.
- If it feels too sticky, apply some baby oil to hands and knead for some more time.
- Add the glitter and knead some more.
- Voila! You have your little science lab and a scientist who can make slime in rainbow colors.
3. Leaf Painting
This is as simple as it can get. You can create a painting with leaves of different shapes and sizes. Later this paper can be used to create greeting cards, bookmarks, postcards and more.
You Will Need
- Leaves in different sizes and shapes
- Cardstock
- Paint
Let’s Create
- Wipe clean your leaves of any dust or dirt.
- Apply a generous amount of paint on the back of the leaf.
- Press it hard on the cardstock to get a perfect impression of the midrib and small netted veins of the leaf.
- Use different colors and leaves to get a beautiful pattern on the cardstock paper.
- Let the impressions blend with prints and colors overlapping each other.
- Let the project dry.
- You have a colorful hand-painted paper ready to cut in different shapes and sizes and use them in various projects.
4. Playdough
There is nothing like too much playdough. Kids can create a lot of projects with this versatile product. It can keep them busy for hours and days. Wouldn’t it be great to make this at home and have an unlimited supply at your disposal? Add fragrance like pumpkin, apple pie or maple to make it smell like the fall season. Make them in different colors and store them in air-tight containers for using as and when you want. Cover them in saran wrap for longer shelf life. Kids are going to be very-very messy and very-very happy making their playdough.
You Will Need
- 1 cup flour
- 2 teaspoon cream of tarter
- 1 cup of water
- Food coloring
- 1 tablespoon cooking oil or olive oil
- ½ cup of salt
- Spice mix or essence for fragrance
Let’s Create
- Take a large bowl.
- Combine flour, salt, spice mix or essence and cream of tartar, mix it well.
- Take another large pot.
- Combine water, oil and food color, blend it well.
- Add dry mixture to the pot and mix it well.
- Cook over medium flame till the dough starts to form.
- Once it starts forming a ball, switch off the heat.
- Let the mixture cool down, knead it well till you get a soft dough.
- Make in different colors and enjoy creating art pieces with cookie cutters, rolling pins, and stamps.
5. Mason Jar Scarecrow
Fall in love with this adorable scarecrow made from a mason jar. Bright up the work desk or the mantle with this handcrafted beauty created by your kid. Use it as a stationary holder to keep your pens and pencils in place.
You Will Need
- Mason jar
- Acrylic paints
- Hay, real or cut from paper
- Burlap cloth
- Googly eyes
- Fake sunflower
- Permanent markers
- Paintbrushes
- Glue gun
- Safety scissors
Let’s Create
- Paint the outsides of the mason jar in colors of your choice and let it dry well. Tan would be an ideal choice for this part.
- Paint or stick a triangle for nose in a bright color like orange.
- Draw a smile with a permanent marker. Keep it crooked or toothy as you like.
- Extend the coloring to cheeks with 2 large dots.
- Stick the googly eyes with the glue gun.
- Tie a small bundle of faux hay.
- Tie a burlap ribbon around the mouth of the mason jar.
- Glue the hay for hair.
- Stick the sunflower to add to the beauty.
- Keep it at windowsill to shoo away the birdie or adorn your desk with it.
6. Paper Turkey Wreath
Ring in the holiday season early. Hang a hand-crafted turkey wreath on the door. Made with recycled materials, this beautiful wreath will adorn your home to welcome friends and family.
You Will Need
- Paper plate
- Paint
- Paintbrushes
- Construction paper
- Googly eyes
- Safety scissors
- Glue
- Red balloon – deflated
- Stapler and pins
Let’s Create
- Cut out the center circle from the paper plate to get a rim for the wreath.
- Paint the outer rim in brown and let it dry completely.
- Cut long strips of colorful construction papers.
- Cut a circle for turkey’s head and a triangle for beak from the construction paper.
- Stick googly eyes, beak, and red balloon to create the face of turkey.
- Staple or stick the face of the turkey to the lower part of wreath’s rim.
- Fold and staple colorful paper strips to create feathers for the turkey.
- Your wreath is ready to adorn the door.
7. Leaf Garland
The time of the year when the leaves are falling from the tree. Recreate the magic of the fall indoors with this beautiful leaf garland.
You Will Need
- A bag of artificial leaves or DIY leaves
- Elmer’s glue
- Colorful glitter
- Hole punch
- Colorful ribbons
- A large twig
Let’s Create
- Let’s start with making artificial leaves.
- Take a thick cardstock and outline with leaves as a stencil.
- Cut the outlines and your artificial leaves are ready.
- Or use artificial leaves readily available at any craft store.
- Apply Elmer’s glue on the leaf.
- Sprinkle glitter to cover the entire leaf.
- Let the leaves dry.
- Dust out the excess glitter.
- Punch a hole in the leaf and tie a ribbon for the string.
- Attach all the ribbons to form a garland on the twig.
- You have your falling leaf garland ready to welcome the season.
8. Leafy People
Make beautiful artwork with leaves arranged in the form of people. Make individual greeting cards or create a family and frame it.
You Will Need
- Leaves of different shapes and sizes
- Glue
- Card stock
- Googly eyes
- Markers
Let’s Create
- Take cardstock.
- Arrange leaves to form a human figure.
- Stick them with glue.
- Stick googly eyes.
- Draw a smile.
- Your leafy people are ready.
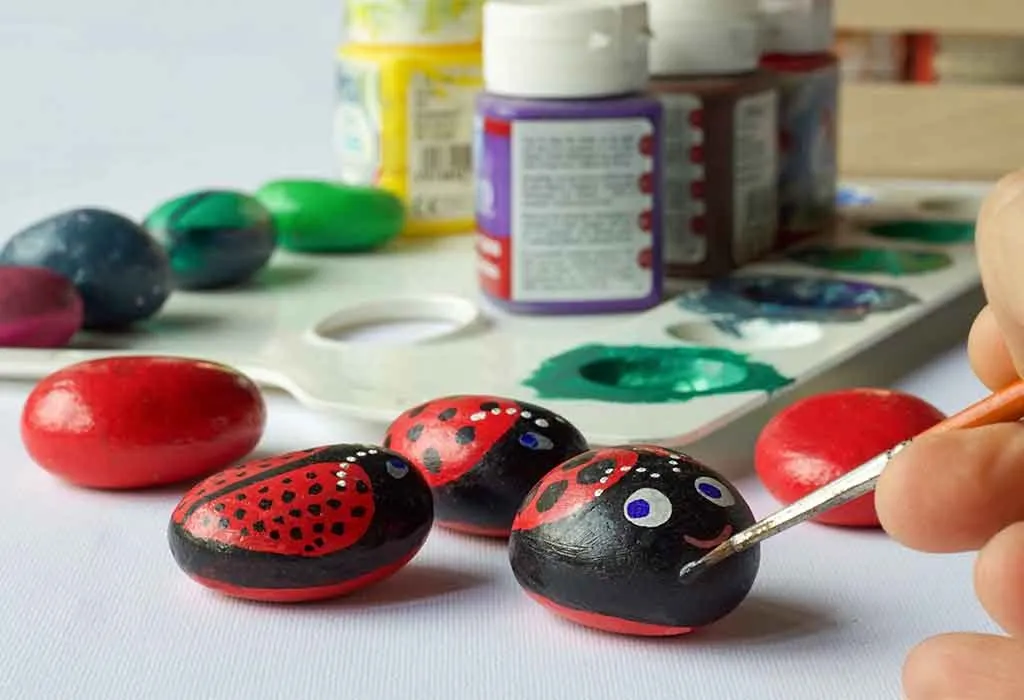
9. Rocky Zoo
This one is a great use of your rock collection. Use them as paperweights or create your rocky zoo. Create beautiful ladybird, hedgehog, turtle or whatever you fancy.
You Will Need
- Smooth rocks, collected from the last trip along the river bed or the woods
- Or you can purchase them from a craft store
- Acrylic paints
- Brushes
- Markers
- Googly eyes
Let’s Create
- Wash the stones well and dry them.
- Apply 2-3 coats of paint depending on what you are creating. For example, if you are creating a ladybird, you will need to paint it red and black.
- Stick the googly eyes or paint them with a marker.
- Create a mini zoo with many stone animals and bugs put together.
- You can even paint cactus and other beautiful things in the same way
10. Hand Tree
This one is fun to make. Your fingers form the branches. There is a lot of fun making handprints in many colors and then assembling them to make trees. The things are going to be very messy, and the thumb rule is – the more is the mess, the more is the fun. The giggles and laughter will just not stop.
You Will Need
- Cardstock
- Glue
- Marker pens
- Acrylic paints
- Water
- Washable plates
- Safety scissors
- Aprons for everyone involved
- Newspaper to cover the table and floor
Let’s Create
- Squeeze some paint on the plate.
- Dilute with some water.
- Dip the palms of little one in paint and press them on the paper.
- Create many such handprints in different colors.
- The plate and the hands need to be washed well with every color change.
- Once you have a substantial number of palm prints. Its time to let things dry well.
- Now draw the marker outline with hands as a stencil.
- Cut along the outlines and you have many handprints ready.
- Draw trunk of the trees from card stock and paint it brown.
- Stick colorful hands to create trees.
- Many such trees can be put together to make a forest.
- Stick pictures of animals and complete the picture story.
Besides these October crafts for kids, you can keep them occupied with activities like fireless cooking, helping with chores at home, shopping and more. Have a great time celebrating the fall season.
Was This Article Helpful?
Parenting is a huge responsibility, for you as a caregiver, but also for us as a parenting content platform. We understand that and take our responsibility of creating credible content seriously. FirstCry Parenting articles are written and published only after extensive research using factually sound references to deliver quality content that is accurate, validated by experts, and completely reliable. To understand how we go about creating content that is credible, read our editorial policy here.
- Author


.svg)


")


