Diaper Wreath Decoration for a Baby Shower


Baby showers are a time to try out creative decoration and gift ideas. If you or anyone you know is throwing a baby shower, diaper wreaths are a must-have item on your list of decorations. While you can buy them off-the-shelf, a diaper wreath DIY is a more fun and creative way to match it with the rest of the decorations. Continue reading for all you need to know about diaper wreath ideas and how to make professional-looking adorable diaper wreaths.
How to Make a Diaper Wreath
You can make a perfect looking diaper wreath with some basic craft skills, a few craft items and a lot of diapers. Since it is an artistic gift, there are no rules on how to make them and what goes into it. In general, diaper wreaths are made out of a cardboard base with diapers arranged around. Some designs use open diapers, while most of them use a wreath with rolled up diapers adorned with coloured ribbons. A stuffed animal usually goes in the middle of the wreath and, if you are feeling extra creative, you can make a washcloth animal for it. Most of the items needed to make it will be available in the house or easily available at your local supply store.
Diaper Wreath Supplies
Before you begin, have all these supplies at hand:
- Diapers- about 22 or more if you choose to roll them tightly
- Thick cardboard- 14”x14” to make the base of the wreath or a readymade base
- White paper – 3 sheets
- Decorative ribbon (wide)- 1.5” x 5 yards
- Decorative ribbon (narrow)- 3/8” x 10 yards
- Hot glue gun
- Glue sticks
- Rubber bands
- Double sided adhesive tape
- Popsicle sticks (optional)
Instructions
If you are starting out without a readymade base then make a base before you start putting the rest of the items together. The base for this wreath will be a circular ring that is about 13.5” in outer diameter and 8.5” in inner diameter. To mark the circle, use a pencil/pen tied to the end of a piece of string. Measure a length of 13.5”, pin the string down to the centre of the cardboard with your thumb and trace the circle with the pen. Now that you have your wreath, continue with the rest of the instructions:
Cut Holes and Put Ribbon Strands
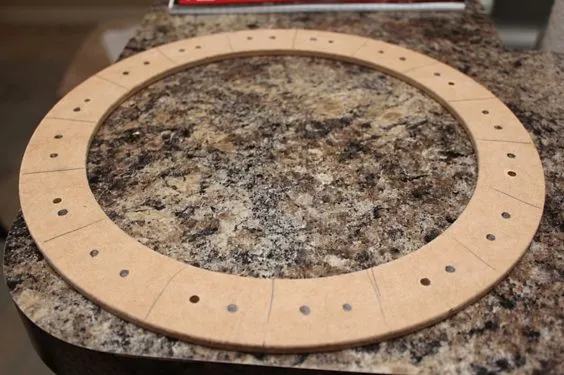
Source: Pinterest
Punch holes into the cardboard base with a pair of craft scissors such that the holes are about 2” apart along the middle of the base. There will be one rolled up diaper between each hole anchored to the base using ribbons. Cut 22 pieces of ribbons, 6 inches long, with 11 pieces from the wide ribbons and 11 pieces from the narrow ribbons. Thread these through the holes to form a loop on the front side and let the loose ends in the back stay untied. You can place the wide and narrow ribbons alternatively or have them uniformly distributed.
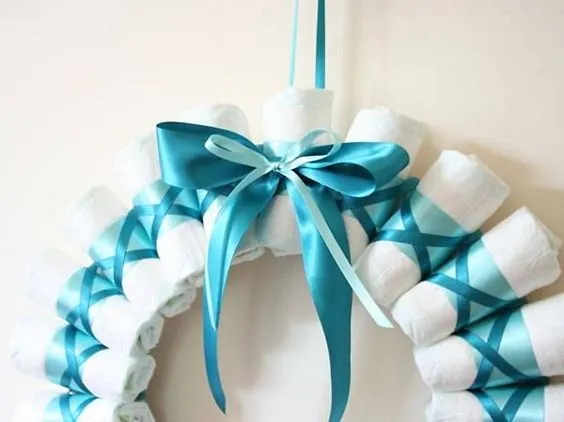
Roll and Tuck the Diapers
Roll each diaper into a bundle and use a small rubber band to keep it in place. You can also choose to keep the diaper rolled up by tying it up tightly with the ribbons, but having a rubber band is a safety feature to keep it from unrolling. If you are making a diaper wreath for a girl, choose a wide pink ribbon initially and cut 22 strips of it to wrap around the diaper. Use hot glue to keep it securely wrapped around the roll and hide the rubber band underneath. Tuck the diaper rolls into the ribbon loops.
Source: Pinterest
You could use hot glue on the roll’s ribbon to stick it to the base once you have tucked the diaper roll into the ribbon loop. It would give a secure adhesion and keep the diaper rolls in place. If you choose to secure the rolls by tying up the loose ends of the ribbons on the back side of the base, then you will have to make a secure knot. It does come with the downside of squeezing the roll in the middle. However, this can also be a butterfly-like look that you might like.
Add Baby Products
Collect a few baby products that can go on the wreath, such as pacifiers, feeding bottles, baby cream tubes or anything else you can think of! Use the wide ribbons to secure these by tying the ribbon along the base segment and a tight knot to keep it in place. You could also use hot glue to keep it from going out of place but be sure to use it minimally, such that it can be peeled off from the product.
Glue a Ribbon to Hang the Wreath
Source: Pinterest
Using one of the wide strips of ribbon, cut a length to make a loop to hang the wreath. This acts as the anchor and needs to support the total weight. Therefore, wrap it around the base ring on both the ends and tie a secure knot. Use hot glue to stick the rest of the ribbon to the base, such that only the tip of the loop is visible from the front end.

Source: Pinterest
A stuffed animal is what completes the wreath. Choose something lightweight and in the size range of the inside diameter of the wreath. If you are making a diaper wreath for a boy, you can pick a monkey or a gorilla or use a teddy bear or doll for a girl. The wreath can go around the neck of the stuffed animal and there’s no need to fasten it in any way.
These are instructions to make a simple diaper wreath with rolled up diapers and ribbons. If you have more creative ideas you can always add extra items to make it better. A wreath with more items will need a stronger base and, hence, a thicker cardboard. You could use a poster board or use two poster boards glued together to make a strong base.
Also Read:
Baby Shower Etiquettes You Must Know
Best Gift Ideas for a Baby Shower
Best Favour Ideas for a Baby Shower
Was This Article Helpful?
Parenting is a huge responsibility, for you as a caregiver, but also for us as a parenting content platform. We understand that and take our responsibility of creating credible content seriously. FirstCry Parenting articles are written and published only after extensive research using factually sound references to deliver quality content that is accurate, validated by experts, and completely reliable. To understand how we go about creating content that is credible, read our editorial policy here.
- Author
Related Articles
-

Accuracy of Pregnancy Ultrasound to Predict the Due Date
-

Is Gardening Safe During Pregnancy?
-

Trichomoniasis in Pregnancy: Signs, Risks, and Treatment Options
-

The Truth About Stretch Marks- 4 Signs You May Get Them While Pregnant
-

Leaking Amniotic Fluid - Signs, Causes, & Treatment
-

23 Foods to Avoid During Pregnancy


")


