15 Awesome Leaf Art and Craft Ideas for Kids
The best part about Autumn is the bunch of leaves that are scattered everywhere on the ground. You go to your garden or a backyard and it is full of leaves. And cleaning your backyard becomes a fun activity. These leaves in different colours look so pretty that you don’t have the heart to throw them away. Kids love playing with leaves and if your kid has a creative side, you both can get busy and make beautiful items like cards, lanterns, and crowns using these leaves. Bring out your child’s creative side and use these leaves for some fun art and craft activities that both you and your child will absolutely enjoy. Check out these leaf arts and crafts for kids.
Easy and Creative Leaf Arts and Crafts for Children
With so many leaves around you, you will have a hard time choosing. But once you decide, try these leaf activities for preschoolers. Let your child appreciate and enjoy the beauty of nature with these fall leaf crafts for kids –
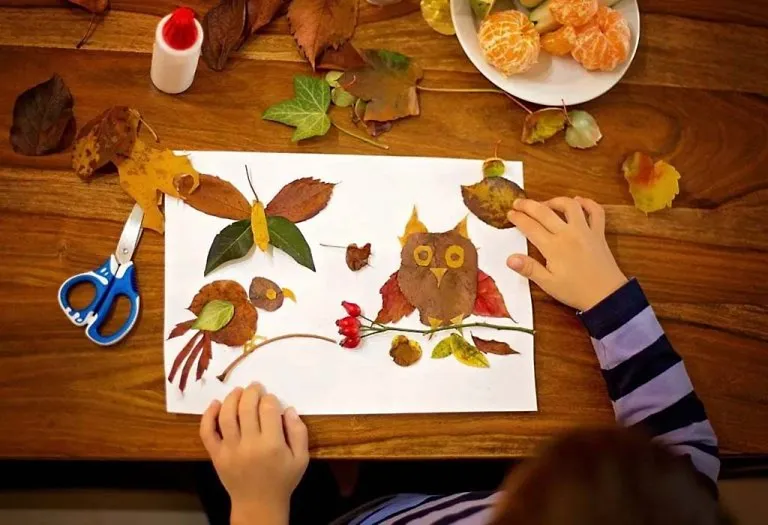
1. Animals With Leaves (Art)
Kids adore animals, so turning leaves into cute animal canvases is a great idea.

What You Need
- A heavy book
- Sketch pens
How to Make
- Collect different kinds of leaves.
- Make sure these leaves of different shapes, sizes, and even colours.
- Place these leaves between the pages of a heavy book and leave it for a week or two.
- After this, draw cute animal figures with the help of sketch pens or a colour marker.
- Stick the leaves on the animal figures and your leaf animals are ready.
2. A Crown of Leaves (Craft)
Your child is royalty, so making a crown of leaves is only justified. Fun and interesting, here’s how you make it –

What You Need
- Leaves of different colours like yellow, green, brown, and orange
- A strip of cardboard paper or a plastic hairband
- Glue
How to Make
- Take the strip of a cardboard paper and measure it to make sure it fits the size of your child’s head.
- Glue the ends together to make a hair band. You can use an old hair band for this as well, although that will look more like a tiara.
- After this, start sticking the leaves along the strip of cardboard or hair band with some glue.
- You can cut the leaves to make fancy shapes as well if you want.
- Leave this to dry for half an hour, and your crown of leaves is ready.
3. A Leaf Lantern (Craft)
A leaf lantern looks beautiful and is loved by kids of all ages. Teach your child to make a leaf lantern:

What You Need
- A glass lantern or a mason jar
- Fall leaves
- Glue
How to Make
- Just stick the fall leaves around the outside of the glass jar with some glue, and leave it to dry.
- Light a small candle inside the jar, turn off the lights and look at the glowing bottle.
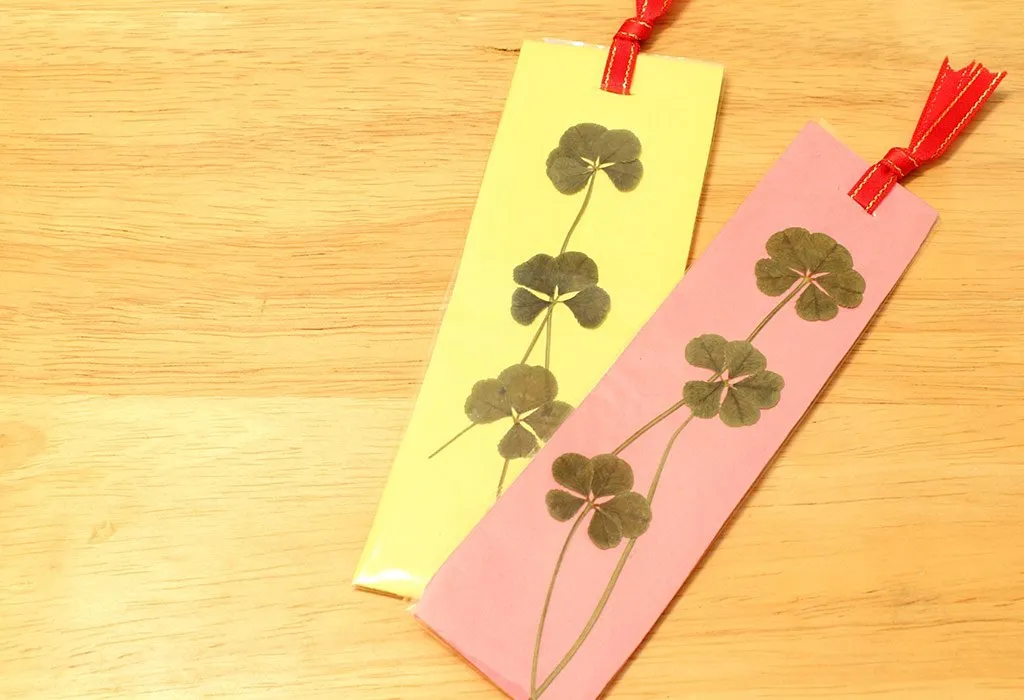
4. A Leaf Bookmark (Craft)
If your child loves to read and enjoys indulging in craft activities every now and then, then he will surely love this activity.
What You Need
- Cardboard or ice cream sticks
- Leaves
- Glue
- Paint
How to Make
- Cut the cardboard into strips that form bookmarks. You can use ice cream stick as well.
- You can cut the leaves into fancy shapes or you can follow a set pattern, as shown in the image. You can opt for simple shapes like circles, squares, and triangles.
- Paste these leaves on the cardboard strip using glue.
- To make it more colourful, bring out the artist in your child and ask him or her to paint the bookmarks.
5. Leaf Greeting Cards (Art)
If a loved one’s birthday is around the corner, you can now make your very own greeting card. Try this leaf greeting card.

What You Need
- Cardboard
- Glue
- Paints or sketch pens
- leaves
- Glitter
How to Make
- Cut the cardboard to the desired size. You can either go for the standard size or go ahead and use the entire cardboard.
- Paint the cardboard with a background colour of your choice. Collect a few leaves, and stick them on to the card.
- You can draw figurines around or on the leaves.
- To make this look fancier, you can sprinkle some glitter on the leaves. Use glue, so you make sure it stays.
- Stick these leaves onto your greeting card.
6. Glittered Leaves (Art)
Kids love playing with glitter. You can ask your child to make glittered leaves; he will simply enjoy it!

What You Need
- Glitter
- Glue
- Paint Brush
- Leaves
How to Make
- For this one, use a brush to paint some glue along the surface of the leaves.
- Sprinkle the leaves with different colours of glitter, from gold and silver to red and blue. Your glitter leaves are all set.
- These leaves are best used to make crowns or tiaras.
7. Ghost Leaves (Art)
This art activity is so much fun. Here’s how you teach your child to make ghost leaves:

What You Need
- Paint
- Leaves
- Sketch pens
How to Make
- Collect different kinds of leaves, preferably big ones.
- In a palette of paints or different bowls, fill some white acrylic paint.
- Dip the leaves in the bowl. Let it dry for some time.
- Once the leaves dry, use a black sketch pen to make eyes and a mouth of the ghost.
- You can make a hole in the leaf and tie it with a thread right above the door to scare your siblings.
8. Fairy Lights With Leaves (Craft)
Nights are about to get beautiful with this craft idea. Perfect for cool autumn nights that make you want to be one with nature –

What You Need
- Fairy Lights
- Fall leaves
- Glue
How to Make
- Decorate your little one’s bedroom with beautiful fairy lights and leaves.
- Stick the leaves on the lights with some glue.
- Make sure you use leaves of different colours; they’ll look great against the lights.
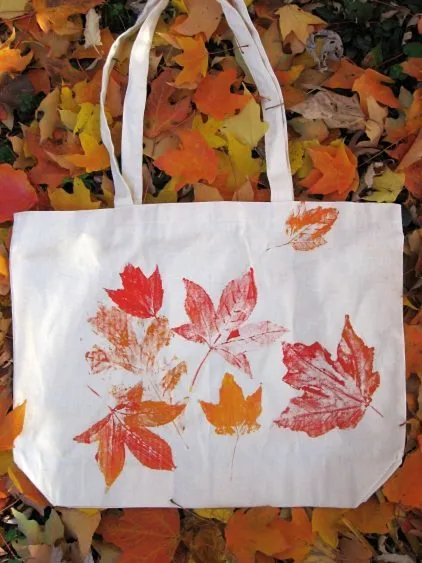
9. Leaf Print Tote Bags (Craft)
Transform plain tote bags into unique masterpieces using the natural beauty of leaves.
Source: Pinterest
What You Need
- Plain cotton tote bags
- Fabric paint
- Paintbrushes
- Fresh leaves
- Paper plates
How to Make
- Lay out the tote bag on a flat surface.
- Pour some fabric paint onto a paper plate.
- Choose a leaf and apply a thin, even layer of paint to one side.
- Press the painted side of the leaf firmly onto the tote bag.
- Carefully lift the leaf to reveal the print.
- Repeat with different leaves and colors to create a pattern or design.
- Let the paint dry completely before using the tote bag.
10. Leaf Garland (Craft)
Create a charming leaf garland to decorate bedrooms or play areas.
What You Need
- Colorful construction paper or cardstock
- Scissors
- String or yarn
- Glue
How to Make
- Cut out leaf shapes from the construction paper or cardstock.
- Glue the leaves onto the string or yarn, spacing them evenly apart.
- Hang the leaf garland in desired location, such as across a window or along a wall.
- You can also add other decorative elements like glitter or sequins for extra flair.
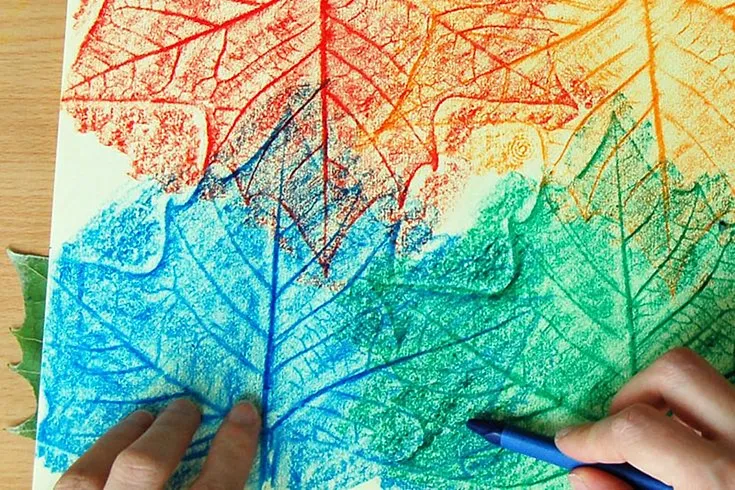
11. Leaf Rubbings (Art)
Explore the intricate textures of leaves with this simple yet fascinating art technique.
Source: Pinterest
What You Need
- Leaves with prominent veins
- Thin paper (such as tracing paper or tissue paper)
- Crayons or colored pencils
How to Make
- Place a leaf underneath the paper, vein side up.
- Gently rub the crayon or colored pencil over the paper, directly above the leaf.
- Watch as the leaf’s intricate texture appears on the paper.
- Experiment with different colors and types of leaves to create unique designs.
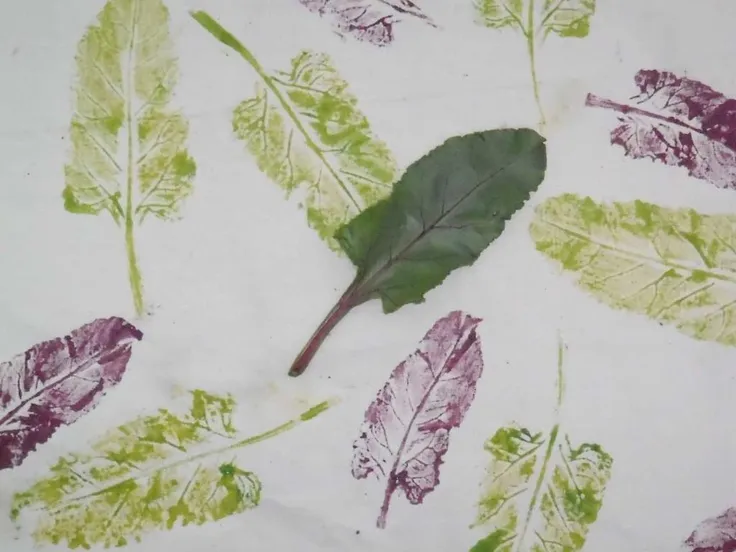
12. Leaf Stamped Stationery (Craft)
Personalize stationery with beautiful leaf stamps for a thoughtful and artistic touch.
Source: Pinterest
What You Need
- Blank cards or paper
- Ink pads or paint
- Fresh leaves
- Paintbrushes (if using paint)
How to Make
- Press the fresh leaves onto the ink pad or dip them into paint.
- Carefully stamp the leaves onto the blank cards or paper.
- Experiment with different colors and arrangements to create unique designs.
- Allow the ink or paint to dry completely before using the stationery.
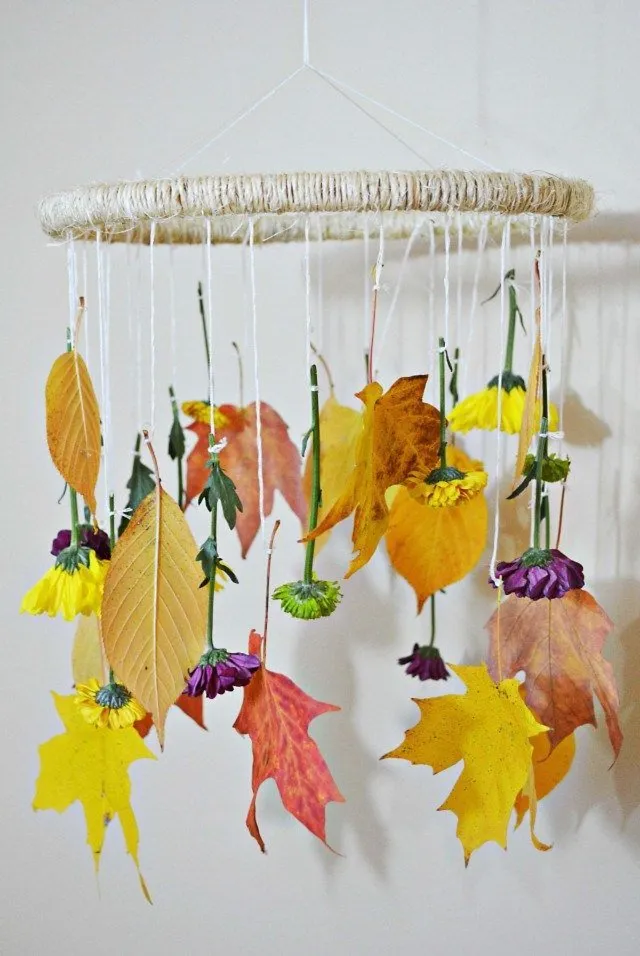
13. Leaf Mobile (Craft)
Craft a delightful leaf mobile to hang in a child’s room, adding a touch of nature-inspired charm to their space.
Source: Pinterest
What You Need
- Assorted leaves
- Thread or fishing line
- Embroidery hoop or sturdy branch
- Scissors
- Clear tape or glue
How to Make
- Select a variety of leaves in different shapes and sizes.
- Attach a length of thread or fishing line to each leaf by tying it securely around the stem or using clear tape.
- Tie the other end of each thread to the embroidery hoop or branch at varying heights.
- Arrange the leaves so they hang at different levels, creating a visually appealing mobile.
- Hang the completed mobile from the ceiling using additional thread or fishing line.
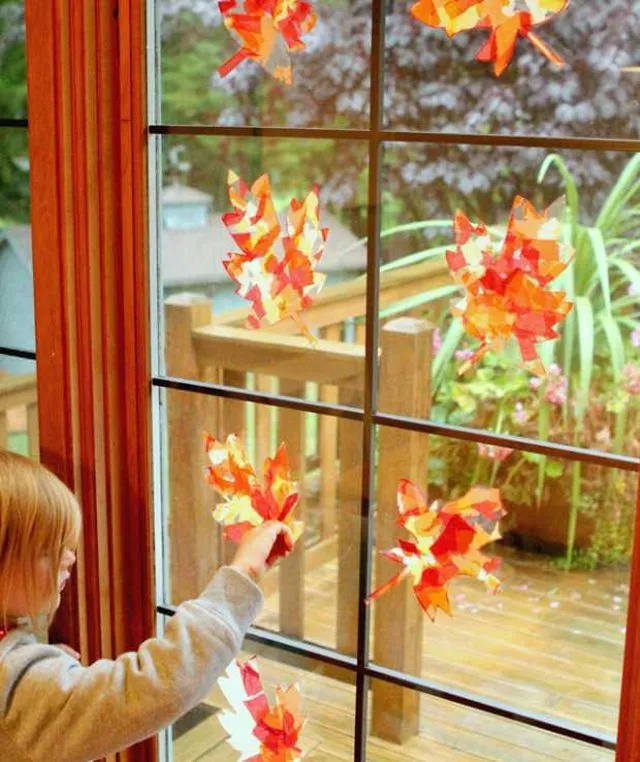
14. Leaf Suncatchers (Craft)
Brighten any room with these beautiful leaf suncatchers, which capture the light and colors of the outdoors.
Source: Pinterest
What You Need
- Assorted colorful leaves
- Wax paper
- Iron
- Crayons or wax blocks
- String or yarn
- Scissors
How to Make
- Arrange colorful leaves in a single layer on a sheet of wax paper.
- Place another sheet of wax paper on top of the leaves to sandwich them between the two sheets.
- Using a warm iron on a low setting, carefully iron over the wax paper until the layers adhere together.
- Allow the wax paper to cool completely before handling.
- Cut out leaf shapes from the wax paper, leaving a small border around each leaf.
- Punch a hole at the top of each leaf.
- Thread string or yarn through the hole and tie it securely to create a loop for hanging.
- Hang the leaf suncatchers in windows where they can catch the sunlight and cast beautiful patterns of color throughout the room.
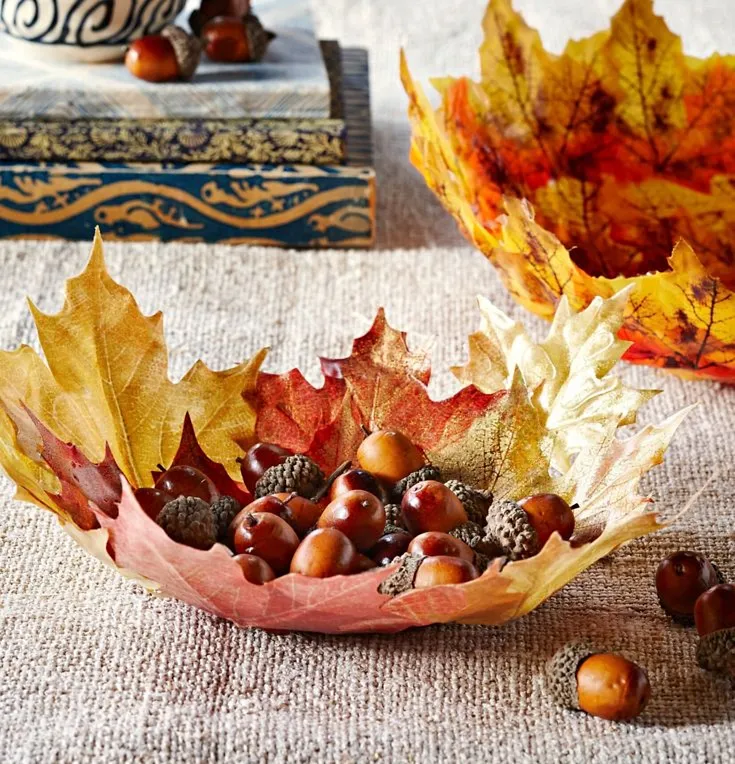
15. Leaf Bowls (Craft)
Create decorative leaf bowls that can be used as unique home decor or to hold small items.
Source: Pinterest
What You Need
- Assorted leaves
- Balloon
- Mod Podge or white glue
- Paintbrush
- Plastic wrap
How to Make
- Inflate a balloon to the desired bowl size.
- Wrap the balloon in plastic wrap to prevent sticking.
- Apply a layer of Mod Podge or glue to the bottom half of the balloon.
- Arrange the leaves on the glued area, overlapping them slightly to cover any gaps.
- Brush another layer of Mod Podge or glue over the leaves to secure them.
- Allow the leaves to dry completely on the balloon.
- Once dry, carefully pop the balloon and remove it, leaving the leaf bowl.
- Trim any uneven edges if necessary.
- Use the leaf bowl to hold small items like keys, jewelry, or decorative accents.
FAQs
1. How can I preserve the leaves so they last longer?
To preserve leaves for crafting, you can press them between heavy books for 1-2 weeks, as mentioned in the first craft idea. Another method is to coat the leaves with a thin layer of Mod Podge or clear acrylic spray to seal and protect them. You can also use a glycerin and water solution to preserve leaves by soaking them in the mixture for a few days. This method helps maintain the leaves’ flexibility and color.
2. Are there any safety concerns when working with leaves?
When working with leaves, especially with young children, it’s important to ensure the leaves are clean and free of any pesticides or harmful chemicals. Always wash the leaves gently with water before using them in crafts. Additionally, be cautious of any leaves that may cause allergic reactions or skin irritation. If you are unsure about the safety of certain leaves, it’s best to stick to leaves from known, non-toxic plants.
3. How can I incorporate educational elements into leaf crafts?
Leaf crafts provide a great opportunity to teach children about nature, plant biology, and the changing seasons. You can incorporate educational elements by discussing the different types of leaves, their shapes, and the trees they come from. Encourage kids to observe the colors and textures of the leaves and talk about why leaves change colors in the fall. You can also use the crafts to teach about the life cycle of plants and the importance of trees in the environment.
These were some lovely children’s leaf art ideas. Introducing your child to art activities is the best thing you can do for him. Art and craft activities are vital for the overall growth and development of the child, so make sure your child indulges in it. Children need to see nature for what it is – a thing of beauty that leaves you in a state of bliss. These DIY leaf arts and crafts for preschoolers and kids are the perfect way to introduce your child to nature, as well as to improve your child’s creativity.
Also Read:
Adorable Acorn Crafts for Kids
Paper Cup Craft Ideas for Children
Creative Construction Paper Crafts for Kids
Best Out of Waste Material Craft Ideas for Children
Was This Article Helpful?
Parenting is a huge responsibility, for you as a caregiver, but also for us as a parenting content platform. We understand that and take our responsibility of creating credible content seriously. FirstCry Parenting articles are written and published only after extensive research using factually sound references to deliver quality content that is accurate, validated by experts, and completely reliable. To understand how we go about creating content that is credible, read our editorial policy here.





.svg)


