Nail Art for Kids: 15 Cute and Easy Designs to Try


We all know that little girls love adorable sparkles, crazy colours, and glitter. They all want to be little ballerinas and princesses, and they are often very obsessed with cartoon characters and cute animals. This vibrant world of imagination provides the perfect inspiration for creative and playful designs. Nail art for kids is a fantastic way to channel this enthusiasm, allowing them to express their unique personalities. These fun themes can easily and safely be incorporated into special, child-friendly nail art, making it a delightful activity for a birthday party or a simple weekend treat.
Easy Nail Art Designs for Kids
Here are some crazy and cool new nail art ideas for little girls.
1. Penguin Nail Art
Penguins are really fun and cute animals. This really creative penguin nails idea is going to make her nails look very pretty.
Steps:
- It is best if you do this on the middle finger and let every other finger have a simple colour.
- First, paint the nail of the middle finger with black polish.
- Then paint a small curve using white coloured polish to represent the body. You could also use a nail art brush for this.
- Paint two eyes by putting white dots with a black dot in the middle to represent the eyeballs.
- Paint a small orange inverted triangle to represent the beak and two orange dots below to represent the feet.
2. Panda Nail Art
Panda nails are really cool and easy to paint using your dotting tools. Check out this easy nail art for kids.
Steps:
- Use white colour to paint a circle at the end of her nails. After letting it dry, you could add a coat of pure opaque.
- Where the eyes should be, paint two black dots and let them dry.
- Above the circle, paint two more black dots to represent the ears.
- Put a dot of pink or black paint under the eyes for the nose.
- Finally, take the white paint and put dots to represent the eyeballs.
3. Rainbow and Cloud Nail Art
This is a sweet looking nail art anybody can try with many colours.
Steps:
- Start by painting her nails with light blue colour nail polish.
- You could also apply a layer of glitter nail polish over the light blue colour.
- Using a nail art brush, paint a curved line from the bottom right corner using red nail polish.
- Just like that, paint all the colours of the rainbow and you could then add some additional glitter on it.
- Draw some clouds by attaching some dots using your dotting tools. You could even add a cloud face on it.
- Finish it off with a good layer of top coat.
4. Butterfly Nail Art
Anybody can easily try this fun butterfly nail art. It is an amazing design for kids and you can easily draw it with your nail art brush and dotting tools.
Steps:
- Start by painting a pink base colour. You could even apply a coat of glitter nail polish on it.
- Draw a yellow line in the middle of your nail to represent the body of the butterfly. Draw a circle on it of the same colour yellow using your dotting tool.
- Draw wings on the left and right side of the body with any colour you like and border it with white nail polish.
- Put two dots of white on the face and two black dots inside that. These are the eyes.
- Finally, draw the antennae using white coloured polish.
5. Hello Kitty Nail Art
Check out this Hello Kitty nail art. This is fun for children who love the hello kitty cartoon.
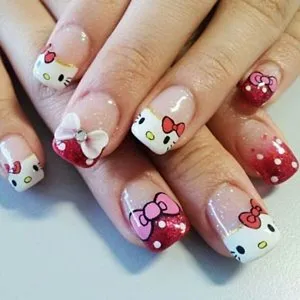
Source: Pinterest
Steps:
- Paint her nails first with one coat of nude or clear polish.
- Paint the tips with white nail polish. On this white layer, put two black dots for the eyes.
- Draw the whiskers, some lines with a striper, and a yellow dot for the nose.
- In addition to this, you could add a nail art deco bow to represent the hello kitty’s bow.
6. Polka Dot Nail Art
Polka dots are pretty cool for a birthday party.
Steps:
- Paint the base with red paint. Using your dotting tools, put white polka dots.
- Finish off with the top coat. You need not use the same colours.
7. Ladybug Nail Art
This adorable design is surprisingly simple to create using just a dotting tool.
Steps:
- Start by painting the nail with a bright red polish as the base colour and let it dry completely.
- Using a dotting tool or a toothpick, add a small black semi-circle at the top of the nail for the ladybug’s head.
- Then, use the dotting tool to create random black dots on the red “body” for the classic ladybug spots.
- For an extra cute touch, add two tiny white dots to the black head for eyes.
8. Mermaid Scale Nail Art
Create a magical, shimmery effect that any little mermaid will love using a makeup sponge.
Steps:
- Paint the nail with a light blue or sea green base colour.
- Once dry, take a small piece of a makeup sponge and dab on a gradient of a contrasting colour (like a shimmery purple or pink) onto the tip of the nail.
- While the second colour is still wet, gently press a small piece of fishnet fabric or a coarse mesh onto the nail to create the scale pattern.
- Carefully peel it away to reveal the design. Seal everything with a glittery top coat for extra sparkle.
9. Flower Garden Nail Art
This design uses the simple dotting tool technique to create a cheerful garden of flowers.
Steps:
- Paint the nail with a light blue (for the sky) or a grassy green base colour.
- Using your dotting tool, create five small dots in a circle using a bright colour like pink or yellow. This forms one flower.
- Use a different colour in the centre of the flower circle to make the pistil.
- With a thin brush or a green nail polish pen, draw simple stems and leaves coming down from your flowers.
10. Ice Cream Cone Nail Art
This sweet design is perfect for summer and uses simple shapes.
Steps:
- Paint the bottom half of the nail with a light brown polish to create the cone.
- At the top of the nail, use a dotting tool to place a large, semi-circle dot of pink polish for the scoop of ice cream.
- You can add a second, smaller scoop on top in a different colour like white or chocolate brown.
- Add a small red dot for a cherry on top and finish with tiny multi-coloured sprinkles using the tip of your brush.
11. Unicorn Nail Art
Unicorns are a forever favourite! This design focuses on the magical horn.
Steps:
- Paint the nail with a pastel base colour like light purple or baby blue.
- Using a thin nail art brush or a striper, draw a slightly curved line starting from the base to the tip of the nail. This is the unicorn horn.
- Paint alternating sections of the line with different pastel colours (e.g., pink, blue, yellow).
- Add a few tiny gold or silver glitter dots around the horn for a magical sparkle effect.
12. Dinosaur Nail Art
A roaringly good design for dino fans, made easy with stickers.
Steps:
- Paint the nail with a base colour like jungle green or earthy brown.
- Instead of freehanding a complex dinosaur, use small, pre-made dinosaur nail decals or stickers.
- After the base coat is completely dry, simply peel the decal and place it onto the nail.
- Press down gently to secure it and then seal the entire design with a clear top coat to make it last.
13. Starry Night Nail Art
A dreamy and sparkly design that is very easy to achieve.
Steps:
- Paint the nail with a dark blue or black polish as the night sky.
- While the polish is still wet, use a glitter polish or loose glitter to dab on clusters of sparkles to represent star clusters.
- Once the base is dry, use a small dotting tool or a toothpick to paint a few small yellow dots as individual stars.
- For a special touch, add one larger star or a small silver crescent moon.
14. Watermelon Slice Nail Art
This fruity design is cute, colourful, and very simple.
Steps:
- Paint most of the nail with a bright pink or red polish.
- At the tip of the nail, leave a thin curved section unpainted (or paint it white) to represent the rind.
- Just above the white rind, paint a thin line of green.
- Finally, use the tip of a dotting tool or a toothpick to add small black dots randomly on the pink section for the watermelon seeds.
15. Stars & Constellations Nail Art
This design creates a magical night sky on their fingertips, perfect for little stargazers.
Steps:
- Start by painting the nail with a deep black or dark navy blue polish. Let it dry completely.
- Using a very fine nail art brush or a toothpick, dip it into white or silver polish and create tiny dots of different sizes scattered across the nail to represent stars. (A dotting tool can also work for the larger stars.)
- To make a constellation, choose a simple shape like a dipper or a basic triangle. Connect a few of your larger “stars” with very faint, thin white lines.
- For an extra magical touch, add one or two tiny silver glitter specks to make certain stars twinkle. Finish with a clear top coat to make the dark sky really shine.
Nail Art Tips and Hacks for Kids
- If you happen to have no time for nail art, you could just use little reward stickers or permanent markers. These will work and they are totally safe.
- You could use nail polish strips. These will stay on for two weeks on the nails. Or check out nail art pens. These are water-based, so you can wipe them off and redo the designs in case you happen to mess up.
- The nails of little girls are very small. Those intricate designs on super-long nails will not work on such hands. Therefore, remember to keep it simple.
- If you do not have the fun colours you are looking for, then make use of some old eyeshadow and make your own colours.
- You could use a toothpick to create amazing nail art shapes.
FAQs
1. How can I make the polish last longer on my child’s nails?
Kids are tough on their nails! For better staying power, ensure their nails are clean and dry before you start. Gently wipe each nail with a little rubbing alcohol on a cotton pad to remove any oils. This helps the polish stick much better. Also, always finish with a clear top coat to seal the design.
2. What’s a quick and easy alternative to nail polish?
If you want to avoid polish altogether, try non-toxic markers! Kids can draw directly on their nails for instant, colourful nail art. The best part? It washes off easily with soap and water, making cleanup a breeze.
3. Is it okay to do nail art on toenails, too?
Absolutely! Toenails are a great canvas, especially for beginners. Kids often fiddle less with their toes, so the design might actually last longer. Just be extra careful to avoid getting polish on the skin around the nail, as this can be a bit trickier. It’s a fun way to have matching fingers and toes.
These were some cute nail designs for kids with short nails. These nail art designs for kids are not at all complicated and do not need many nail art accessories. All you need are some simple colours to create something very beautiful. There are many other designs like toenail art for kids and glitter nail art which little girls can try. You could also try Christmas nail art and other seasonal nail art designs.
Also Read:
Easy Cd Craft Ideas for Kids
Creative Painting Ideas for Children
Amazing Newspaper Crafts Ideas for Kids
Easy and Scary Halloween Makeup Ideas for Kids
Was This Article Helpful?
Parenting is a huge responsibility, for you as a caregiver, but also for us as a parenting content platform. We understand that and take our responsibility of creating credible content seriously. FirstCry Parenting articles are written and published only after extensive research using factually sound references to deliver quality content that is accurate, validated by experts, and completely reliable. To understand how we go about creating content that is credible, read our editorial policy here.
- Author


.svg)


